The inventory adjustment record changes the quantity and value of an item without entering a purchase order. Inventory adjustments are used to account for clerical errors, changes in cost, thefts, or miscounts. You can create and update inventory adjustment records using the CSV Import Assistant. When importing, you can use multiple files or a single file to perform the import.
For a comprehensive overview of importing Inventory Adjustments see the Oracle NetSuite help article ‘Inventory Adjustment Import’.
This article will walk through how to create an Inventory Adjustment via CSV import using one import file, which can be a simpler and quicker way to prep the inventory adjustment file imports.
How to Import Inventory Adjustment with Bins
Prepare the import CSV file with the following columns at a minimum. Note each row in your file will correspond to a specific Bin and Quantity (in the inventory detail).
- External ID (if you’re importing more than one transaction)
- Adjustment Account
- Transaction Date
- Memo (Header)
- Subsidiary (if using OneWorld)
- Item (or Item Internal ID)
- Adjustment Location (Line)
- Adjust Quantity By (Line)
- Unit Cost (Line)
- Bin Number (or Bin Internal ID)
- Inventory Detail Quantity
-
-
- Note the sum of the inventory detail quantity across all bins for this item at this location needs to equal the value in ‘Adjust Quantity By (Line)’ for this item.
- If the ‘Adjust Quantity By’ field is positive, all Inventory Detail Quantity field values must be positive and vice versa. There cannot be a mix of positive and negative values in the ‘Inventory Detail Quantity’ even if the sum does match the value in the ‘Adjust Quantity By’ column.
- Surrogate Subrecord ID
- This references the external ID of the Inventory Detail sub-record. Essentially, this is a ‘counter’ for the data import tool to know what item in the file the inventory detail quantity and bin are associated with. This should be in sequential order starting at 1.
-
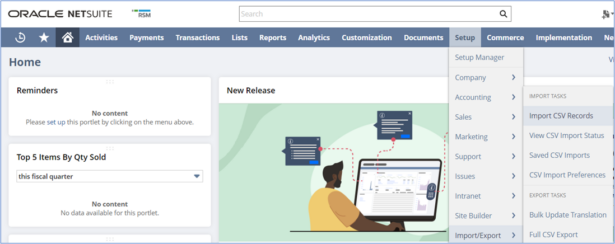
Next in NetSuite navigate to Setup > Import/Export > Import CSV Records

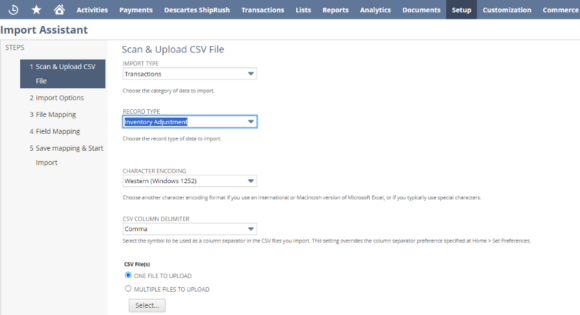
Set the Import Type as ‘Transactions’ and Record Type as ‘Inventory Adjustment.’ Character Encoding and CSV Column Delimiter can be left as the default values. Click the ‘Select’ button to open the browse window, select the CSV import file, then click OK. Then click the ‘Next’ button on the screen’s lower right-hand corner.

On the Field Mapping page map the columns from the CSV file to their corresponding fields in NetSuite.

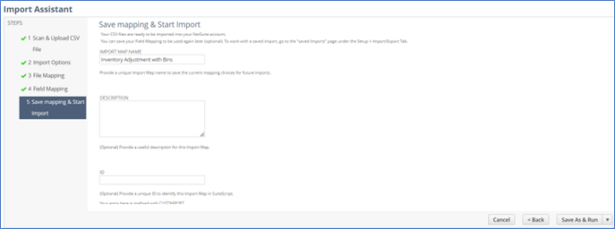
On the Save Mapping & Start Import page, enter a name for the data mapping in the ‘Import Map Name’ field. Then click on the Save & Run button in the lower right-hand corner. Now, next time you want to run the same import, you can view the saved import mapping instead of recreating the mapping (Setup > Import/Export > Saved CSV Mappings).

In closing, mastering the single-file import process for inventory adjustments with multiple bins in NetSuite streamlines your inventory management and significantly enhances operational efficiency and accuracy. This guide has walked you through a simplified yet powerful approach to maintaining accurate inventory levels, ensuring businesses can focus more on strategic growth rather than complex data entry tasks. By embracing this method, companies can swiftly adapt to changes, correct discrepancies, and optimize their supply chain operations. For those looking to leverage NetSuite’s inventory capabilities fully, our team is ready to support your journey towards more agile and effective inventory management practices. Contact our team if you have any questions!

 RSMUS.com


