So quite some time ago, you decided to starting using SharePoint for content management and collaboration. That was about a year, what seems like a long year, ago. Today, as your organization has started to adopt and consider SharePoint as a reliable platform for your content, someone mentions handling more formal documentation in SharePoint as well.. Typically known as the R:/ drive. (“R” is for records.)
You, as the SharePoint Guru of your company, know that this is a very different type of effort – one that involves defining/redefining policies, governance, introducing more complex solutions to your environment, and yet another change to manage in your organization’s culture. In order to be successful, some well-thought out planning and understanding of records management in SharePoint 2013 and SharePoint Online is needed for this initiative to succeed.
1) Define your records policies
Like any implementation, you have to have requirements. For records management solutions, these will be driven from the records policies as those should also define the record life cycle. Below are the questions this document should answer:
- What is the record? Name and description.
- Is there an ‘informal’ name for the document? Policies don’t mean much unless people know what they say.
- What does the retention look like? What is the ‘trigger’? What is the term?
- Who OWNS the document and who ACCESSES the document?
This shouldn’t be a complicated document. Less is more. Typically, I have a document with a document purpose and a table that contains the above information.

Records Management in SharePoint: Planning your Records Strategy
2) Define content types
Ok, so now you have your records policies defined. Now, we have to translate this into the SharePoint vernacular — Content types.
As I have mentioned in a previous post, content types drive many functions and capabilities in SharePoint including workflow, behaviors, data integrity, and records management features. Based upon the content types and date fields associated to the content type, we are able to define outcomes when a condition is met.
Like any other content type, the fields must be identified and added to the content type, reusing any site columns where possible. In addition to these fields, a date/time trigger must be added to be used by the retention rule defined in the next step.
As a side note, I think that Content Hub Publishing is a very important part of this effort as it will allow content to be managed the same way regardless of where it lives in your SharePoint environment.
3) Use the records management features
Information Policy Settings

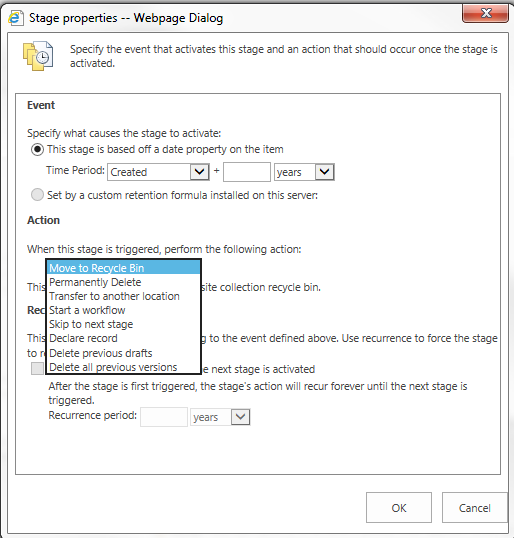
Records Management in SharePoint: Configuring RM Rules
Information Policy Settings will drive your records management processes. What is so great about this feature is that when these are configured in the content hub, they are global settings. In other words, whether you have 1 site collection or 10,000, a contract will be managed the same way. Based upon a date rule, 7 activities can be initiated depending on what your business process calls for:
- Permanently delete
- Move to recycle bin
- Transfer to another location
- Start a workflow
- Begin a new stage
- Declare a record
- Delete all previous version
- Delete all previous drafts
Records Center
A records center is a central location for records to be stored and accessed. Much like a file room, access to this site collection is typically secure and only a very few people have access to change anything (i.e. records administrator). The purpose of this site collection is really to store a lot of files, so record centers are usually comprised of a landing page, document libraries, and possibly a search center scoped to that site collection. They are also provisioned with a drop off library to help with records routing.
Drop off library and send to location
The drop off library is used to organize and file somewhat ‘stagnant’ content systematically by classification and business rules, usually enforced with content organizer rules. This ensures the same business processes are used for all processed records and the end up where they are supposed to end up.
When we enable the content organizer feature, the content organizer rules list and the drop off library are provisioned. When this occurs, the ability to create a send to location in central administration or SharePoint online administration. This breaks down the wall between site collections and allows documents to be sent to a receiving Drop Off Library.
Records declaration
SharePoint also provides the ability to ‘lock’ a file for a legal/business reason so that content in the document or metadata around the document cannot change. This becomes important with records of high sensitivity, financial impact, and records with severe compliance implications. When in-place records declaration is configured, authorized users or processes have the ability to lock a document so that it can be read, but not altered so that all history is preserved.
Conclusion
There are many features to facilitate records management in SharePoint 2013, but with the available features there is planning that must occur to make sure that it is done correctly. When properly planned and executed, records management in SharePoint can take burden off of administrative and IT stave, standardize processes, and mitigate risk of non-compliance.
To find out more about this or other ways that RSM can assist you with your SharePoint needs, contact McGladrey’s technology consulting professionals at 800.274.3978 or email us.

 RSMUS.com