
 RSMUS.com
With the introduction of Global Connections, in Scribe Insight Version 7.9, it became a little bit tricky to change connection properties on your target from say a Dev to Test environment or Test to Production. When you modified the connection, it would modify the settings for not only other DTS files in the same folder, but in other folders or collaborations as well. This is changed in 7.9 because the connection is “Global”, the settings are stored in the database and any other DTS using that same connection name will now be pointing to the new target regardless of their location. Prior to version 7.9, the settings were stored in the DTS file and Scribe would ask you if you wanted to change the connection settings for the other files in the same folder. In version 7.9 this was no longer an option. The only workaround I was able to find for this was to create a new connection, add the same steps as the existing connection, copy all of the mappings from the original connection steps to the new connection steps and then delete the original connection steps. Not a very streamlined process.
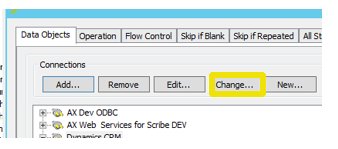
Now we have Scribe version 7.9.1 and they have made things a little bit easier, but still a little confusing. If you go into the configure steps on your target connection and go to the Data Objects tab, you will now see a new button labeled “Change”.
Clicking this button brings you to the following window.
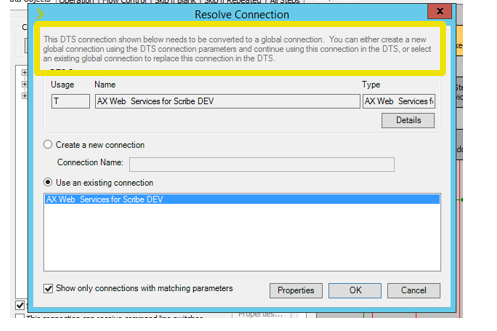
I was a little confused by this prompt, especially since I created this connection in Scribe 7.9 and I thought it should already be a global connection. I also didn’t think I needed a new connection because I was trying to repoint my DTS to a test environment for which I had already created a new connection. So I went ahead and selected existing connection, thinking I was converting this connection to now be the required “Global” connection, despite the fact that I believed it already was a global connection. I selected the option to use existing connection and clicked OK. Great, now that that was done, I was thinking I could click change again, and then actually change this connection to be pointing to my Test environment.
So once again I clicked change, and I was greeted by the same exact pop-up window telling me my connection needed to be converted to a global connection. Now I was really confused because I thought that it should have already been converted by my previous steps, so why was it telling me this again?
So I started experimenting with the other options. This time I chose, “Create a new Connection”. I appended TEST to the name and clicked Ok.
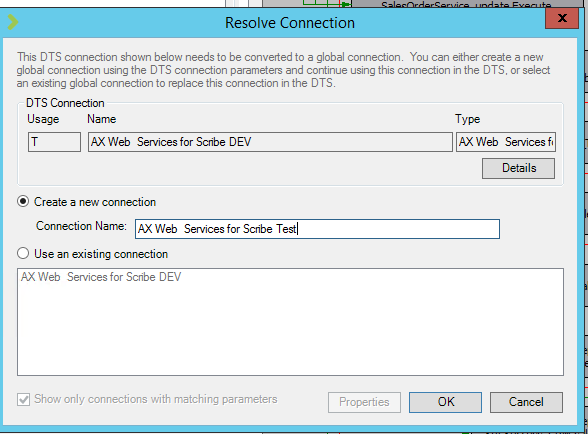
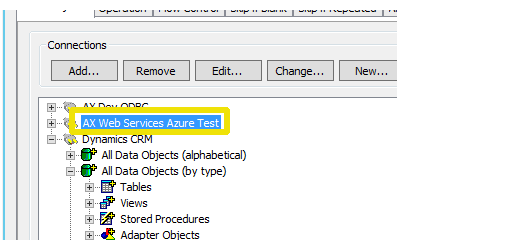
Shortly thereafter, the connection name in my Data Objects tab changed to the new connection name. I clicked on the new connection and clicked properties; I noticed the connection was still pointing to my Dev environment, so not much had changed, except the name.
It appeared as if the “Create new Connection” option, basically created an exact duplicate of my existing connection and gave it a new name.
From here I can edit the connection properties and point it to my Test environment, and I don’t lose any of my mappings.

But now I have 2 connections pointing to test, and I really don’t want or need multiple connections pointing to the same target.
The only steps I needed to take to change one connection to another existing connection are as follows: I select my target connection and click Change.

Again it shows at the top that it needs to be converted to a global connection. I ignore this message at this point, as it doesn’t really seem to do anything.
I select “Use an Existing Connection”, and I uncheck the “Show Only Connections with Matching Parameters” checkbox. At this point I am shown a list of all of my existing connections, including the connection I had already set up to point to my Test environment. I select that connection and click Ok.
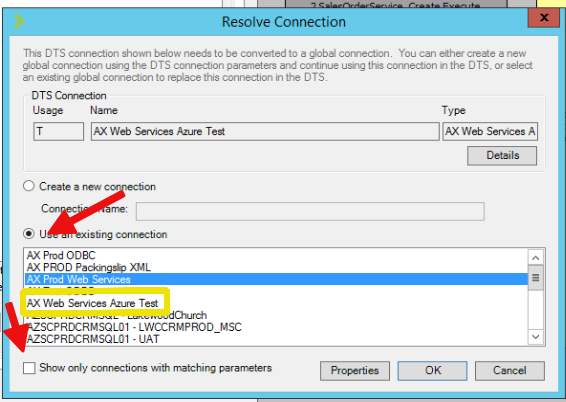
About 15 seconds later, the connection name in my Data Objects tab now reflects the connection name I had created that points to my test environment.
This whole process was a little bit confusing to me, and the help file didn’t seem to clarify the process at all. Eventually I was able to get where I wanted to be and I’m happy that Scribe version 7.9.1 has made changes to allow you to once again, fairly easily change your target from one environment to another without having to re-map everything.
One final thing to make note of: if the change button is grayed out on the connections page, it may be because your source and destinations are using the same connection. You will have to make them different by changing your source to something else, then change your target, then point back to your original source.
For more information and help with this and related issues, subscribe to our Dynamics Community News publication or contact our experts at RSM 855-437-7201
by LaTonia Watne for RSM
RSM Staff
RSM empowers middle market companies worldwide to take charge of change. Our unique middle market perspective makes RSM the natural choice for growth-oriented, internationally active organizations seeking relevant insights and tailored, innovative solutions for a complex and changing world. With a global reach spanning more than 120 countries, we instill confidence in a world of change by bringing the full power of RSM to make a lasting impact on our clients, colleagues and communities.