One of the benefits of hosting Microsoft Dynamics 365 for Operations virtual machines through Microsoft Azure is the pay-as-you-go payment format. This means you’re only required to pay for what you use. As you can imagine, though, this can end up being fairly costly if you leave your virtual machine on outside of work hours. It’s much more cost effective to turn off your virtual machines at the end of each work day.
Manually turning virtual machines on and off in Azure is an obvious solution to this issue, but I’d like to recommend an easier solution. Instead of manually turning virtual machines on and off, with the Automation Accounts feature in Azure, you can set up a virtual machine to automatically turn on and off based on a schedule. The automation tool even allows you to automate an entire set of machines all at once.
In the training world, we often deal with dozens of virtual machines at a given time, so the ability to automate the process of turning these machines on and off has saved us time and money. Even if you’re not dealing with a large number of virtual machines in Azure, you can certainly still find value in this tool.
Let’s walk through the process of automating the schedule for a set of virtual machines.
- Go to portal.azure.com and log in to your account.
- On the Resources pane on the left side of the Azure portal homepage, select the Automation Accounts Note: If you can’t see the Automation Accounts resource, click More services and you should find it there.
- From the Automation Accounts page, you can choose to add a new automation account or select an existing automation account.

Important! If you choose to create a new automation account, it’s important to note that in order to create an Azure Run As account, the automation account creation process must be completed by the subscription administrator.
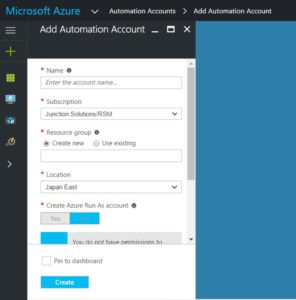
- Once you have an automation account to use, click the name to select it.
- Once you have your automation account open, click the Runbooks tile, as seen in the screenshot below.
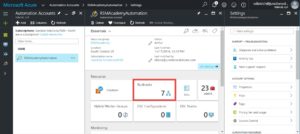
- From the Runbooks blade, you can now choose an existing runbook or add a new runbook.
- In this example for our automation account, we chose to create separate runbooks for turning virtual machines off and on. Note: For more information on creating runbooks, I recommend this documentation from Microsoft on creating and importing runbooks.
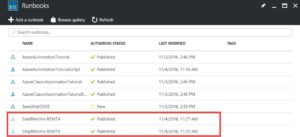
- Once you have a runbook to work with, you can now select your runbook to continue the process. (We will walk through the process using the runbook for starting our virtual machines but you can go through the same process for stopping virtual machines as well.)
- On the blade for your runbook, click the Schedules
 On the Schedules blade, set up your automation schedule by clicking Add a schedule.

- You can now link a schedule to our runbook by selecting Link a schedule to your runbook.
 Set up the schedule for starting our machines by clicking Create a new schedule.
- In this example, we have a set of virtual machines we are using for a one-week period, and we’d like them to turn on at 7:00 AM MDT every day. To make this happen, we filled out the fields as shown in the screenshot below.
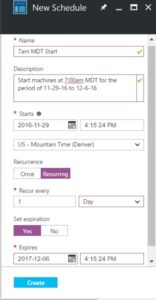
- Once the schedule has been set, you can then click the Create button to finish the process. Your machines will now turn on during that time frame at 7:00 AM MDT each day.
- Now click Configure parameters and run settings to complete the final steps.
 In the Resourcegroupname field, enter in the start of the name of the virtual machines you want to set automated scheduling for. In order for this feature to work, make sure the set of virtual machines all start with the same first few characters.
- In this example, for the schedule we’re setting up, I have named each virtual machine “TR” followed by a number to differentiate between each machine. So my virtual machines are named TR1, TR2, TR3, etc.
- In the Startswith field, select True. In this example, this allows any virtual machines in my project starting with the characters “TR” to run on this schedule.
- Once these fields have been filled out, click OK on the Parameters
- Click OK on the Schedule Runbooks
- We can now see our schedule assigned to our runbook.
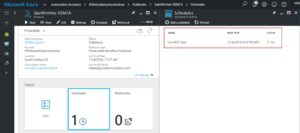
At this point, all the virtual machines starting with a name of “TR” will now start on the schedule we’ve set.
To schedule your virtual machines to stop, all you need to do is run through the exact same process using the runbook assigned to stopping the virtual machine.
For more information about how to get the most out of your Dynamics 365, contact our experts at RSM, 855-437-7210 and visit our Microsoft Dynamics Community News page.
by Sonia Burnette for RSM

 RSMUS.com
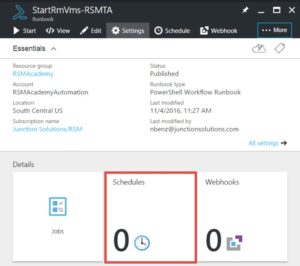 On the Schedules blade, set up your automation schedule by clicking Add a schedule.
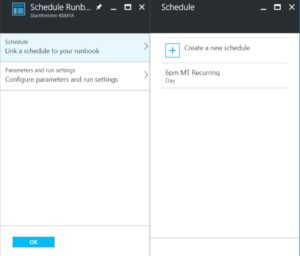 Set up the schedule for starting our machines by clicking Create a new schedule.
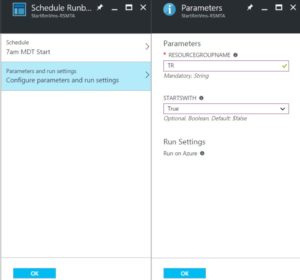 In the Resourcegroupname field, enter in the start of the name of the virtual machines you want to set automated scheduling for. In order for this feature to work, make sure the set of virtual machines all start with the same first few characters.