
 RSMUS.com
This article outlines some tips and tricks to use when setting up email notifications to Customers, Vendors, and employees when using the Electronic Bank Payments (ID 287418) bundle in NetSuite. The Electronic Bank Payments Bundle not only enables you to process bank payments for bill payment transactions, issue customer refunds, and reimburse employee expenses – but can also be used as a means to distribute email notifications to customers, vendors, or employees once the payments have been created. Beyond the standard, or “out of the box” payment notification template, we can also use NetSuite’s Advanced PDF/HTML Template builder to customize the email to include custom fields in the notification in a PDF attachment, or in the body of the email itself.
Creating a custom PDF attachment
To create a custom PDF attachment for these notifications, navigate to Customization > Forms > Advanced PDF/HTML Templates, and select to Customize the appropriate transaction’s advanced PDF:
- For Customer Payments (Direct Debit) customize the “Standard Customer Payment PDF/HTML Template”
- For Vendor Payments or Employee Payments (EFT) customize the “Standard Payment Voucher PDF/HTML Template”

Once in the Advanced PDF builder, customize the PDF by adding or removing columns, rows, or images to your liking using the WYSIWYG (“What you see is what you get”) builder, or switch to source code to edit the PDF using .xml code. Once all desired changes have been made, select the “Template Options” button to rename as needed, then Save and close.
Next, we will need to apply this custom PDF layout to the appropriate custom form for the transactions we are generating. Navigate to Customization > Forms > Transaction Forms, and select the appropriate Transaction form to apply the PDF changes:
- For Customer Payments (Direct Debit) Edit the standard “Payment” form, or a preferred custom form of this type.
- For Vendor Payments or Employee Payments (EFT) Edit the standard “Bill Payment” form, or a preferred custom form of this type.
When editing the transaction form, ensure that the “Advanced” option is selected on the printing type, then select the custom PDF created under both the “PRINT TEMPLATE” and the “EMAIL TEMPLATE”. This will ensure the custom PDF is the default for both printing and emailing moving forward.
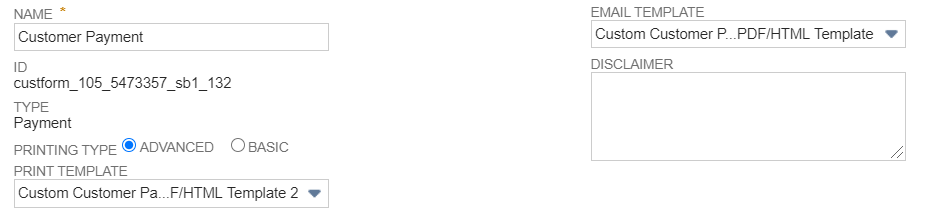
**Note: if referencing a sublist field in the Advanced PDF – you will also need to customize the sublist on the transaction form to include this column. The PDF will only populate fields that are exposed to the record when it is printed. Furthermore, custom fields will not be available on the Advanced PDF unless operating in the administrator role – for a workaround solution to this, see this SuiteAnswers Article for more information.**
Creating a custom email template
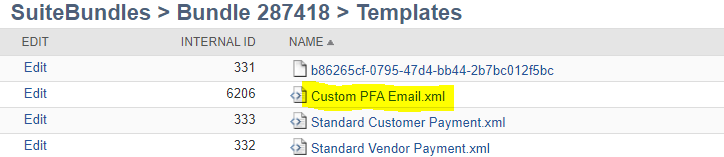
If you’d like to create a custom in-line email template for these notifications, navigate to Documents > Files > File Cabinet, Select the Bundles folder, then the Bundle ID, then the “Templates” folder. Select to edit the standard transaction template to use as a baseline if desired, or drop a custom .xml message file in this folder:
Once the PDF/.xml doc has been assigned, Email notifications are ready to be sent!
Navigate to Payments > Payment Processing > Payment File Administration, and View the payment file you wish to send notifications for. When viewing the record, click the “Email Payment Notification” button, and it will take you to a batch processing screen to send the emails.
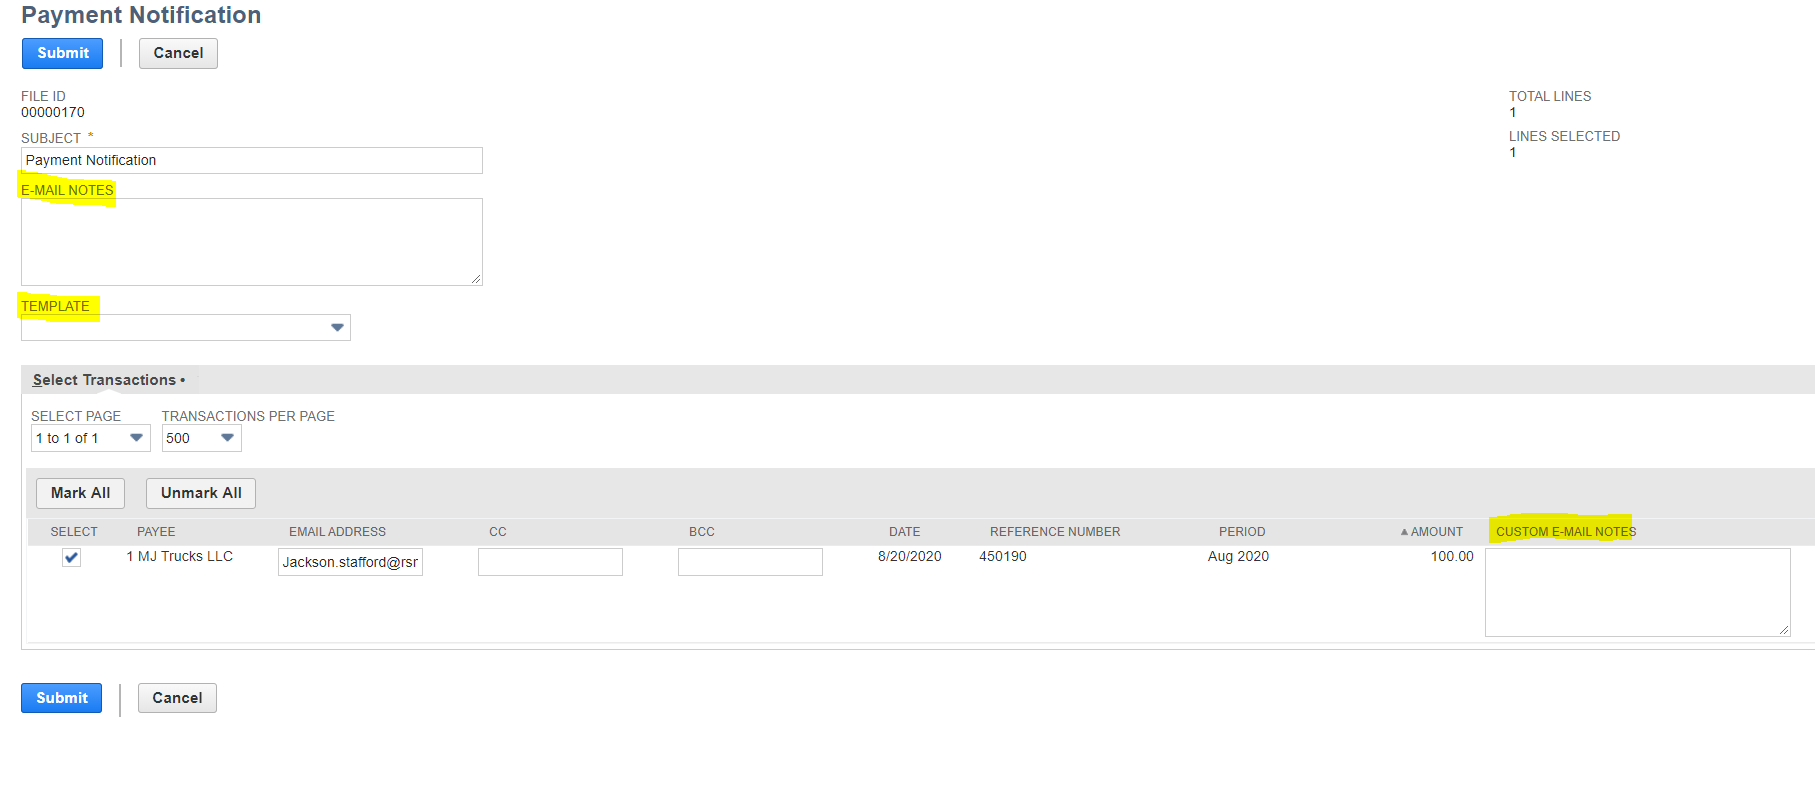
At this time, we have the option to send out either the Advanced PDF as an attachment to the email or send the .xml customization within the body of the email itself.
How to send your customizations
To send the Advanced PDF, leave the “Template” dropdown blank, as the preferred template we set on the record will automatically pull in this PDF. One benefit of using the PDF attachment is that we can choose to also send a custom email note to the entire batch, or to specific recipients in the batch, using the “Email Notes” and “Custom Email Notes” fields at the header and line levels. If using custom email notes and email notes together, the custom email notes will override the email notes for that recipient only. Once email notes are entered and transactions are marked to be sent, Submit the page and email notifications will be sent out! The notifications will go into a queue similar to when creating the payment file itself, so you can watch as this process progresses.
To send the custom .xml template inline of the email, select the appropriate custom template in the “Template” dropdown. This will pull in all template files in the Bundle’s file cabinet location as options. One drawback of using the .xml template is that custom Email Notes at the header and line will become unavailable – if you try to enter notes at this time it will clear out the template field and defaults back to the advanced PDF. Once the template is selected and transactions are marked to be sent, Submit the page and email notifications will be sent out! The notifications will go into a queue similar to when creating the payment file itself, so you can watch as this process progresses.
For more information about the general electronic bank payments setup, please refer to Beth Johnson’s article with an overview of the bundle here.
For more information about customizing Advanced PDF’s, please refer to Chris Corral’s article on FreeMarker Logic and Advanced PDF/HTML Templates with NetSuite here.