Configuring Balance Sheet Templates in Microsoft Dynamics AX 2012
Management Reporter 2012® incorporates many new features such as interactive report view, dimension set collections, and greater integrations with Microsoft Dynamics AX 2012. With many existing legacy FRx and previous versions of Management Reporter no longer available, it is an excellent time to upgrade to what the product is today. In addition, Management Reporter completely replaces legacy financial reports in Release 3. To aid with the transition, Microsoft published both a comprehensive help file and twelve example reports. The reports come with a disclaimer that they are for illustration only and are fictitious, however, they have merit as an excellent starting point. This article illustrates how to take an example template Balance Sheet report and easily adapt it to fit your enterprise.
The Scenario / Project Example
The Contoso database uses Fabrikam as an example of an audio product manufacturing company that uses Management Reporter 2012 for all of their financial accounting reporting. This exercise configures the template Balance Sheet report which is provided with Management Reporter 2012. If this is not supplied, it can be downloaded from MSDN or TechNet.
Following are the operations that must be completed to adapt the template Balance sheet report to work with Management Reporter 2012 with your general ledger accounts.
Extracting the Chart of Accounts from AX 2012
The first step is retrieving a current chart of accounts. One of the fastest methods to get the chart of accounts extracted from AX 2012 is using the export to Excel feature. Other processes can be utilized, such as an auto-report from the main account list page or an SSRS report, however, the goal is to quickly extract the information for possible sorting and annotation at a later time.
Use the following steps to retrieve a usable printout for review the chart of accounts:
- Open Microsoft Dynamics AX 2012.
- Open the company that you are adapting the report to, if not the default for your user profile.
- Open General Ledger > Common > Main Accounts.
- In the List group of the Action Pane, click Export to Excel.
- In Excel, review the data making note of main account type and main account category.
- Select File and Print.
- Save the file for future reference and annotation. Be sure to rename it to something more meaningful than DYNFAC3.tmp or the default generated name.
Reviewing the Balance Sheet Example Template
The Balance Sheet example template that is supplied with Management Reporter follows the standard main accounts format for the Microsoft Dynamics Base AX R2 image that is utilized for training. This structure can be reviewed and adapted for your enterprise. Following are the detailed areas that you can make note of for adaption to your model.
- Open Management Reporter 2012 Report Designer.
- Open Company > Companies to ensure that you are on GLMF. If not, click Set as Default.
- Click on Row Definitions on the Navigation Pane.
- Open the Row Definition, titled Balance Sheet.
- Take note of the Current Assets first. Notice that in the example, it uses +Main Account = [110110] to Link to Financial Dimensions such as the Bank Account – USD.
- On your Excel Main Account printout or online, review the Cash and Cash Equivalents. Using either different colored markers or electronic highlighters to identify the accounts and account categories to use in your template.
- An alternative method is to sort the Excel spreadsheet by main account type or main account category if they follow accounting naming conventions.
- Follow this same process for Securities, Accounts Receivable, Other Current Assets, Physical Inventory, Project WIP, Assets, and other categories that are relevant to the line of business that you are in.
- With each review, ensure that accounts are identified to fit in to at least one category.

- Click Column Definitions on the Navigation Pane.
- Open the Column Definition, titled YTD.
- Ensure that the column width for the DESC column is set to AutoFit . The purpose is to verify that all account names are properly displayed.
- Click Report Definitions on the Navigation Pane.
- Open the Report Definition, titled Balance Sheet.
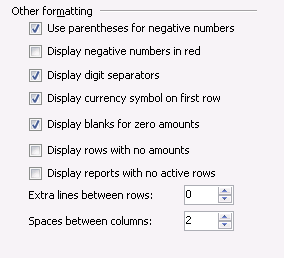
- Notice the Settings Tab, specifically the Other Formatting options. They are standard for the Balance sheet and will be used again.
Creating a Row Definition
Row definitions are the top to bottom inclusion of all accounts used in the Balance Sheet report. They also serve the function of summarizing totals and including any custom formatting. To customize, define each grouping with a title header, account descriptions and links, and a footer totaling all of the accounts.
Define the Assets Section
The assets section includes all assets for the enterprise. Since we identified all of them in the earlier main account sorting and highlighting process, this step is to fit them into appropriate categories and to create totals.
The row definition is populated with asset accounts in the following steps:
- Open File > New > Row Definition.
- In column B of Row Code 100, type “CURRENT ASSETS”.
- In column B of Row Code 130, type “CASH AND EQUIVALENTS”, select the DES format code.
- Save. Use “Balance Sheet – Rows” as the name and description.
- Click any field of Row Code 160.
- Open Edit > Insert Rows from Dimensions.
- If the cash accounts all fall within the same range of dimensions, click the Dimension Range Start for the MainAccount dimension and type the starting account number for Cash and Cash Equivalents. Type the final account for the cash and cash equivalents in the Dimension Range End. Notice that the starting row code is 160 and each row is incremented by 30, up to the final row that is inserted.
- Click OK.
- Alternatively, insert each account by entering a description and a Link to the Financial Dimensions.
- On the row immediately following the last account, select the — (Underscore amounts) format code.
- On the next available row code, type the description “TOTAL CASH AND CASH EQUIVALENTS”, select the TOT format code, and in Related Formulas type the row codes for all of the cash and cash equivalent rows that were created previously. In the following example, the Format code is “TOT” and the Related Formulas “160:640”
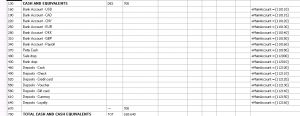
- Return to row code 130 and the row code containing the underscore, on Related Rows D, type the row code for the Total. This enables those rows to show when there is data and to automatically hide when there is not.
- Skipping down a row definition, type the description “SECURITIES”, select the DES format code.
- Click on the next available row.
- Repeat the process from Step 6 through Step 11 for Securities, ensuring that all security accounts are included.

- Repeat this process for Accounts Receivable, Other Current Assets, Physical Inventory, Project WIP, and so on.
- After the last section, select the next available row code and use the DES format code. In the template, this is row code 3250.
- On the next row, select the — (Underscore amounts) format code.
- On the next row, type the description “TOTAL FIXED ASSETS”, select the TOT format code, and in Related Formulas type the formula for the Fixed Assets used. In the template, 2680:3220.
- Skip a row, then on the next row, type the description “TOTAL ASSETS”, select the TOT format code, and in Related Formulas type from the first row to the last row just prior to the one that you are currently on. In example, “100:3340”
- On the next two, select the === (Double underscore amounts) format code, on Related Rows D, type the row of the Total Assets Row.
- Return to rows codes that related to Total Fixed Assets and enter that number. Use the template as a guide.

Define the Liabilities & Equity
The Liabilities and Equity section uses many of the same techniques as the asset section with a main difference that special attention is needed for the Normal Balance column. If the account is a credit account, and the normal balance is a credit, ensure that this is selected as C. This is so that the appropriate sign is applied for the account.
- After the first blank Row Code after the double underscore for the Total Assets section, type the description “LIABILITIES”
- In the next Row Code, type the description “ACCOUNTS PAYABLE”, select the DES format code.
- Click on the next row code.
- Open Edit > Insert Rows from Dimensions.
- Click the Dimension Range Start for the MainAccount dimension and type “2*”. Type “201999” in the Dimension Range End.
- If there are rows that need to be included, yet are not sequential use the following.
o On row next available row code, type the description of the item set the MainAccount to the non-sequential item. Ensure that C is set for column F, Normal Balance.
o Repeat for each one.
- On the final row, select the — (Underscore amounts) format code.
- On the next row, type the description “TOTAL ACCOUNTS PAYABLE”, select the TOT format code, and in Related Formulas type the total for the rows. In the example, 3520:4300
- Return to the rows for the title “Accounts Receivable” and the Underscore, on Related Rows D, type the row code for the Total.
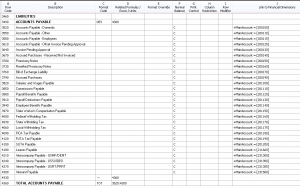
- Repeat the process from Step 2 to Step 9 for Tax Payable, ensuring that all tax accounts are included.
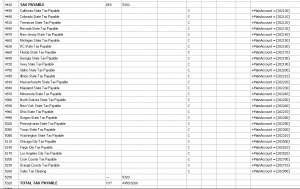
- Repeat this process for Other Current Liabilities, Long Term Liabilities, and so on.
- After the last section, select the next available row code and use the DES format code. In the template, this is row code 6250.
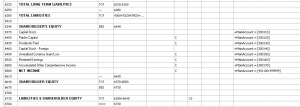
- On the next row, type the description “TOTAL LIABILITIES”, select the TOT format code, and in Related Formulas type the totals for each liability section, for our example, use “4360+5320+5920+6220”
- Skip the next row code and on the second row, type the description “SHAREHOLDER’S EQUITY”, select the DES format code.
- Click on the first available row.
- On the Edit menu, click Insert Rows from Dimensions.
- Click the Dimension Range Start for the MainAccount dimension and type “3*”. Type “399999*” in the Dimension Range End.
- For additional items that were not included, ensure that they are added. In the template they are row codes 6400: Paid-in Capital, 6430: Dividends Paid, 6490: Unrealized Currency Gain/Loss, 6520: Retained Earnings, 6550: Accumulated Other Comprehensive income, Set the Normal Balance to “C”.
- On the row immediately following the equity accounts, type the description “NET INCOME”, set the MainAccount to “401110:999999”, and the Normal Balance to “C”. This is assuming that all income accounts fall withing this range. Ensure that your accounts are all included appropriately.
- On the next row, select the — (Underscore amounts) format code.
- On the next row, type the description “SHAREHOLDER EQUITY”, select the TOT format code, and in Related Formulas type the total. For example, type “6370:6580”
- Set any related row codes needed for Share Holder Equity totals.
- On the next row code, select the DES format code.
- Skip the next row code and on the second row, type the description “LIABILITIES & SHAREHOLDER EQUITY”, select the TOT format code, and in Related Formulas type the addition of Shareholders Equity and Total Liabilities. From the template, “6280+6640”, Ensure that you have set Print Control on Column G to CS.
- On the next row, select the === (Double underscore amounts) format code, on Related Rows D, for example, type “6730”.
- Ensure any other related codes are set.
Creating a Column Definition
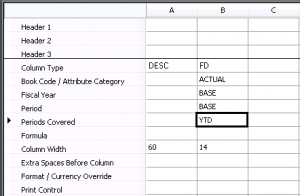
The next configuration step is the creation of column definition. An alternative is to use the existing column definition provide called “YTD”. Perform the following steps to create a new column definition.
- On the File menu, point to New, and then click Column Definition.
- In column A, double-click the Column Type and select DESC.
- Double-click the Column Width field. Set to 60.
- In column B, double-click the Column Type and select FD.
- Double-click the Periods Covered field and select YTD.
- Save the column definition with the name “Balance Sheet – Columns” and description “Year-to-date only – for balance sheet”.
Creating a Report Definition
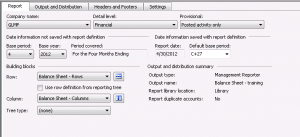
The Report Definition is the collection of the row and column definitions plus the key configuration items to display the report.
Use the following steps to create a balance sheet definition:
- On the File menu, point to New, and then click Report Definition.
- Click the Default base period for your report. If you are using the template supplied in the example database, type “C+27”. The report date is updated to 4/30/2012.
- Click the Row drop-down arrow and then select Balance Sheet – Rows.
- Click the Column drop-down arrow and select Balance Sheet – Columns.
- On the File menu, click Save.
- Type the name “Balance Sheet – training” and the description “Balance Sheet”.
- Click OK.
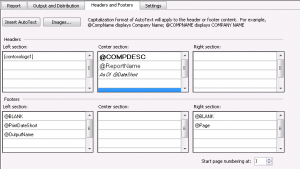
- Click the Headers and Footers tab.
- Click the third row of the center section and update the code to @DateShort.
- Click the Settings tab.
- Select Whole Dollars in the Rounding precision field.
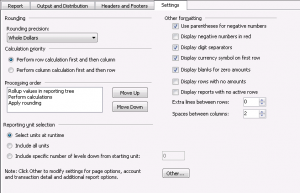
- On the File menu, click Save.
- Click Generate Report.
- Review for all accounts, proper reported balances, and credit switches.
Conclusion
This article reviewed the configuration of the template balance sheet for your company. Specifically, it covered the extraction of the chart of accounts from Microsoft Dynamics AX 2012, reviewing the Balance sheet template example, creating row definitions, creating column definitions, and creating a report definition. By following this guide it breaks down the requisite steps into an easily defined process to utilize the sample template Balance Sheet and rapidly develop it to your enterprise needs.

 RSMUS.com