The Catch Weight functionality was introduced to Microsoft Dynamics AX with version 2012 and designed for the food and beverage industry. However, it was adopted to support the procurement and inventory management of diamonds, which are ultimately consumed in jewelry. Using the catch weight function reduced the amount of part numbers that had to be created. Instead of thousands of different diamonds, each being its own part number, we were able to reduce this amount to about 150 part numbers.
The product is created as a catch weight type product because it varies slightly in weight or size or both. This is very normal in the diamond industry. Catch weight product use two units of measure. One is the inventory unit of measure and the other is the catch weight unit of measure. The inventory unit of measure is the default unit of measure. The catch weight unit of measure is used in inventory transactions, sales transaction, picking transaction, receipts etc.
Step One – Creating Your Catch Weight Product (or Product Master)
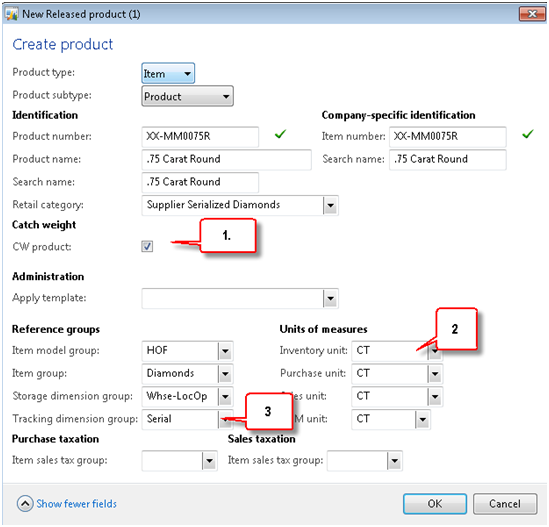
Catch Weight must be identified when creating your product. You cannot apply catch weight after the item has been created.
Navigate to Product Information Management > Released Products > New

- Select the Catch Weight check box
- Select your Inventory Unit of Measure – This is the UOM with a catch weight range
- Select the Tracking Dimension – This must be serialized to allow for full catch weight traceability
These steps are critical. You can’t go back later and fix these.
People often confuse the catch weight unit of measure with the inventory unit of measure. Catch weight must be an integer based unit of measure, such as box, ea, plate…
In our example we are using diamonds. Each diamond is individually serialized, but is priced based on the catch weight.
Step Two – Applying the Unit of Measures and Nominal Values
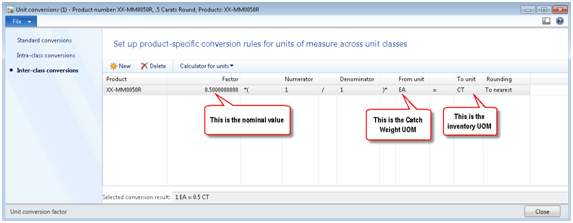
While setting up the product as catch weight it gives the business the flexibility to define the minimum and maximum unit allowed within the range of catch weight. The nominal quantity represents the conversion between catch weight unit and the inventory unit. In our example, we are setting up catch weight rules around a diamond.
Navigate to Organization Administration > Setup > Units > Unit Conversions – Inter-Class Conversions

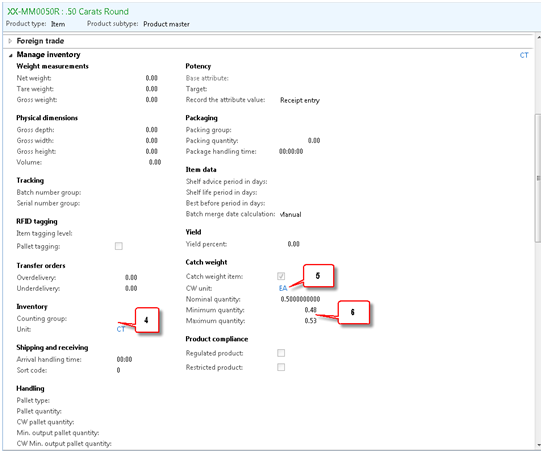
Step Three – Setting the Catch Weight Range

- Enter the Inventory Unit of Measure – for us this came from item 2 in the first screen shot.
- Enter your catch weight unit of measure – This was each for us. When you enter this, the nominal value will populate from your unit of measure conversion as shown in the second screen shot
- Enter your range. This should be a fairly narrow band of acceptable values. If you wide range you way want to consider multiple part numbers. Too wide a range will make your catch weight less meaningful
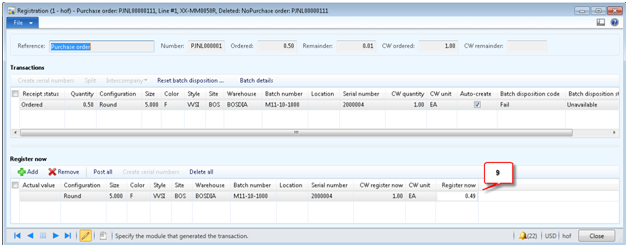
Now you are all set up. But, catch weight can be a tricky proposition on your sales or purchase order. We have an example of a purchase order for a catch weight item below.

- The Catch Weight value can be modified, but…
- The Inventory Quantity is pre-filled from nominal.
When you register your item, you can revise the Inventory Unit of Measure quantity to equal the actual qty received.

- By changing the registration quantity we can receive the actual value, instead of the nominal value.
- We could then proceed with this order with standard Dynamics AX functionality.
RSM is nationally recognized partner in the mid-market ERP and CRM market. If you’d like to learn more about this solution or our other implementations of Microsoft Dynamics AX solutions in manufacturing, please contact our professionals at erp@rsmus.com or by phone at 855.437.7202.
By: Sunit Parikh – Top ranking national Microsoft Dynamics AX partner

 RSMUS.com