One of the key legacy support items is extracting data from Microsoft Dynamics AX 2012. For our purposes, we will be using data that we render using a Pivot Table in Excel 2013. This article is an update to an earlier TechNet series on the same topic; I have updated for the tools and menus that you see today. In this exercise we will be extracting data from a list page into Excel, importing data into PowerPivot using an OData feed, and creating a Pivot Table from the output.
This is part one of a four-part series on this topic. Two parts of the series cover Dynamics AX 2012 and the other two parts cover Microsoft Dynamics 365 for Finance and Operations, Enterprise edition. Each time we are modeling the same tools only using different connections and a bit different data. The purpose of this is to support both groups of implementations and to transition you quickly to the new Dynamics 365 for Finance and Operations, Enterprise edition tools.
Extracting Data from a List Page into Excel
We will need to get our data from AX 2012. One of the best methods is to harvest data from a list page. If you don’t have a list page that feeds this information, ask your IT department to create one. Many of the existing list pages in AX 2012 R3 do all that you would need by using personalization to extract the information.
To extract key data from a list page in to Excel:
- Open Dynamics AX 2012.
- Select Accounts receivable > Common > Customers > All customers.
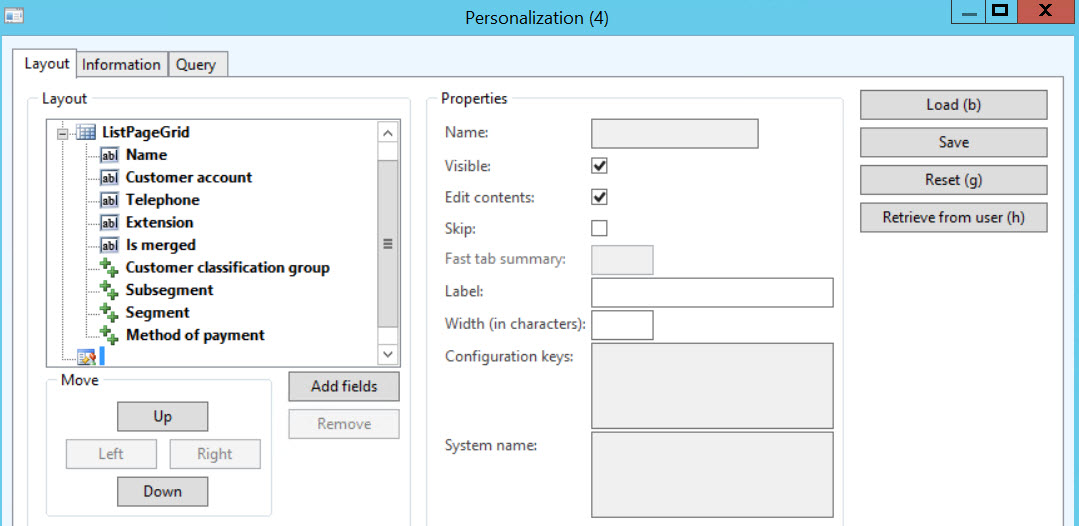
- Right-click the column header of the grid and then click Personalize.
- Expand ListPageGrid.
- Click Add fields.
- Add the following fields from the Customers table:
- Method of Payment
- Segment
- Subsegment
- Customer classification group

- Close the Add fields window and refresh the form.
- After the All customers list page is refreshed, click Export to Microsoft Excel in the List
- File > Save as > find the desktop or where you would like to place > File name CustomerInformation > Save.
- Minimize
Importing Data into Power Pivot by using OData
Not to be left out from the latest technology advancements, you can access Odata information using the Document management features of AX2012. This has an advantage of using direct query data for use.
To create an Odata feed:
- Click Organization administration > Setup > Document management > Document data sources.
- Click New.
- Enter the following values:
- Module: Accounts receivable
- Data source type: Query reference
- Data source name: CustTransList
- Activated: Select the Activated check box.
- Description: This is an Odata feed for CustTransList
- Close the Document data sources form.
- In the same Excel workbook you used earlier in this walkthrough, click the PowerPivot tab.
- Click Manage from the Data model group.
- Click From Data Service > From OData Data feed.
- In Data Feed Url field, enter:
http://<SERVER IP ADDRESS >:8101/DynamicsAX/Services/ODataQueryservice/
NOTE: The previous method was to use Server name, this is not as reliable. This also assumes you have not reconfigured your AX client to a different port than the 8101.
- Click Next.
- Select CustTransList, and then click Finish.
- Close.
- Minimize the PowerPivot for Excel.
- From the original Customer table, select PowerPivot tab, if not already
- Click Enable Content, if you receive a security warning.
- Click Add to Data Model in the Tables
Creating a Pivot Table
We are now ready to render the data in a Pivot Table. These steps will create a pivot table from the data. With a small amount of alteration, you could also render this data using a Pivot Chart.
To create a sample report:
- In PowerPivot, click PivotTable.
- Click OK to create a pivot table in a new sheet.
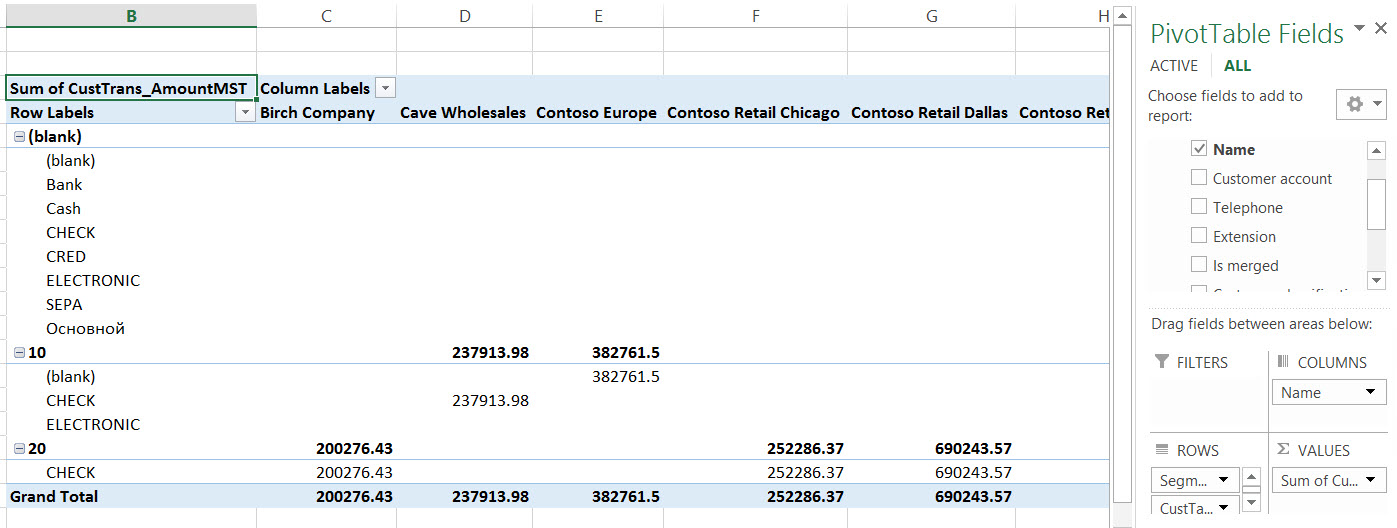
- Expand CustTransList and then select CustTrans_AmountMST. The total sales value is displayed in the pivot table.
- Expand Table and then select Segment. The segment value is displayed in the pivot table.
- Click Create on the warning that says Relationship may be needed.

- Click OK.
- Add CustTrans_PaymMode to rows and Add Name (from Customer Table) to Columns.

- Click Analyze
- Select Insert TimeLine.
- Choose CustTrans_TransDate.
- Click OK.
- Use items to interact with.
This article explored the process of using AX 2012 to visualize data within a Pivot Table, which can be easily be translated to a Pivot Chart. In this exercise, we extracted the data from a list page into Excel, Imported Data into PowerPivot using an OData feed, and created a Pivot Table from the output. Through the process of creating several different renderings of the data, you can quickly interact with the set of information and create inferences for decision making.
For more information, I would recommend that you attend our Dynamics AX2 012 or Dynamics 365 for Finance and Operations, Enterprise edition training in person or on-demand online to learn more.
Plus keep an eye out for more articles that dive into the technical aspects of using Excel, X++ code, and PowerBI. Please visit academy.rsmus.com for more information and training materials that will cover this and 100’s of other topics for AX 2012 and Dynamics 365 for Finance and Operations, Enterprise edition.
by Shaun McMikle for RSM

 RSMUS.com

