How many times have you had users in the system who make unauthorized changes to a released product that caused issues down the line? With the release of D365 Finance and Operations, version 17, new functionality was introduced with Product versioning and Engineering change management. This functionality allows for the product setup, editing, etc., in the ‘engineering’ or owning company within your environment. After the product is set up, it can be released to other ‘operational’ legal entities to use or manufacture the product. Using this functionality provides structure to the process of product maintenance and enables product updates to be controlled by the engineering company that can also be supported by workflow.
Enable features and configuration keys
Engineering change management is an additional feature that is enabled through Feature management, and there are configuration keys that must be enabled as well.
First, enable the following features by navigating to:
- Go to System administration > Workspaces > Feature management.
- Select the All
- Search for ‘Engineering change management.’
- Select the Enable button in the lower right of the screen.

- If you would like to use Engineering change management on existing products, you must enable the ‘Enable change management on existing products‘ feature as well. Once enabled, you must convert the relevant products to engineering items(also referred to as engineering products).

- Versioned products are engineering products in Engineering change management. The versioning functionality enables the engineers to track the history of a product. Enable the Product dimension version
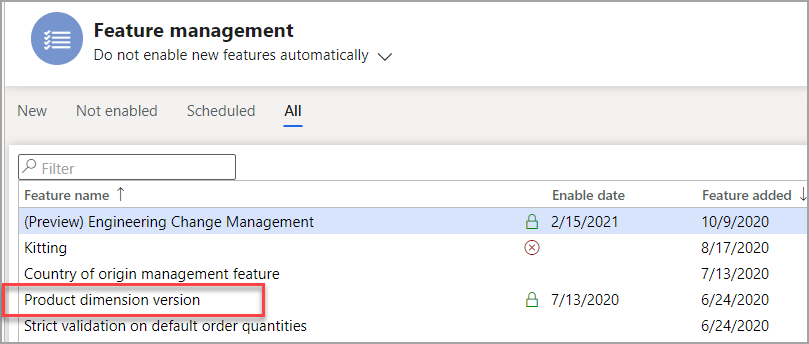
Next, you must enable the configuration keys. To allow the configuration keys, follow these steps:
- The company must be in Maintenance mode. For information on Maintenance mode, go to Maintenance mode – Finance & Operations | Dynamics 365 | Microsoft Docs
- Go into System administration > Setup > License configuration, and then expand the Trade
- Select the Product dimension – Version checkbox
- Select
- When you get a message, Do you want to save changes done to configuration, select Yes.
- Go to the Trade group and expand and select Engineering change management configuration key.
- When you get a message, Do you want to save changes done to configuration, select Yes.
- Refresh your session, and you will receive a message that one feature has been added.
- Engineering change management will now be listed in the module menu.
Within the Engineering change management module in the Contoso data, all the setups and configurations in this module already have sample data. The required setups are:
Create an engineering organization
The engineering organization will be the ‘parent’ company, where the creation and lifecycle management of the engineering product will be performed. If possible, it is recommended to have one engineering company to eliminate any confusion about where to perform product maintenance. To set up the engineering organization, follow these steps:
- Go to Engineering change management > Setup > Engineering organizations.
- Select Newto add a row to the grid, and set the following values for it:
- Engineering organization: DEMF
- Organization name: Contoso Entertainment System Germany
Create version numbers and version number rules
A version number is used to track changes and modifications to an engineering product. There are three options when setting up version rules:
- Auto – this will generate a version number based on the format you provide (example: V## would be V05 for the 5th version)
- List – this is a fixed list of characters – alpha, numeric, or any combination.
- Manual – entered when needed; free form text at every update
To configure that version number, follow these steps:
- Go to Engineering change management > Setup > Product version number rules
- Select New
- For the Name, enter Roman Numeral List
- For the Number rule, select List
- Expand the Version fast tab
- Select Add
- Enter I, II, III, IV, V as your list sequence
- Close the form
Create engineering attributes
Engineering attributes (same as Product attributes) identify the details that you want to maintain for your products such as brands, manufacturer, model, etc., and provide additional details that your organization might want to record for a particular product or category. You can associate product attributes, along with a product, through the category to which the product belongs.
To create an engineering attribute, follow these steps:
- Go to Engineering change management > Setup > Attributes > Engineering attributes.
- Select Newon the Action Pane to create a new attribute.
- Select a Name, such as Rating
- Select the Attribute type from the list, Rating
- Enter a Friendly name if applicable, which will default to the Name
- Enter a Description and Help text as needed
- If a Default value is set up on the Attribute type, you can select one.
Product readiness policies
When engineering products are created, the first option is to select the Engineering Product Category. The category will have both readiness and release policy options to attach to it.
This feature provides a check to ensure that all the required master data has been specified for a product before it can be used in transactions. Only when a readiness check has been validated can a product be released or used in transactions.
There are three types of readiness checks included in each policy:
| Type | Check |
| System Check | The system will check if there is a valid recording according to the policy setup |
| Manual Check | User will verify if the record is valid |
| Checklist | This will require that the user answers a series of questions from a checklist |
To create the readiness policies, follow these steps:
- Go to Engineering change management > Setup > Product readiness policies.
- Create New
- Enter Name and Description
- Select Product type and whether the policy is active or not.
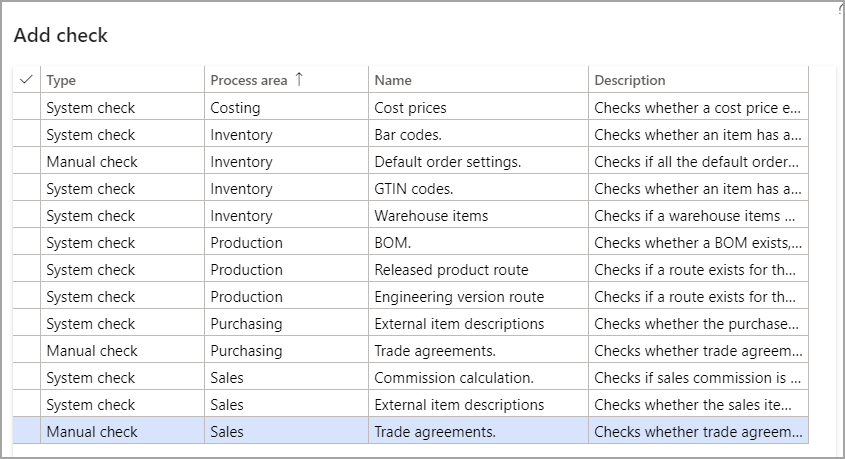
- In the Readiness control FastTab select Add check
- The application has 13 checks to choose from.
Product release policies
When engineering products are created, the first option is to select the Engineering Product Category. The category will have both readiness and release policy to attach to it.
To create the policy, follow these steps:
- Go to Engineering change management > Setup > Product release policies. The policy is set up as follows:
- Enter the header information:
| Field Name | Usage |
| Name | User-created identifier |
| Description | Description of policy |
| Product type | Item or service |
| Apply templates | Always, Optional, Never |
- On the All product FastTab, select Add and select the following criteria as it pertains to this Product release policy:
| Field | Description |
| Company accounts ID | Select the legal entity this line of policies will refer to. |
| Template released product | Choose which template will be used for the legal entity selected |
| Receive BOM | Select Item or service |
| Copy BOM approval | Copies the BOM approval to the receiving company |
| Copy BOM activation | Copies the BOM activation to the receiving company |
| Receive route | Copies the route to the receiving company |
| Copy route approval | Copies the route approval to the receiving company |
| Copy route activation | Copies the route activation to the receiving company |
Create engineering categories
To set up an engineering product, an engineering category must be assigned. The category indicates default values, attributes, and policies. Each category establishes the default behavior of the products in that category. Once a product is assigned to a category, it cannot be changed. The only solution for removing a product from a category is to delete it and then re-create it in another category.
Follow these steps to set up a new category:
- Go to Engineering change management > Setup > Engineering product category details.
- Select New.
- Enter the category name and select the Engineering organization.
- In the Default FastTab, select the values that are applicable for the category.
- In the Attributes FastTab, select the attributes applied when a new product is released to legal entities.

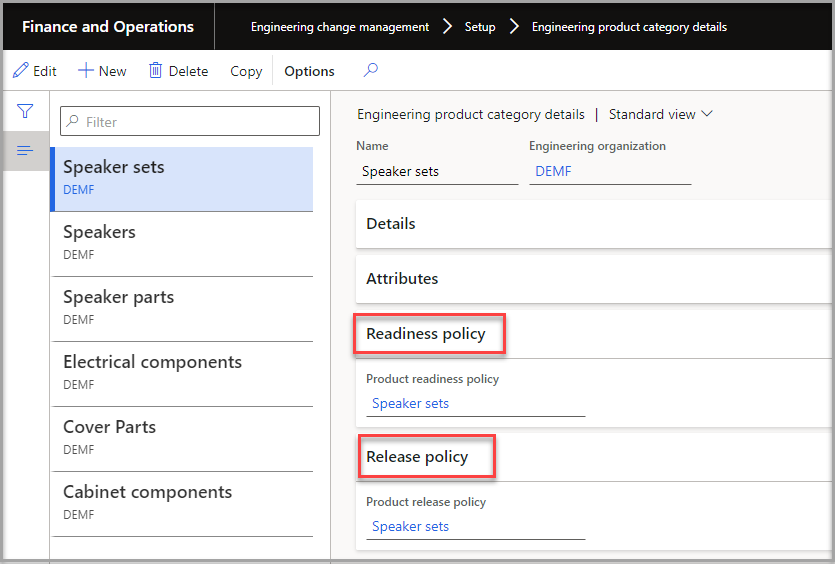
- On the Readiness policy and Release policy FastTabs, select a policy that you configured in the previous steps.
Setup engineering severities
Engineering severities indicate the level of impact that applies to the products in an engineering change order.
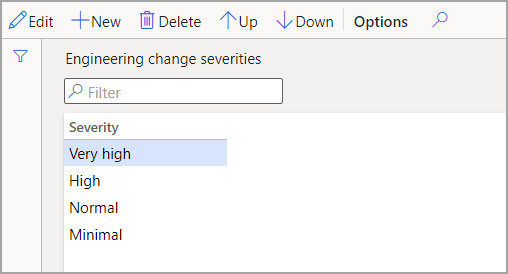
Follow these steps to create the severities:
- Go to Engineering change management > Setup > Engineering change management > Engineering change severities.
- Add the severities you will use for change orders.
Setup severity rule sets
Severity rule sets are used to calculate the severity of the change order automatically. When the system evaluates a severity, it will process the rules configured in the parameters. To use them for this, open the parameters page and set the Severity Rule field to Calculate or Calculate automatically.
To setup, the severity rules, follow these steps:
- Go to Engineering change management > Setup > Engineering change management parameters.
- On the Engineering change management tab, under Rules, select the applicable options.
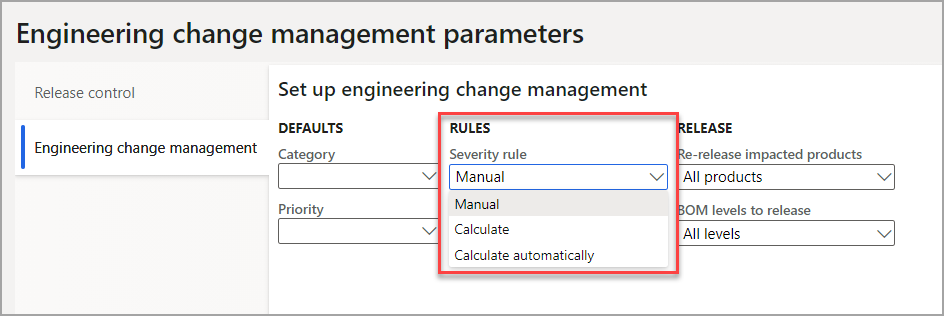
Five separate rules can be selected to apply to the different severities that are set up. The system will process the rules in which they appear on the page, from top to bottom.
To create a rule set, follow these steps:
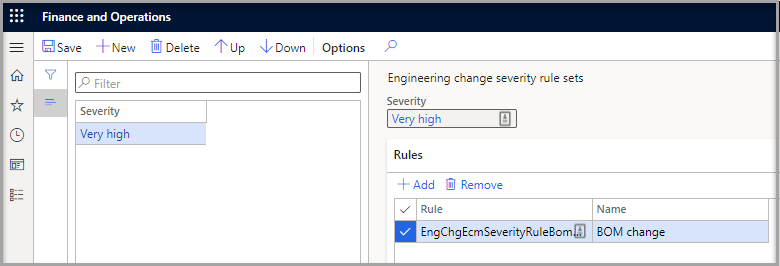
- Go to Engineering change management >Setup > Engineering change management > Engineering change severity rule sets.
- Select New
- Select the Severity from the drop-down list from the severities that have been created.
- Select Add in the Rules fast tab
- Select from the Rules in the drop-down list, which are paraphrased below:
- The overall impact of the change
- Route change
- Attribute change
- BOM change
- Document change
Setup product owners
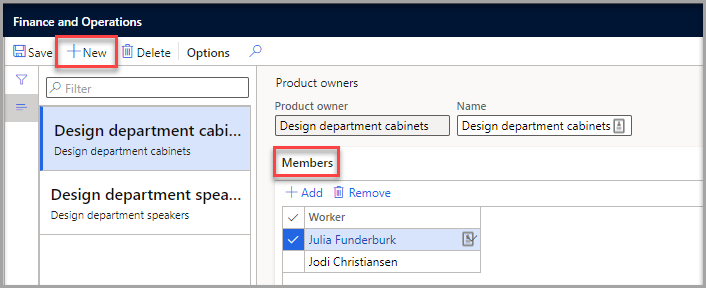
A product owner is a group of users who are responsible for specific engineering products. When a product owner group is assigned to a product, only the group members can release the product to the operational, legal entities. The product owner can also be used in the approval workflows. Product owners are assigned globally; therefore, they are available to all legal entities.
To create a product owner group, follow these steps:
- Go to Engineering change management > Setup > Product owners.
- On the Action Pane, select New.
- In the Product ownerfield, enter a name for the group.
- In the Namefield, enter a description of the group.
- On the MembersFastTab, add the workers who should be members of the group.
This blog covered the setup and configuration for Engineering change management. Stay tuned for more blogs on the creation, release, change requests, and change orders. Additional training sessions similar to this are available at the academy.

 RSMUS.com
