Introduction
The workflow process is vastly expanded in Microsoft Dynamics® AX2012. The built in new capabilities of line item approval, work item queues, cross company workflows, and specific notifications for each workflow alone are well worth the price of admission. This article addresses the situation where there is a need to setup a new workflow project or there isn’t an existing workflow template in the enterprise for Sales Order. It is the first in a series of three articles that discuss the setup, design, and configuration a workflow. Workflow setup is not difficult for it uses elements from the Dynamics AX rich client to create a new project in the application object tree (AOT) that is the basis of the next phase.
Scenario
The Contoso sample database uses Fabrikam as an example of an audio product manufacturing company that needs to configure and setup a new Sales order workflow project. The sales team would like a process for approving sales orders for customers that will exceed their credit limit, however, there is no current sales order workflow infrastructure to build this upon. This exercise constructs the framework for the Sales order workflow for this case plus any others that will be needed by the team. Following are the operations that must be completed before you can design the workflow.
Operation One
The first step is to setup the batch jobs that manage workflow processing. There are three jobs areas that need to be configured using the wizard.
Perform the following steps to assign batch jobs to the correct batch groups:
- Open System Administration > Setup > Workflow > Workflow infrastructure configuration.
- The Workflow infrastructure configuration wizard is displayed.
- Click Next.
- Configure the workflow messaging batch job, under Batch group select DataUpdate.

![]()
- Click Next.
- Configure the workflow due date processing batch job, under Batch group select DataUpdate.
- Accept the default Repeat job after the specified number of hours, 1.
- Click Next.
- Configure the line-item workflow notification batch job, under Batch group select DataUpdate.
- Accept the default Repeat job after the specified number of minutes, 30.
- Click Next.
- Review Completing the workflow infrastructure configuration wizard output and click Finish.
![]()
Operation Two
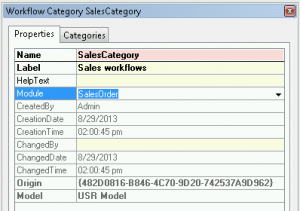
The next operation is to create a workflow category. The category is used to relate the module in which the workflow will be available from.
- Open the AOT.
- Expand the Workflow node.
- Right-click on the Workflow Categories node and select New Workflow Category. A new workflow category called WorkflowCategory1 with be created.
- Right-click on the newly created workflow category and select Properties.
- Change the name property to Sales Category.
- Change the label property to Sales workflows.
- Change the module property to SalesOrder.
- Right-click on the Sales Category category and select Save.
Operation Three
Operation three focuses on the query creation setup, however, you can use an existing query that returns the required information. A workflow uses the query to define the tables and fields that will be used by the workflow to define the data set available.
- Open the AOT.
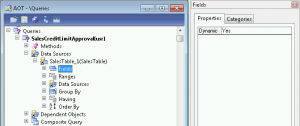
- Right-click on the Queries node and select New Query.
- Rename the query to SalesCreditLimitApproval.
- Expand the newly created query.
- Open an additional AOT window (Ctrl+D).
- Expand Data Dictionary > Tables.
- Find the table SalesTable.
- Drag the SalesTable table to the Data Sources node of the SalesCreditLimitApproval query.
- Expand the SalesTable_1 node.
- Right-click on the Fields node and select Properties.
- Set the Dynamic property to Yes and close the property sheet.
- Right-click on the SalesCreditLimitApproval query and select Save.
Operation Four
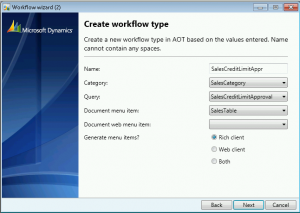
The final step is to create a workflow type. A workflow type defines the name, category, query, and document menu items to tie all of the pieces that were created in the previous operations together in to one definition. This definition can be reused for other workflows that are based on this type.
- Open the AOT.
- Expand the Workflow node.
- Right-click on the Workflow Types node and select Add-ins >Workflow type wizard.
- Click Next.
- Enter SalesCreditLimitApprv in the name.
- Enter SalesCategory in the category.
- Enter SalesCreditLimitApproval in the query.
- Enter SalesTable in the Document menu item.
- Default the Document web menu item to blank.
- Use the radio button to select Rich client if not already selected under Generate menuitems.
- Click Next.
- Click Finish.
Output
You will receive a message with instructions for final steps. The following is an example of the output:
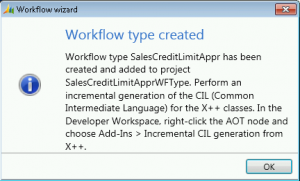
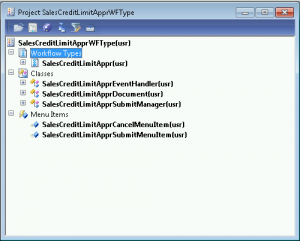
The product of this process is a fully built project that contains all of the basic key elements to design a workflow from. The following is an example of the output:
Conclusion
This article reviewed the setup of a new Sales Order workflow project . Specifically, it covered configuring batch processing, assigning a workflow category, creating a query, and creating a workflow type. By following this setup, it is much faster to develop a new workflow. In the next article, designing workflow components will be explored based on this same scenario.

 RSMUS.com