Custom forms, views and menu items can greatly enhance a Microsoft Dynamics AX user’s experience. And once learned, this is a repeatable way you can improve your Dynamics AX system deployment. Forms, views and menu items are all created through the AOT (Application Object Tree). The short cut to open the AOT is (CTRL+D).
Dynamics AX 2012 uses a layer system to help aide in managing custom elements. By default when creating customizations, they are made at the USR (User) level because most users log into this layer of the software, so that is what is shown in this article. This blog does not take layers into consideration, this is solely for the purpose of how to create forms, views and menu items. When implementing customizations in your environment, you must consider which layer to use for development depending on your environment and who should see the customizations (i.e. a particular user vs. all users). For instance, there are code layers for third party software products (ISV), partner-provided customizations (VAR), customer-developed code (CUS) and all of these can interact and affect what the end users see when using AX. Please refer to your Dynamics AX documentation for a detailed review of the concept of layers before determining which layer to use for any customization.
The advantage of utilizing Views in Dynamics AX is that they come with five aggregate functions already installed: Sum, Min, Max, Avg, and Count. Another tip is that if you want to change the placement of a field in the AOT (move a field up or down for display), highlight the field and hold the ALT key, then use the up and down arrows to move. Lastly, from any grid in Dynamics AX the shortcut to export the data from the grid into excel is CTRL+T.
Creating a custom form is an easy task and once the form is created you have the ability to create a menu item and place that form in any module. This can all be done easily with little knowledge of how the AOT works. When adding fields to a view and a form, you can add any fields that would benefit the end user.
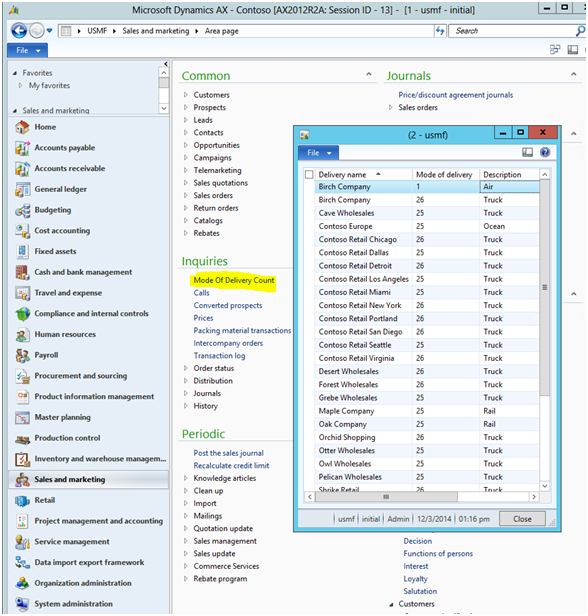
The hypothetical example below creates a form which uses a custom view to count the mode of delivery from sales orders to customers. With this information available, a company could analyze their mode of delivery to their customers and associate shipping costs of each method for further analysis. For instance, perhaps this information can help aide in strategically optimizing shipping costs.
This example is designed as a step by step example of how to create these types of customizations.

Create a view
- AOT>Data Dictionary> Right click views> New View
- For ease of maneuvering, open View in new window Right click the new view and then click Properties. Change the name of the view, in this example, I named it ‘MyView’.
- Expand the metadata dropdown and go back into the AOT. AOT>data dictionary> Tables> SalesTable
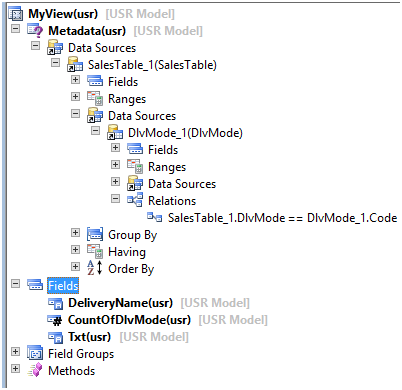
- Drag SalesTable into the data sources of your created view.
- Go back into the AOT, find table ‘DlvMod’e and add to the data sources of the SalesTable (picture above for reference)
- Be sure to add the relation between the two tables
- The initial relation between the two tables is incorrect. To view relations that are predefined:
- Data Sources> Tables> Find desired table>Relations
- Expand the Fields node from the tables that are added under your data source (i.e. SalesTable & DlvMode). Now drag the desired fields into the Fields node of your view.
- In this example, from the ‘SalesTable’; drag fields: DeliveryName, DlvMode. From table ‘DlvMode’; drag field: Txt.
- Highlight field ‘DlvMode’ and from the properties window choose the aggregation function Count.
- Save your View
Create Form
- From the AOT>Forms> Right click ‘new form’.
- Change the name of your form from the properties window.
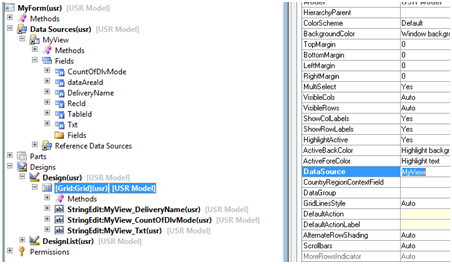
- Expand the data sources node> drag the created view ‘MyView’ into the data sources.
- Expand Designs node> right click design> New Control> Grid
- Just like how you added fields when creating the view above, you drag the fields from the view that is in the data sources into the grid.
- From the properties window for the grid; be sure to set the DataSource property to the name of your view, ‘MyView’
- This step is often forgotten and failure to do so your grid will not display any information. See above picture
- Save your form. To view your form, right click> Open
Create a Menu Item
- AOT>Menu Items> Display> Right click ‘New Menu Item’.
- Change the name of your menu item. I named mine, ‘MOD_Count’.
- Open the properties for your menu item and change the Object property to the name of your form, ‘myForm’.
- The ‘label’ property is what you will actually see from the module. In the picture above you will see that I named it ‘Mode of Delivery Count’.
The next step is to decide which module and where in that module to place this newly created form. I am choosing to place this form in the ‘Sales and Marketing’ module. In this module, I will place it in the ‘Inquiries’ submenu section.
Place Menu Item in a Module
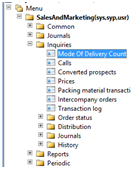
- AOT>Menus>SalesandMarketing>inquires
- From here you will drag your menu item, ‘MOD_Count’ into the ‘inquires’ submenu of the sales and marketing module.
- Save and compile the changes made
Note: this will not instantly appear once you place this menu item and then save it. You have to click off the Sales and Marketing module and then click back to allow it to load.

Please let us know in comments if you found this information helpful.
If you are looking for more complex configurations in Dynamics AX, RSM is a top ranking national Microsoft Dynamics partner and we can help. Our consultants offer a high level of industry and technical experience. We pick teams based on your unique needs. Contact our professionals for more information at erp@rsmus.com.
By: Michael Lang – Great Lakes Microsoft Dynamics AX Associate

 RSMUS.com

