As we go into 2017, I’m sure everyone is still getting comfortable with the new name, Financial Report Designer. In this blog, we will explore using financial dimensions from the General ledger module in reports created in Financial Report Designer.
Financial Dimensions
In this blog we will look at two ways to utilize financial dimensions in Financial Report Designer. Both methods use the financial dimension, MainAccount, however they differ in how MainAccount is displayed on reports. The first approach displays all MainAccounts for cash on separate rows of the report, while the second introduces dimension value sets to display a total of all the accounts on just one row of the report.
Method 1 – Single Financial Dimension
In this example we will work with the Financial dimension MainAccount.
- To insert the single financial dimension MainAccount for all cash accounts in a new row definition, we need to follow these steps.
- Open General ledger > Inquiries and reports > Financial reports.
- Choose New from the action
- Log on to Financial Report Designer.
- Create a new Row
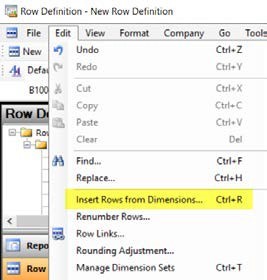
- In the Edit menu, choose Insert Rows from Dimensions….
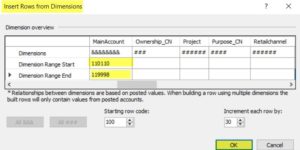
- Enter the MainAccount Dimension Range Start and Dimension Range End (See the Chart of Accounts below.)


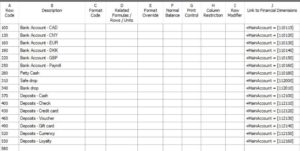
- Click MainAccount dimension from 110110 to 119998 will insert into the new Row definition.
Method 2 – Dimension Value Sets
Now let’s look at a method of reporting all the cash accounts as a single total. Instead of displaying each cash account with the balance, we will display a total for the combined cash accounts. We can achieve this by creating a Dimension Value Set for the cash accounts.
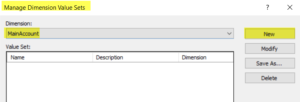
- On the Edit menu, choose Manage Dimension Value
- Choose MainAccount from the drop-down in
- Click
- In the Name field, type
- In the Description field, type Cash
- From, double-click and choose the first Cash account
- In the To field, type
Note: By entering a number 1 < the Totaling account number, you will ensure that any new cash accounts added to the Chart of Accounts between 110110 and 119999, will be included in the Total for Cash. This means less maintenance on reports.)
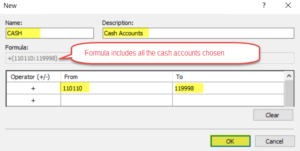
- Click OK and close the
- Create a new row
- On Row Code 100, type in Cash Accounts.
- Double-click in Column
- On the Dimensions form, in the drop-down list, choose
- Double-click

- Click the Dimension Value Set b
- Click the ellipsis beside the Name field.
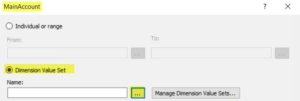
- Choose
- Click
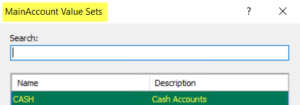
![]()
- Click OK to close the last two
- The Dimensions form will look like the screenshot
- Click OK. The Dimension Value Set will display in the new row
![]()

Now that you have seen two ways to use Financial Dimensions in Financial Report Designer, I hope you are thinking about how this robust reporting tool can meet and simplify your reporting needs. To learn more about Financial Report Designer or any of the other Dynamics 365 for Operations modules, check it out at RSM Technology Academy or subscribe to our Microsoft Dynamics Community News publication.
by Bo Powe for RSM

 RSMUS.com