Microsoft PowerPoint is one of the most frequently used slide-based presentation programs on the market. It’s likely that, at some point during your professional career, you have either created a PowerPoint presentation or seen one. However, Microsoft PowerPoint isn’t just useful for slide-based presentations; you can also create videos with it by using the Office Mix add-in.
Office Mix Add-In
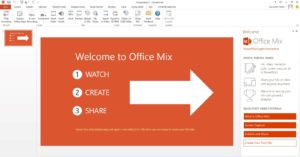
To create videos with PowerPoint, you need more than just the basic PowerPoint program. The two requirements to create videos in PowerPoint are a copy of Office 2013 (or newer) along with an add-in called Office Mix. Office Mix is a free extension for PowerPoint that gives the user the ability to perform a multitude of actions.
These actions include but are not limited to:
- Recording audio on your PowerPoint slides
- Writing and drawing on PowerPoint slides
- Adding quizzes and polls to slides
- Capturing screen recordings
- Editing videos
- Exporting videos to MP4 files
- Publishing videos online
You can install the Office Mix add-in by visiting https://mix.office.com/en-us/Home and clicking the Get Office Mix button. While the add-in is free to install, it’s important to note that this installation will require that you first log in to a Microsoft account.
After installing Office Mix, when you open a new PowerPoint presentation, you should see a new tab on the ribbon called Mix. From there, you can perform all the actions we just discussed.

Create a Slide Recording
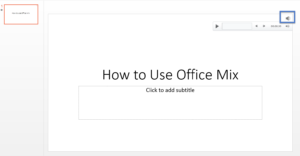
To add an audio recording to one of your slides, follow these steps:
- Open the PowerPoint presentation you’re working in.
- Select the slide you’d like to add your recording to.
- Select the Mix
- Click the Slide Recording
- Click the Record button and start talking.
- To draw on the slide while recording is in process, hold down left-click on your mouse and drag the cursor where you would like to draw.
- If your slide contains animations you can trigger the animations within the recording by left-clicking on the slide or clicking the icon highlighted on the graphic below in red.
- When you’re finished recording, click the Stop Recording


Additional Slide Recording Settings
- To add a webcam video recording to your slide, you must first choose whether you’d like the video to be the size of a thumbnail on the slide, or if you’d like the video to appear in full screen on the slide.
- You can also choose the camera and headset you’d like to use. If you set the camera option to No camera, there will be no video recording included in your slide recording.
- The slider below the microphone setting controls how the volume of the slide recording.
- If you’d like to draw on your slide while recording, you can choose the size of the line and also the marking color.
Create a Screen Recording
In addition to slide recordings, you can also use Office Mix to create screen recordings. A screen recording will record any actions you perform on your computer and also record your voice while the recording in in process.
To create a screen recording, follow these steps:
- In your PowerPoint presentation, select the slide you’d like the screen recording to be attached to.
- Select the Mix
- Click Screen Recording.

- The Select Area button will allow you to choose which part of your screen you’d like to record. This can be particularly useful if you utilize two or more monitors.
- You can choose whether you’d like to include audio in your screen recordings by clicking the Audio
- You can choose whether you’d like your mouse pointer to appear in the screen recording by clicking the Record Pointer button.
- When you’re ready to record, click the Record
- When your recording is complete, there are two ways to end your recording:
- Press Windows Key + Shift + Q.
- Place your mouse pointer at the top of your monitor and wait for the recording controls to appear. Then, click the Stop

Export to Video
Once your slide and screen recordings are complete, you are now ready to export your slides into a video format. The only video format available is MP4, but there are a few different video sizes to choose from; we’ll get into that in our exporting steps down below.
To export your slides into a video, follow these steps:
- Select the slides you’d like to include in the video using one of the following methods:
- Right-click and hide all of the slides in your PowerPoint presentation that you do not want to include in the video. All of the slides that are still shown will be included in the exported video.
- Select all of the slides that should be included in the video and press Ctrl + C to copy the slides. Open a new PowerPoint presentation and press Ctrl + V to paste the slides into the new presentation.

- After you have selected your slides, click the recording icon on each slide to determine whether the audio levels should be adjusted. Often, slide recordings and screen recordings can vary in sound levels, so it’s important to preview the audio ahead of time.
- After reviewing the audio levels, click the Mix
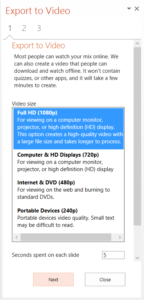
- Click the Export to Video
- Select one of the options in the Video Size section of the Export to Video
- The Full HD (1080p) option produces the highest quality video, but will also take the longest amount of time to export.
- If you need the video to export quickly, you can choose the Portable Devices (240p) option.

- By default, your exported video will show each slide for the duration of the slide or screen recording. If there is no screen or slide recording for some of your slides (perhaps a title slide or disclaimer slide), enter a value in the Seconds spent on each slide field to determine the number of seconds that each non-recorded slide will show. This value defaults to 5, meaning that slides with no recordings will play in the video for 5 seconds before continuing to the next slide.
- Click the Next button and browse to the location where you’d like to save your video.
- Enter a name for your exported file.
- Click Save to start the export process. The export time can vary, usually somewhere between 1–30 minutes depending on the length of the recordings and the video size.
Want to learn more? Visit our RSM academy for eLearning courses and information about our client-site and Denver-hosted training!
by Nick Dietrich for RSM
Follow me on twitter! @nickd365

 RSMUS.com


