The Dynamics CRM 2015 Spring Update contains a wonderful new preview feature titled Office 365 Groups which will allow for a unified experience among Microsoft Dynamics CRM and non-Dynamics CRM users as they collaborate operationally and on shared content. This specific new update from Microsoft is more than an enabled preview, it is an entire solution preview built for and leveraging the already exchange-configured Microsoft Dynamics CRM. Once initially installed, it will be called to publish customizations contained within the solution of your Dynamics CRM system as you configure entities when starting to use the Office 365 Groups tools.
Here Microsoft has utilized many platform features like:
- The reach and security of Office 365
- The extensive operational support tools and document services of SharePoint
- OneNote’s simplistic yet sophisticated collaborative notebooks
- The familiar Dynamics CRM and Outlook interfaces to access all these tools in each place
Responding to the need for more rapid business development via streamlined processes and collaboration without borders, we get more done together while working with less barriers. That’s what this combination grants – the opportunity for the organizational growth that happens when everyone’s day runs a little smoother. Group members will be able to hold centralized conversations, share documents, meeting notes, OneNote information and more related to your accounts and other Dynamics CRM records.
A note for administrators, the steps below for enabling entities involves a system-wide publish near the end, which we caution will publish all of your pending, saved and unpublished Dynamics CRM customizations in all areas.
Now how you can start using it…
As a housekeeping item, first an Administrator must enable server-based SharePoint integration. Why? Because SharePoint sometimes thought of as a single piece or item delivered by Microsoft, is actually a complete set of customizable service platforms, apps and services within the Microsoft platform. It will provide many of the operational tools used between users and groups.
Enable server-based SharePoint Integration:
Click the Menu icon then click Settings > Document Management. The page will load.
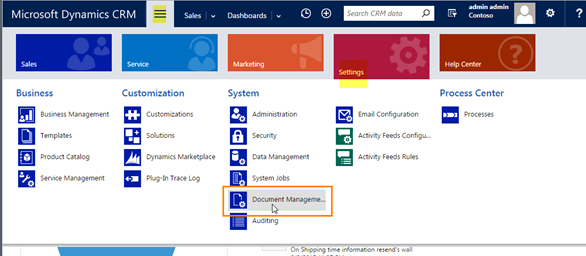
Select Enable Server-Based SharePoint Integration link. A window will open.

In the initial Window are highlights of the latest benefits of Microsoft’s Dynamics CRM SharePoint integration.
Click Next
Select Onpremise or Online to define your tenant> Click Next
Paste your SharePoint URL> Click Next. Always remove any page references after .com.
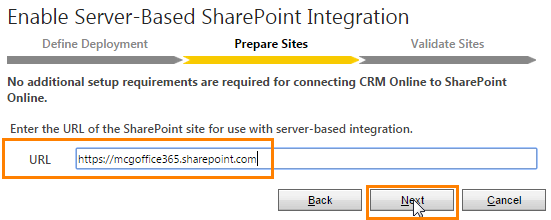
The platform will validate the site, and allow you to enable.
Click Enable
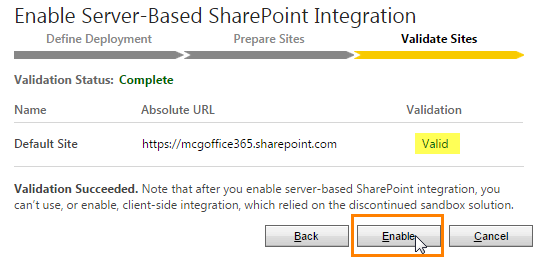
When you use a URL that is part of the same Office 365 as your Dynamics CRM, Microsoft provides the added benefit of automatically created document libraries and folders when you use new features like OneNote directly from the Dynamics CRM record.
Check Option Box ‘Open Document Management Settings Wizard’ > Click Finish
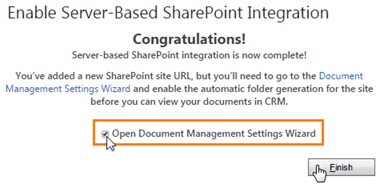
Enable Dynamics CRM Entities via Dynamics CRM’s Document Management Settings Wizard
From the open wizard or by Navigating to the documents management settings wizard in Dynamics CRM via Menu > Settings > Document Management > Document Management Settings follow these set up steps.
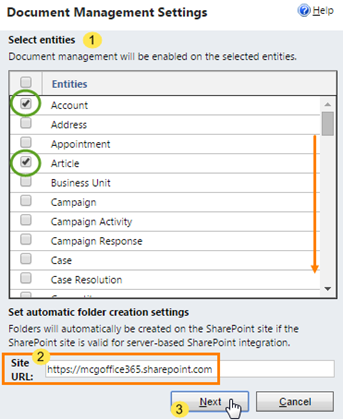
Select the Dynamics CRM Entities that will be enabled for document management via the Office 365 Groups Solution.
Paste your SharePoint URL > Click Next.
Next you’ll Select a Folder Structure
Option I: Simply Click Next. By leaving the Based on Entity Option null the system will create a library with folders for each entity independently. Each folder will contain the entire set of records for that corresponding Dynamics CRM entity integrated.
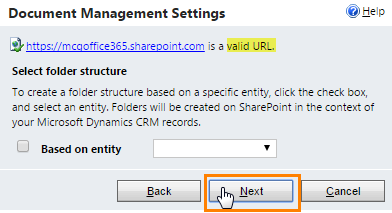
Option 2: Check the Based on Entity Option Box
Select the Entity for which the folder structure based on. In most cases, this can be described as the ‘tree top’ of the entity hierarchy you have established in Dynamics CRM and want to mimic in your content library structure. For example, selecting Account means all entities that are children of the account will have their folders tucked under or within the specific Account’s folder or path. Ex. …/account/account name>/<entity name>/<record name>. An example for selecting Contact might be a member organization that differentiates their groups of data based on the partners or contacts involved vs the legal entities or accounts involved.
Click Next
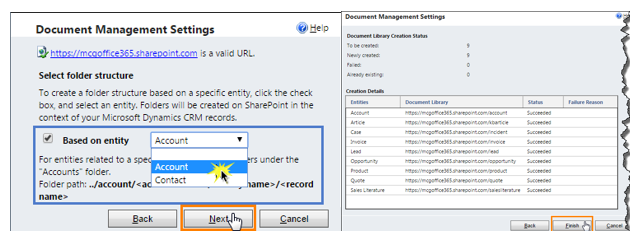
A document library creation status summary panel will appear.
Click Finish
Next, you’re ready to install the preview solution into your Dynamics CRM. Because this is a solution utilizing Microsoft’s underlining platform you’ll get it from your Office 365 Admin center.
It is important to note that during the installation, your Dynamics CRM Online site will be taken down for a short time. For our example, it took less than ten minutes while Microsoft performs the maintenance of installing the solution for you. The following steps require administrator access.
Install the Solution Preview
Access your Office 365 Admin Center. Found in the left hand ‘my app’ panel selector of your Office 365 portal, https://portal.office.com/
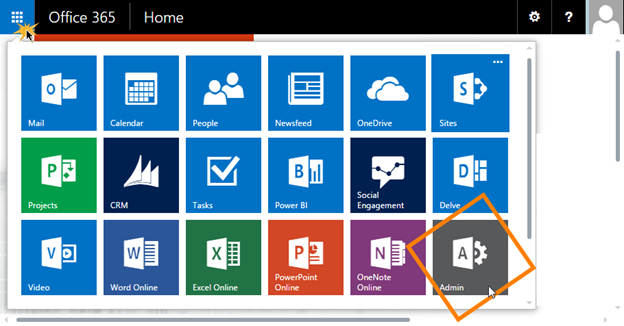
Select Admin > CRM. In the left Navigator, Scroll to Admin > CRM. Select CRM.
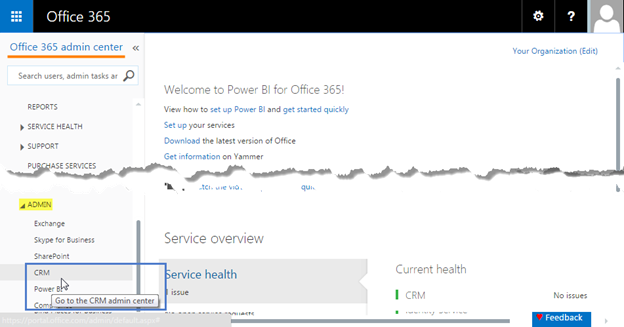
Highlight your Organization > Click Solutions

Select Office 365 Groups Solution
Click Install.
The Dynamics CRM Online site will be taken down during installation.
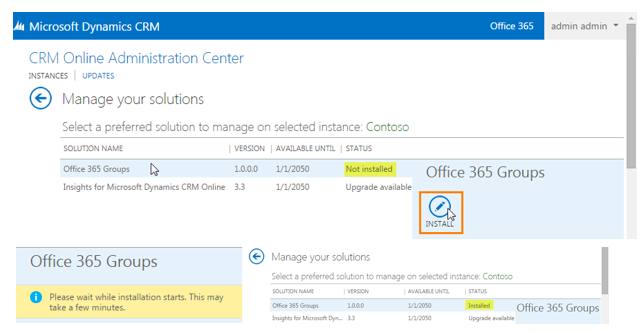
Once Installation is complete, the next step is to configure the Office 365 Groups to your specific Dynamics CRM entities.
Configure Office 365 Groups
Refresh Dynamics CRM and access the new Office 365 Groups Settings area to select entities that will receive the customization i.e. be able to offer and support the new tools.
Click the Menu Icon then click Settings > Office 365 Groups
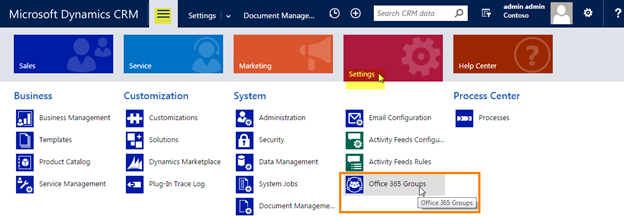
The Office 365 Groups integration Settings page will load.

It’s here that you add entities for configuration, from the entities that were enabled for document management when the server-based for SharePoint integration was enabled. Adding entities and then publishing will allow the preview solution to customize these entities and create the Office 365 groups configurations.
Select Add Entity. Once you have completed the list of entities
Click Publish All. You’ll get the standard quick spool Publishing Customizations visualization.
Once published you’re ready to create an Office 365 Group from any of the included Dynamics CRM entities.
Note: there is an option here for Auto Create. It’s recommended to give this some thought and only select auto create for those entities that typically, or nearly always, need a large group to collaborate. For example, if Dynamics CRM was being used to make transparent and catalyze complex product cycles. In this case, auto create might help standardize and optimize how large teams work together to publish finalized product content. Specifically, Office 365 Groups could be enabled and used on Dynamics CRM’s out of the box Sales Literature entity to connect sales and your back-end product teams that have product knowledge but may not need CRM access within your organization.
Create an Office 365 Group from Dynamics CRM
Creating a group can be done from multiple places including Outlook, Office 365 and the Dynamics CRM record. From the enabled Dynamics CRM record, access the Office 365 Groups area using the Microsoft navigation bar.
Menu > Sales > Accounts > Specific Account > Navigation Bar Drop Down > Office 365 Groups

The page will open with a welcome message.
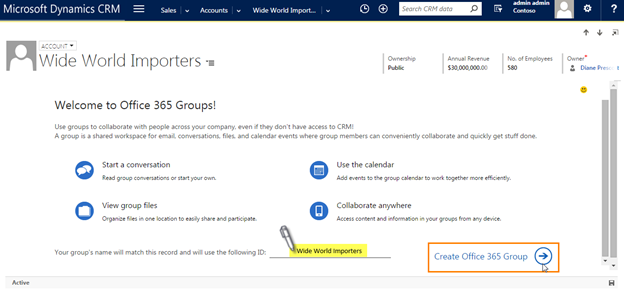
The group name will auto populate to the record name. Prior to creation you can edit the Group Name here. For our purpose, we didn’t find doing so useful.
Select the Create Office 365 Group link. The system will create a group and load the group page.
After creation, the Dynamics CRM record’s Office 365 Group page will appear with access to new tools.
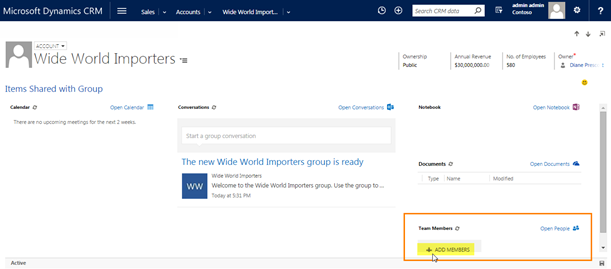
Click Add Members, in the Team Members section.
Outlook will open in another tab, with the Groups admin area open.
Click Add Members
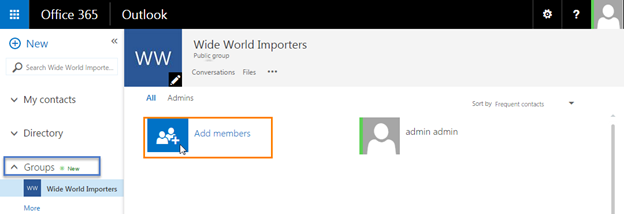
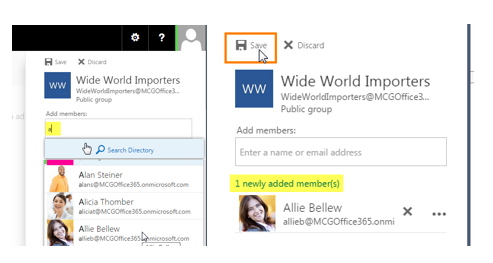
A side panel will slide in displaying a look-up to the directory. Use it to search names and add members.
Enter a Partial Name > Click Search Directory > Click User > Click Save
Users receive an email confirmation containing bold subscribe & explore tiles for the group. Note that while within Outlook, a non-Dynamics CRM group member will use the ellipse to navigate the same sections displayed on the Dynamics CRM record’s Office 365 Group page:
Conversations, Calendar, Files and Notebooks. The familiar Microsoft Add to Favorites is there too.

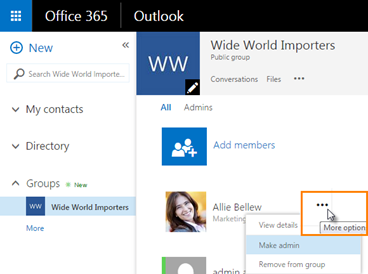
Groups must have at least one administrator, by default it will be the creator. There is no limit on the number of administrators. To add or remove a team member as an Admin click the more options Ellipse and select make an admin.
Access Dynamics CRM’s Office 365 Group Features
Once you’re set up, users can start using OneNote directly from Microsoft’s Dynamics CRM Collaboration Pane. These notebooks will be accessible to the group via Notebook on the group page as well.
Access the Dynamics CRM Record > Click > OneNote > Select Notebook
The notebook will open, preview below:
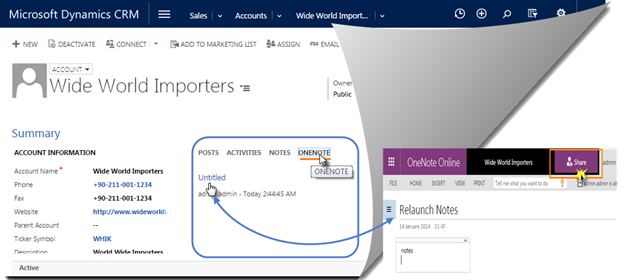
Then start exploring the Office 365 Groups page it’s intuitive and users can begin using the calendar, conversations, Notebooks and documents sections right away. All from the Dynamics CRM record.
Menu > Sales > Accounts > Specific Record ex. Account > Navigation Bar Drop Down > Office 365 Groups
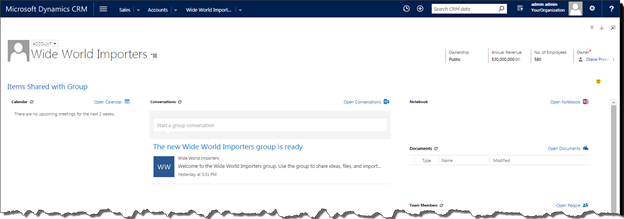
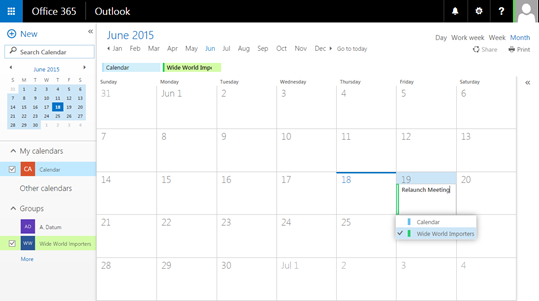
Use Calendar to add meetings in the familiar Outlook User Interface and apply them to any Group’s Calendar.
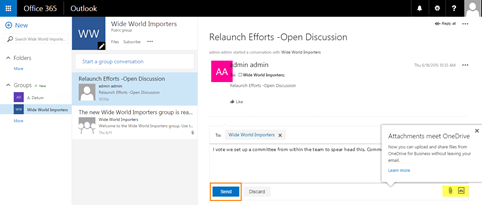
Use Conversations in between meetings to get more done. Example nominating a committee to get meetings and agendas in order before everyone meets.
Use Notebook to access all the groups’ related notebooks.
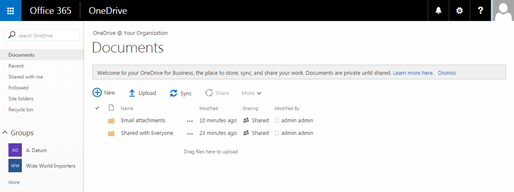
Use Documents to explore collaborating and sharing documents
We hope these consolidated instructions can help your organization begin using the Dynamics CRM Office 365 solution today. If you have more questions about Microsoft Dynamics CRM 2015 or you are looking to upgrade your system, contact RSM LLP at crm@rsmus.com or by phone at 855.437.7202.
By: Kellie Williams – California Microsoft Dynamics CRM partner

 RSMUS.com


