One of the continuing ways to extract data from Microsoft Dynamics 365 for Finance and Operation, Enterprise edition is to use the OData connector. For our purposes, we will be using data that we gather from a variety of sources that we transform using Power Query and then render in Power View using Excel 2016. This article is an update to an earlier TechNet series on the same topic for Microsoft Dynamics AX 2012; I have updated for the tools and menus that you see today. In this exercise, we will be extracting the data from document management using OData, import external data, merge the data, create a calculated column, and finally display using Power View. As a bonus, we will also render this information in Power BI.
This is part four of a four-part series on this topic. Parts one and two worked with Power Pivot. Part three worked with Power Query, Power View and AX 2012. This one completes the series by using Power Query, Power View and Dynamics 365 for Finance and Operations, Enterprise edition. Each time we are modeling the same tools only using different connections and a bit different data. The purpose of this is to support both groups of implementations and to transition you quickly to the new Dynamics 365 for Finance and Operations, Enterprise edition tools.
Extracting Data From ODATA
We will need to get our data from Dynamics 365 for Finance and Operations, Enterprise edition and in this case, we will be using data from an OData data source. For this process, we will connect to an existing query called CustInvoiceSRS that has a custom filter called USSalesUSMF2011. Please see my earlier article on AX 2012 Power Pivot for instructions to create an OData feed if none exists using Document Management.
To connect to an OData feed:
- Open Excel.
- Click the Data
- Click New Query in the Get & Transform
- Click From Other Sources.
- Click From OData feed.
- URL, enter:
https://<YOUR SERVER NAME HERE>.cloudax.dynamics.com/data
- Click OK.
- If asked for authentication, use organizational credentials from AAD to connect.
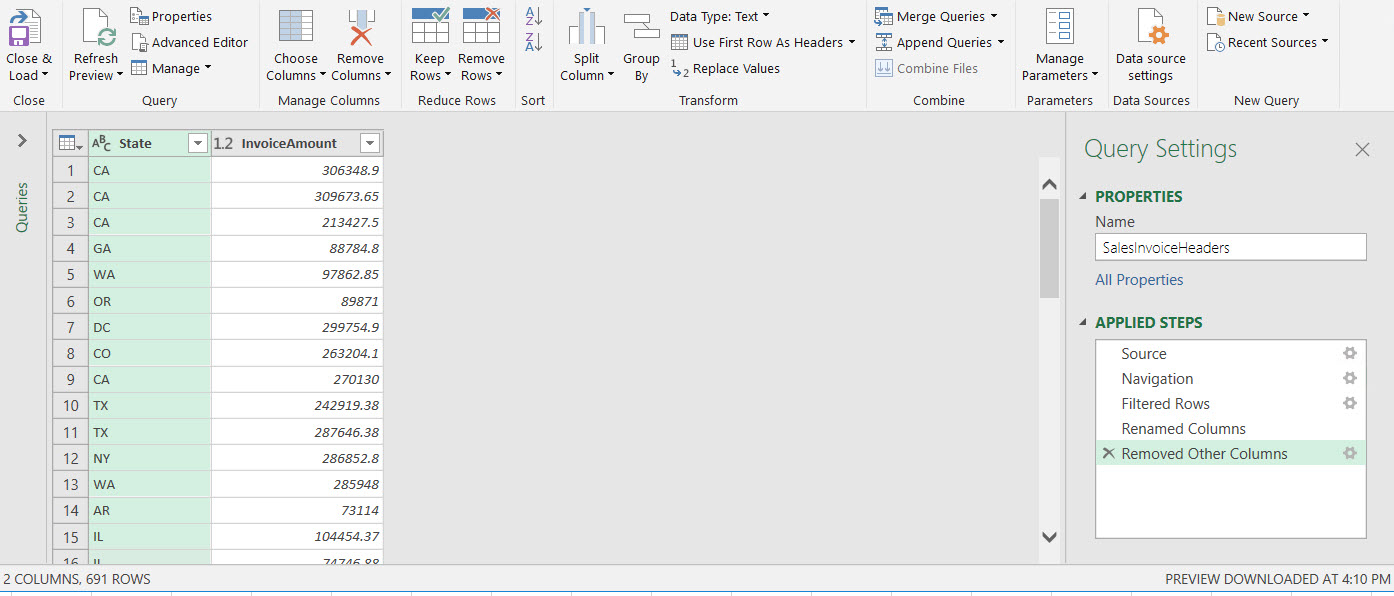
- Choose SalesInvoiceHeaders.
- Click Edit to use Power Query to filter the data.
- Isolate transactions in US Dollars – click the CurrencyCode column drop-down and select only USD. Rename to Currency.
- Remove the transactions don’t have an identified state. – click InvoiceAddressState and unselect (blank). Rename to State.
- Rename TotalInvoiceAmount to InvoiceAmount.
- Remove columns that aren’t needed – Select the Currency and Invoice Amount Right-click the selection and then click Remove Other Columns.

- Click Close & Load. The data is added to your workbook in a new tab.
Importing External Data
One of the key ways to explore new data sets is to find information that is external that can be used for summary purposes or to update the data. In this case, we will be using the population data from Wikipedia and abbreviation data from a website.
To add external data:
- In Excel, click Data tab > New Query > From Other Data Sources > From Web.
- In the URL enter:
https://en.wikipedia.org/wiki/List_of_U.S._states_and_territories_by_population
- Click OK.
- Select Population of states, territories, divisions and regions.
- Click Edit to use Power Query to filter the data.
- Rename the State/Territory/Division/Region column to State.
- Rename the 2013 column to Population. Set the Data type to Whole Number.
- Select State and Population, right click and Remove Other Columns.
- Click Remove errors to eliminate areas without populations listed.
- Click Close & Load. The data is added to your workbook in a new tab.
- Click Data tab > New Query > From Other Data Sources > From Web.
- In the URL enter:
www.50states.com/abbreviations.htm
- Click OK.
- Select State Abbreviations.
- Click Load.
- The data is added to your workbook in a new tab.
Merge data and calculate
We are now ready to merge the data and create a calculation.
To merge the data.
- In Excel, starting with Sheet2 that contains the Sales data, select the table.
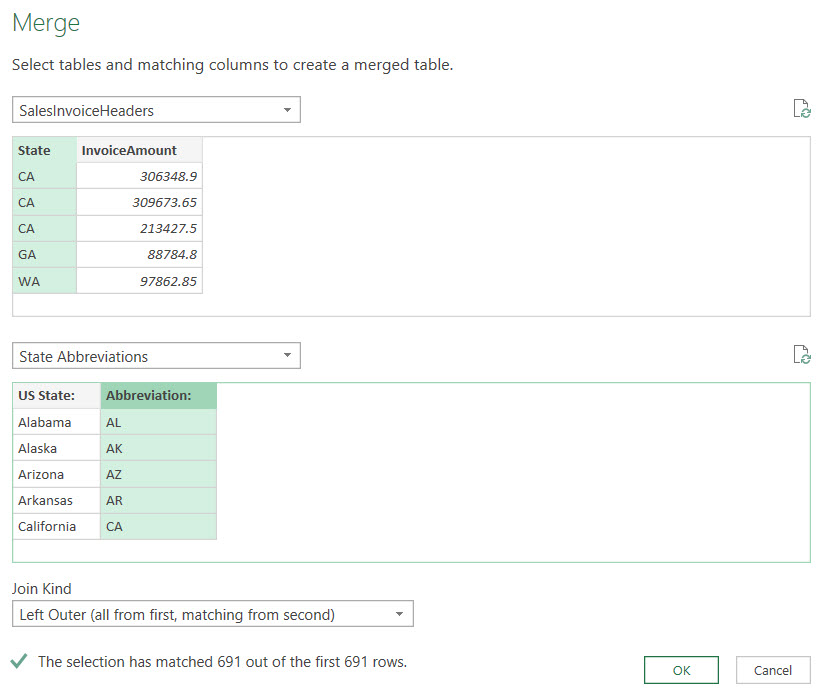
- Under Query Tools on the ribbon, select Query > Merge.
- Select State Abbreviations as the second table.
- Select columns State and Abbreviation:

- Click OK.
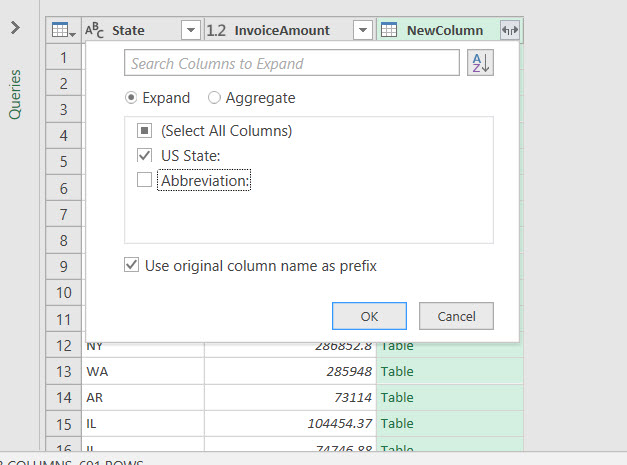
- Click NewColumn double arrow, unselect Abbreviation > Click OK.

- Rename the new column State Name.
- Click Close & Load. The data is added to your workbook in a new tab.
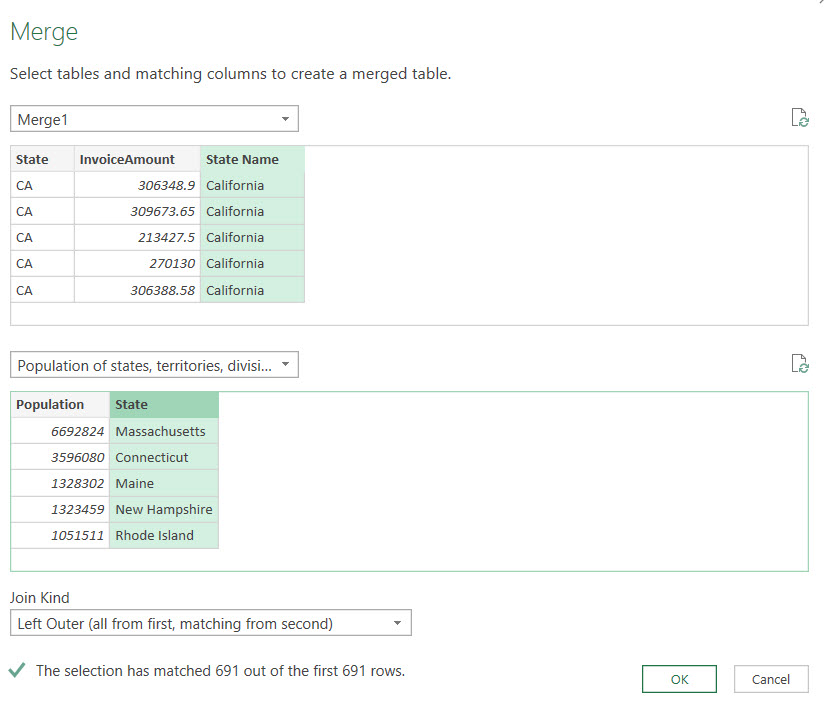
- Click Query > Merge.
- Select Population of states, territories, division… for second table.

- Click OK.
- Click NewColumn double arrow, unselect State > Click OK.
- Rename the new column Population.
- Click Add Column.
- Click Custom Column.
- Enter
100*([InvoiceAmount]/[Population])
- Click OK.
- Rename the column to Sales per capita.
- Click Home
- Click Close & Load. The data is added to your workbook in a new tab.
- Save your Excel file, if you haven’t already.
Display using Power View and Power BI
Now our data set is ready for us to render the information. The goal is to better understand the information graphically so that we can make inferences or decisions.
To graph data.
- In Excel, starting with Sheet6 that contains our master data set. Select the table.
- Click Insert
- Click Power View. If no Power View is available, use the Help to configure the button as it varies by version.
- Select the newly created table.
- Click Other Chart in the Switch Visualization group.
- Select Scatter. Expand to fit page. Here is an example of what it will look like:
- Title your work.
- Save.
- In Power BI, click Get Data.
- Under Files, click Get.
- Local File.
- Select the file you created earlier.
- Click Open.
- Click Upload.
- Under Workbooks, open the file and review.
This article explored the process of using Dynamics 365 for Finance and Operations, Enterprise edition to visualize data within a Pivot View, which can be easily be translated to a Power BI dashboard. Through the process of creating several different renderings of the data, you can quickly interact with the set of information and create inferences for decision making.
For more information, I would recommend that you attend our Dynamics AX2012 or Dynamics 365 for Finance and Operations, Enterprise edition training in person or on-demand online to learn more.
Plus, keep an eye out for more articles that dive into the technical aspects of using Excel, X++ code, and PowerBI. Please visit academy.rsmus.com for more information and training materials that will cover this and 100’s of other topics for AX2012 and Dynamics 365 for Finance and Operations, Enterprise edition.
by Shaun McMikle for RSM

 RSMUS.com


