The Inventory Status feature is a core function of NetSuite that allows you to associate attributes to items to drive internal processes. In today’s fast workplace environment, effective inventory management is the key to success. For those using NetSuite, understanding how to utilize inventory statuses can significantly enhance operational efficiency. Throughout this post, we will dive into:
- What is an inventory statuses / Why is it important for businesses?
- How to use.
- How to change.
What are Inventory Statuses within NetSuite:
Inventory statuses in NetSuite are used to categorize inventory items based on availability and condition. This can allow businesses to manage their stock more efficiently and effectively, making sure that items are in the correct location and in the proper condition for sale or use. These statuses can be configured to display various conditions and tag items with labels such as:
- Available (items ready for sale)
- Reserved (in stock, but set aside for a specific customer)
- Damaged (items that are unsellable for quality reasons and are to be returned to vendor)
Using statuses such as those listed above can help gain visibility into inventory levels and make better, more informed decisions about purchasing, sales, and other operations.
How to Use:
1. To enable inventory statuses, navigate to Setup > Company > Enable Features.
2. Click Items & Inventory located on the blue sub header shown below.

3. Locate the inventory statuses checkbox click the box to check it.

-
- Advanced Bin/Numbered Inventory Management must be enabled as well.
4. To create an inventory status, navigate to Lists > Supply Chain > Inventory Statuses > New.
-
- Enter a name for the status and click save.
- The make inventory available checkbox is selected by default.
- If enabled, this will associate all inventory with this status available to add to orders.
- If disabled, inventory with this status will not be included in available count (example: damaged item status can have this box deselected to make items with this status not appear).

5. Inventory statuses are assigned after an item is ordered and is received to your inventory. When receiving items, on the item receipt you can assign statuses to items as they come in.

How to Change:
Changing inventory statuses is important to maintaining correct item information and monitoring correct stock levels. To maximize business processes, ensure that inventory statuses are updated regularly and train your team on the importance of managing them effectively.
In order to change inventory statuses:
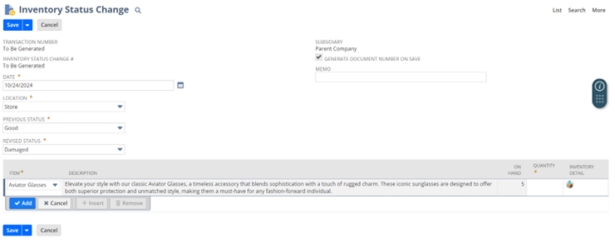
- Navigate to Transactions > Inventory > Inventory Status Change.
- Select the store location that the item is located within.
- Using the dropdown list, select the previous status and then select the status you want to change the item to have.
- Select the item at the bottom and then choose the quantity of the items you want to have changed
In the example below, let’s say you have flooding within your store and some products were damaged, those aviator glasses that were originally good, now are damaged and will need to be disposed of. You can update your inventory status by choosing the revised status as damaged and then selecting how many are damaged by adding in the quantity. Once you save, your quantity on hand will update and show the remaining items on hand without including those that were damaged.

Conclusion:
Inventory statuses in NetSuite are a powerful tool for managing inventory effectively. By training your team to understand how to use and change these statuses, your business will be able to improve visibility and enhance order fulfillment. Embrace this tool and watch your inventory management process transform into a more organized and effective system.

 RSMUS.com