Purpose: Calculate Commissions based on profit per line by using Custom Commission Fields.
USE CASE: “Commissions are paid based on collected payments to invoices (partials as well). Commissions are also required to be based on profit per line.”
The Incentive Management Module offered by NetSuite brings a plethora of tools to manage most commission models you can think of. One of these tools is the capability to use Custom Column Fields to host the commission per line. Using this feature, in combination with the now available Workflow Sublist Action Group, allows you to elaborate very creative profit per line calculations. This powerful combination provides a much easier solution than using the old method of scripting and enabling Alternate Sales Amount.
Some of you might say, why use a Calculated Column field if you can just enable Gross Profit? Well…here is the issue, what do you consider profit and/or cost?
Calculating Profit: If we have a simple formula to calculate gross profit as Profit = Revenue – Cost, then let’s examine the two main variables that make up that formula.
Estimated Revenue: This one is simple right? Let’s just make it the Rate field on the item. Do you apply discounts? Okay, then Revenue is then Unit Price (Rate) – Unit Discount (is a discount applied to the whole sales order or per line or for specific promotion?) So you see how it starts to get a bit complicated? Here is where you can use a Custom Column Field to host the desired calculation.
Estimated Cost: If you use the Gross Profit feature, NetSuite explains that the “Cost Estimate Type determines what value NetSuite uses to calculate estimated Gross Profit. The estimated Gross Profit for Items on a transaction provides the data needed to calculate the total estimated Gross Profit on that transaction.” Understanding how NetSuite calculates each Cost Estimate Type is beyond this blog, but you will need to pick a model when using Gross Profit. Also, remember the object of this exercise is to pay commissions, so a very volatile cost will only bring unnecessary disputes with commission agents. Coming up with the best alternative for both the business and Sales Reps is important. If you have an alternate method, you can then use the Custom Column Field to host that calculation. For example, you would like to use the highest of the cost from Average Cost, Item Defined Cost, and Last Purchase Price. You can then incorporate the formula. At the end of this document, you can find a description of NetSuite’s Cost Estimate Types.
For this exercise we will use the function Greatest (value1, value2,…) and use the greatest cost from Average Cost, Item Defined Cost and Last Purchase Price.
Here are the steps to create a simple profit per line:
- Create a Custom Column Field
-
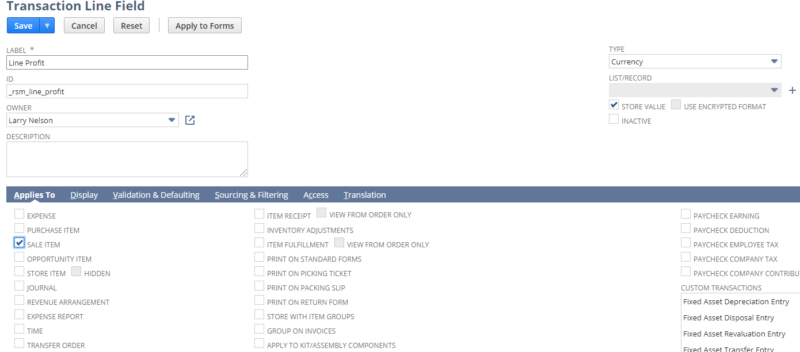
- Go to Customizations>List, Records, & Fields>Transaction Line Field>New
- Field type must be Currency
- Apply to Sales
2. Select any sales item, go to the Sales/Pricing tab and locate the Cost Estimate Type. Select Item Defined Cost (this will apply to all items). For each item, you will need to add the corresponding Item Defined Cost, found on the same page/tab. This is not the best method to maintain either, again select the best method that applies to your company or calculate.

3. Create a Workflow to incorporate the profit calculation
-
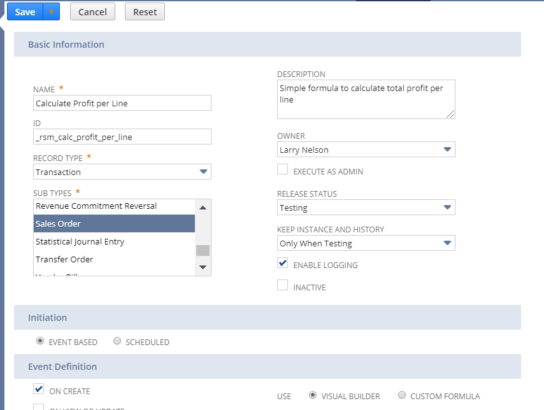
- Select Transaction on the record type
- Select Sales Order on the Sub-type. In this case, our customer did not use Sales Orders, uploaded Invoices from a separate system. Unfortunately, the Incentive Module does not work from Invoices, rather, we had to Import the Invoices as Sales Orders and use a workflow to transform these automatically to Invoices.
- Save the workflow header
-
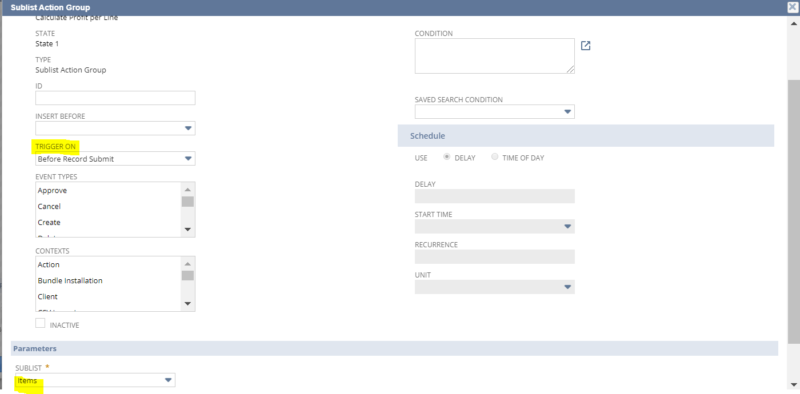
- Create a Sublist Action Group on Items (version 2020.1 now offers Expenses as well) triggered on Before Record Submit.
-
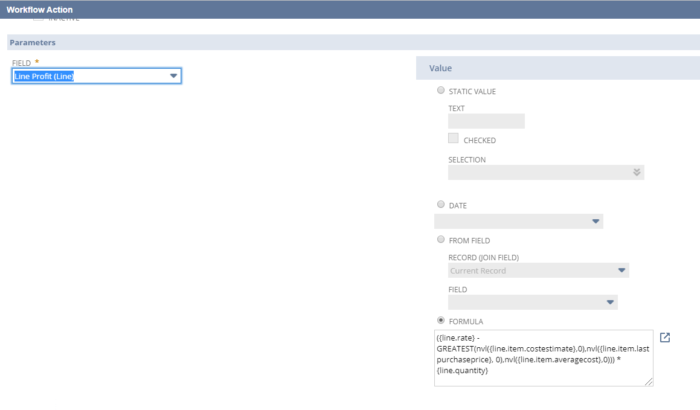
- Create the Action that will calculate the profit per line. Open the Sublist Group and create a New Action, select Set Field Value as the desired Action:

-
- Select the Line item you created and use the formula to calculate your profit. The formula below does not include testing for if the item is commissionable nor it calculates the tax portion of the cost. For simplicity purposes, it only calculates the profit using the (unit price (Rate) – GREATEST (of the three costs on the item: Item Defined Cost (costestimate), Item Purchase Price (lastpurchaseprice), Average Cost) multiplied times the quantity sold.
Sample sales order
For demonstration purposes, we show the different costs on the item and profit information, normally this would be restricted from view. Using the normal Gross Profit feature, the Estimated Gross Profit results in a positive amount of AUD 125.06 based on the Rate of AUD 650 – Line Item Defined Cost of AUD 400, however, using the GREATEST of the three different costs, we see that the Last Purchase Price had a negative effect on the Gross Profit. The formula, in this case, should have placed a zero value on the commission line profit as a result. Also, the Line Item Defined Cost is showing the Base Currency which is USD, so it would first have to be converted to AUD (exchange rate at the time 1.31234998) in order to get the value of AUD 524.94. The key point was to demonstrate the versatility of using Calculated Custom Item Fields for Gross Profit Commissions.

4. Create your Commission Schedule using Custom Item Field.
-
- Go to Lists>Commissions>Employee Schedules>New
- Provide a name to the Commission Schedule
- Select Commission on Custom Field
- Use the drop-down on Custom Field and select field you created
- Select Flat Rate for Calculation Scale
- Under Per select Transaction Line Item, and
- Select Commissionable Saved Search on the Categorized By (you can select other categorization). In this case, a Commissionable Saved Search was utilized to restrict only Sales Orders with Line Profit > Zero
- Select Eligible on Collections (as commissions are to be reported on paid invoices including partial payments. If you report commissions on fully paid invoices, then select the checkbox for Commissions Eligible on Fully Paid Invoice Only)
- In the Collections Eligibility drop-down list, select Percentage of Order. This is critical if using the Custom Field, First In will not work.
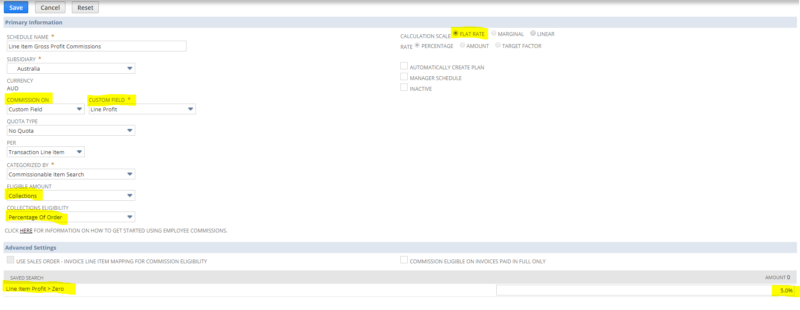
That is it, you would now finish the configuration by creating a Commission Plan and assign Employees to the Plan.
NetSuite’s definition of the different Cost Estimate Types
The following Cost Estimate Types on Items are available:
- Item Defined Cost – a user-defined amount, entered into the Item Defined Cost field on the Item definition page.
- Average Cost – NetSuite calculates an average cost of the units purchased.
- Last Purchase Price – This field displays the most recent purchase price of the item as determined by purchase order receipt transactions.
- Purchase Price – Price entered that you pay for this item. If you do not enter a price, then the most recent purchase price from purchase orders provides the price for this item by default.
- Preferred Vendor Rate – This option is only used if the Multi-Vendor feature is enabled and multiple vendors supply the same item.
- The first priority is to use the preferred vendor rate if defined on the Item record.
- The next priority would be to use the purchase price.
- The last priority would be the purchase order rate. (Initially, this uses the preferred vendor rate cost, and then after a purchase order is entered, this type uses the most recent actual purchase order rate. Special orders and drop-shipped items use this cost information.)
- Derived from member items – Total costs of items currently included in a kit. This Cost Estimate Type only applies to kits and sums the estimated costs of each item in the kit, based on each of their individual Cost Estimate Types. Uses the latest definition of the kit, not its historical definition.
If you would like more information on this topic or others related to NetSuite, please reach out to RSM’s NetSuite professionals by contacting us at NetSuite@rsmus.com or call 855.437.7202.

 RSMUS.com