Assigning permissions in any ERP system is always a balancing act. You want to make sure that your users don’t have access to the areas they’re not supposed to be, and have the permissions they need to do their job, all without putting an excessive burden on you to manage and maintain those roles. While designing roles in NetSuite doesn’t eliminate this balancing act, if you follow a few simple best practices, you can make the process much easier on yourself and your users, ensuring that you maintain the flexibility you need without compromising your permission requirements.
1. Always rename your standard roles prior to using them
Starting with the standard NetSuite roles that come with your account, rather than creating roles from scratch, can help jump-start your role design and give you a good sense what types of permissions might be required for different positions within your organization. While it can be tempting to just assign these standard roles to your users as a starting point and refine your roles later, you should always edit and rename the standard NetSuite roles you are going to assign, even if you think you are not going to make any changes to the permissions assigned to the standard role. The reason for this is that the default roles cannot be edited and users’ personal preferences and dashboard changes are saved with the role, so if you do need to make a change later you’re going to end up wiping out any personalization that user performed. Be safe and edit the standard role you want to use and save it as a new name, that way you can always come back and edit the permissions assigned to that role without impacting the user’s personalization.
2. Consider the center type carefully
Look carefully at the center type assigned to each role. This seemingly small detail controls the way NetSuite’s navigation menus are organized as well as the standard dashboards that appear with this role and the published dashboards that you are allowed to assign to this role. This is especially important if you are creating documentation to help guide your users through NetSuite tasks or publishing the same dashboard to multiple roles within your organization. Since navigation menus are different for each role, any documentation that includes navigation directions will need to be created for each center type. Additionally, when you publish a dashboard, only roles with that center type will be able to use this dashboard. If you like having a different layout for different employees within your organization, center types can be very useful, but if you prefer having consistency throughout your organization, you may want to consider assigning all roles the same center type.
3. How many roles should I create?
An important consideration when designing your roles is whether you should assign one role per person or whether it makes sense to split up some of the permissions into multiple roles. Typically, if the positions within your organization are relatively stable over time, each person should have only one primary role assigned. Each distinct set of permissions should be created as a separate role, whether there is one person or a hundred people utilizing that role. However, if you have consistent change in the duties required by each employee, it may make sense to manage your permissions by breaking them into smaller chunks that can be assigned to a specific role, that way each user can be assigned multiple roles, which together, comprise all the permissions they need. This strategy minimizes the impact on the role administrator(s) but does require users to flip back and forth between different roles to access all the permissions they require, and therefore only makes sense when permission requirements are very temporary or in constant flux, making managing a single role per distinct permission set infeasible.
4. What permission do I need to give a user to perform a specific function?
NetSuite gives you a lot of control over what you can allow users to do in NetSuite by restricting their role(s). Unfortunately, all this power means there are a seemingly endless amount of options to select for user permissions. Fortunately, there are a couple tricks that can help you identify what permissions a user needs to perform a certain task within NetSuite. The permissions documentation excel spreadsheet is a very valuable resource provided by NetSuite that can help with this. To access this document:
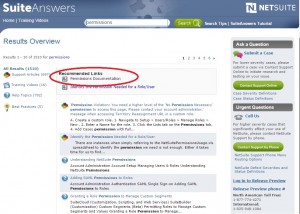
- Navigate to SuiteAnswers and search for “permissions” or “permissions documentation”.
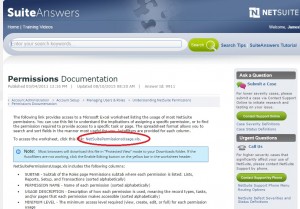
- Click on the Permissions Documentation link to access the SuiteAnswers article.

- Click on the NetSuitePermissionsUsage.xls link to download the excel spreadsheet

This spreadsheet provides a list of all the permissions, where to find the permission when editing a role, and a description of the functions they allow access to. Doing a quick Ctrl+F to search the spreadsheet for a certain action, task, or record can help easily identify what permissions a role will need. If you’re still unclear on what permission is required to access a certain area, log in as an administrator, go to that area and copy the URL. Log into the role without the necessary permissions (or create a role with no permissions), paste the URL and hit enter. You should get a Permission Violation Error that will tell you the permission necessary to access that page.
RSM has helped thousands of customers successfully go-live with their software implementation. For questions on implementing this specific functionality or for questions on any other topic related to NetSuite, please contact us at erp@rsmus.com or by phone at 855.437.7202.
By: James Morris – Virginia NetSuite Solution Provider

 RSMUS.com