
 RSMUS.com
Does your company struggle with efficiently uploading and organizing files within NetSuite? Within minutes of setup, your company could easily be utilizing NetSuite’s File Drag and Drop feature. The File Drag and Drop feature (BETA) will allow the end user to upload files directly to a record or transaction with one click and drag motion as seen in Figure 1. Depending on the record/transaction and the level of detailed setup completed for the feature, files could then be uploaded automatically to previously specified folders within NetSuite’s file cabinet/document library. This compares to the standard feature of file uploading which is found on the record/transaction under Communication>Files.
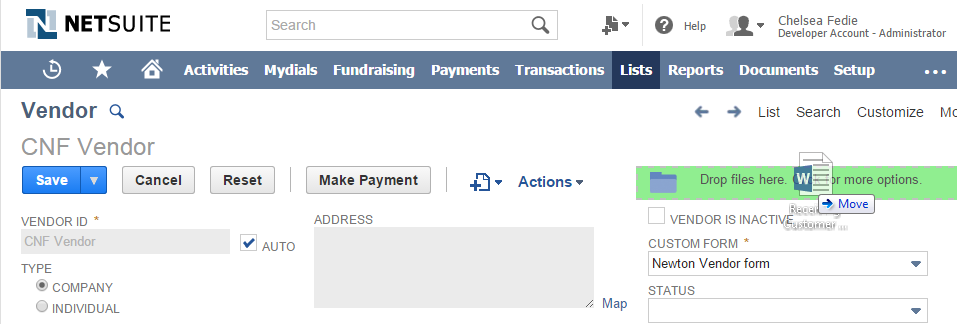
Figure 1
Before downloading the bundle, access the File Cabinet (Documents>Files>File Cabinet) and create the desired folder structure. This is important as when going through the feature setup, a prompt will appear to assign folders to drag and drop uploads to certain record types. Customization at this point can be as detailed as an individual folder for purchase orders or as general as on global folder for all drag and drop uploads. This is determined by what would best suit your file organization business needs.
Download bundle ID 41309 File Drag and Drop and complete the setup is which is found under Setup>Customization>File Drag and Drop Setup. The File Drag and Drop Setup Assistant will appear with 3 steps to complete, File Drag and Drop Preferences, Enable File Drag and Drop on Record Types, and Summary. Within preferences, specify the global folder destination where all files will be uploaded to when the drag and drop feature is utilized. To setup the more detailed folder uploads per record type, advance onto the next section, Enable File Drag and Drop on Record Types. Select the New File Drag and Drop Record Type option and add each record type by assigning a folder for which all drag and drop uploads will be saved to. An example of this setup is seen in Figure 2.
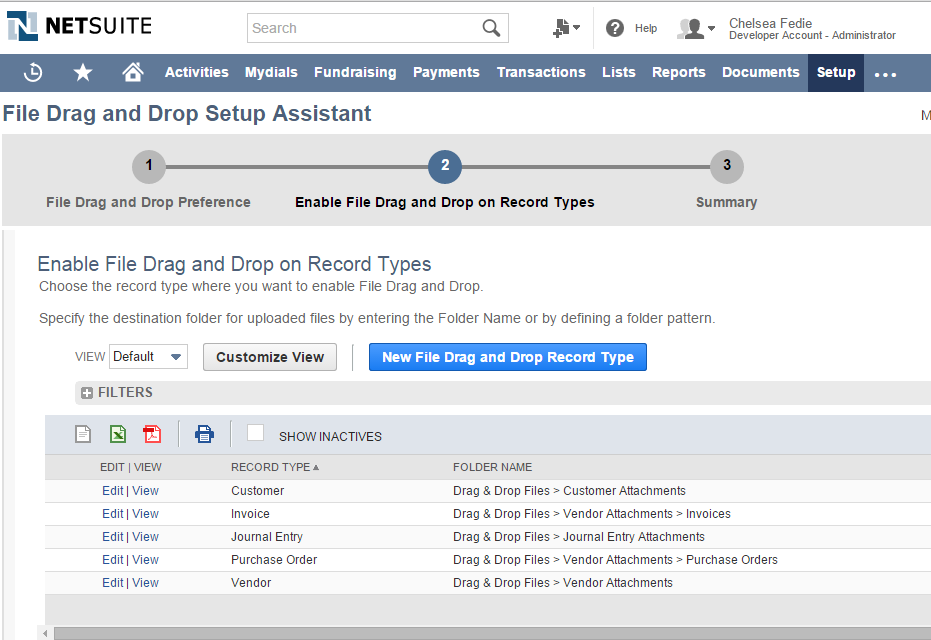
Figure 2
In order to finalize and review the setup, move along to the Summary section of the setup assistant. Review and select Finish once approved. Your account is now ready to utilize the File Drag and Drop feature. The dashed Drag and Drop box will now appear in the upper right hand corner of records when in edit mode. If a file is uploaded in error or any edits need to be made to the file/folder destination, the standard functionality is still available under Communication>Files.
File Drag and Drop can be very useful for an end user who uploads attachments from a wide range of records/transactions including but not limited to excel backup spreadsheets on journal entries or vendor service agreements on vendor records or purchase orders.
If your business is interested in increasing efficiencies and organization around file uploads in NetSuite, don’t hesitate to explore your options and seek out the knowledge of RSM’s NetSuite professionals by contacting us at erp@rsmus.com or call 855.437.7202.
By: Chelsea Fedie – Minnesota NetSuite Solution Provider
RSM Staff
RSM empowers middle market companies worldwide to take charge of change. Our unique middle market perspective makes RSM the natural choice for growth-oriented, internationally active organizations seeking relevant insights and tailored, innovative solutions for a complex and changing world. With a global reach spanning more than 120 countries, we instill confidence in a world of change by bringing the full power of RSM to make a lasting impact on our clients, colleagues and communities.