
 RSMUS.com
How to Expose Customer Entity Bank Details in a NetSuite Saved Search
A Saved Search in NetSuite is an ad hoc report that is a dynamic list of results and provides more flexibility than reports. Considering recent economic events, you might find this particular saved search to view the Entity Bank Details of your Customers useful (SuiteAnswers ID: 62745).
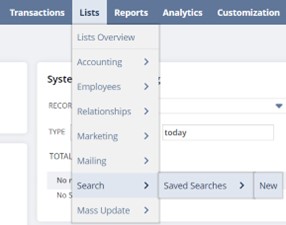
Step 1: In your NetSuite account, navigate to Lists > Search > Saved Searches > New
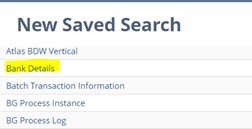
Step 2: Select “Bank Details”
Step 3: Enter a Search Title: E.g. “Customer Entity Bank Details List”.
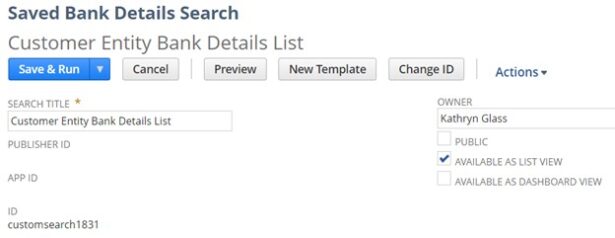 Note: Under the “Audience” tab, select the users you want to have visibility to make this search available to all users with sufficient permissions. To multi-select hold the Ctrl key and select the roles or employees. This setting allows these users to run the search and view the search’s results. You can also allow them to edit the search.

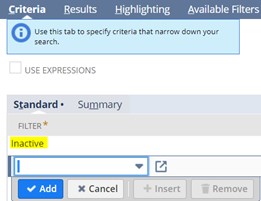
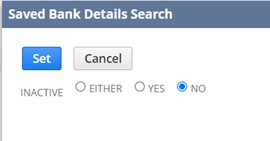
Step 4: Select Standard Criteria: Inactive and set as “is false”.
This returns only non-inactive results. Be sure to hit the “Add” button or your selection will not save.
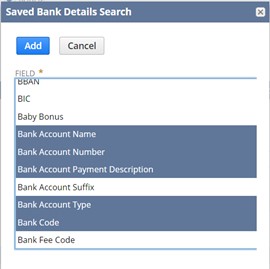
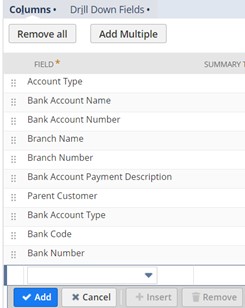
Step 5: Select Results Fields.
Click “Remove all” to clear the field selections. Hit “Add Multiple”. To multi-select hold the Ctrl key to scroll and click on the desired fields listed below.
Field:
- Account Type
- Bank Account Name
- Bank Account Number
- Branch Name
- Branch Number
- Bank Account Payment Description
- Parent Customer
- Bank Account Type
- Bank Code
- Bank Number
Step 6: Click Save & Run to view results.
Click the Excel Icon to export results to .xls file.

If you have any additional questions regarding how to utilize NetSuite saved search, please contact our team.

RSM Staff
RSM empowers middle market companies worldwide to take charge of change. Our unique middle market perspective makes RSM the natural choice for growth-oriented, internationally active organizations seeking relevant insights and tailored, innovative solutions for a complex and changing world. With a global reach spanning more than 120 countries, we instill confidence in a world of change by bringing the full power of RSM to make a lasting impact on our clients, colleagues and communities.