RSMUS.com
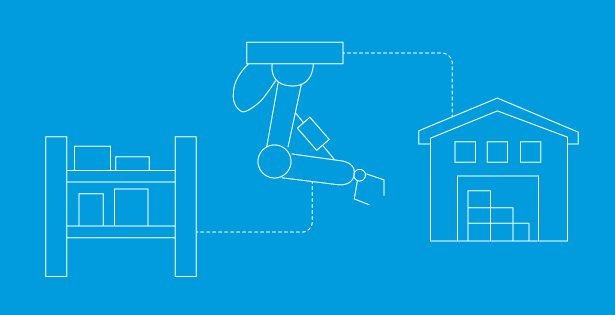
Managing intercompany transaction is a crucial aspect of accounting for businesses with multiple subsidiaries. NetSuite intercompany development framework offer a feature called pairing intercompany transactions that provide a streamlined way to reconcile related record, such as standalone vendor bills and invoice, without utilizing SO and PO. This feature is particularly useful for business with multiple subsidiaries that ad hoc or non-standard intercompany transaction, where flexibility and efficiency are key. By pairing these transactions, business can ensure accuracy and improve visibility and reduce the time spent on manual reconciliation. In the following, we’ll walk you through how to pair intercompany transaction in NetSuite to simplify your financial process.
Pairing intercompany transaction requires creating 2 standalone transactions, such as vendor bill and invoice. You can create transaction in any order.
Step 1: Reveal the ‘Paired Intercompany Transaction’ Field
- Navigate to Transactions > Payables > Enter Bills.
- Click on Customize, and then select Customize Form.
- Click the Screen Fields subtab and locate the Paired Intercompany Transaction box. Check this box to enable the field.
- Click Save.
- Repeat steps 1-4 for the Invoice form.
- The Paired Intercompany Transaction field should now display on both your Vendor Bill and Invoice forms.
Step 2: Enter the Vendor Bill
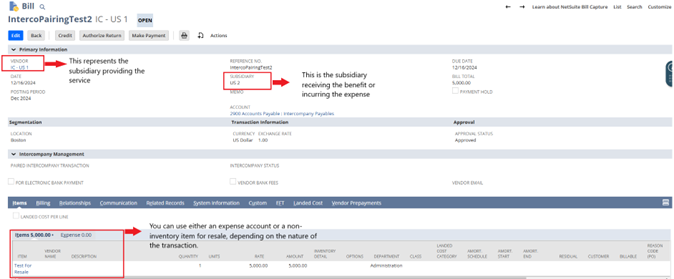
- Navigate to Transactions > Payables > Enter Bills. If you are in the Accounting Center, go to Vendor > Purchases > Enter Bills.
- On the Vendor Bill form, ensure you are using the Intercompany Form.
- In the Vendor field, select the intercompany representing vendor.
- Example: If Subsidiary US-1 is providing the service or paying on behalf of Subsidiary US-2, select Subsidiary US-1 as the vendor.
- In the Subsidiary field, select the subsidiary receiving the bill.
- Example: If Subsidiary US-2 is the one incurring the expense, select Subsidiary US-2.
- In the Items subtab, select a non-inventory item for resale if the cost is related to goods or services intended for resale or tracking under Cost of Goods Sold (COGS). If the cost is an operational expense (e.g., rent, insurance), use the Expenses subtab and select the appropriate Expense Account.
- Enter the relevant details in the line item fields, such as Amount, and fill in required segments like Department, Location, or Class.
- Once all the information is entered and verified, click Save to create the Vendor Bill.
Step 3: Enter a Customer Invoice
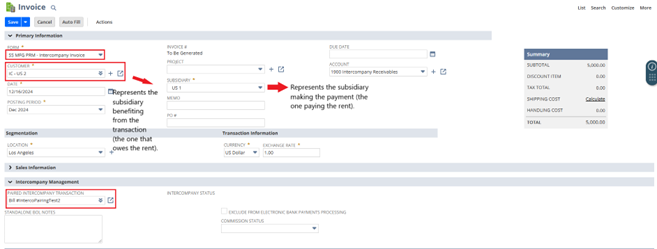
- Navigate to Transactions > Sales > Create Invoices. If you are in the Accounting Center, go to Customer > Sales > Create Invoices.
- On the Invoice form, ensure you are using the Intercompany Form.
- In the Customer field, select the intercompany representing customer. This customer must match the subsidiary specified in Step 2.
- In the Subsidiary field, select the subsidiary paying the bill.
- Example:
If Subsidiary A paid an insurance expense on behalf of Subsidiary B, the subsidiary field on the invoice should be set to Subsidiary A (the origin of the payment).
- Example:
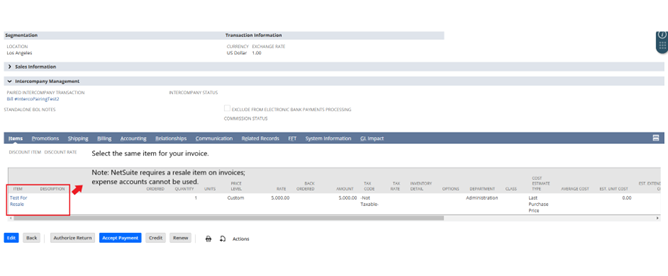
- In the Items subtab, select an intercompany item for resale.
- Note: You must use a resale item because it is the only item type that allows an income/expense account to be selected.
- In the Paired Intercompany Transaction field, select the Vendor Bill created in Step 2.
- Click Save.
Step 4: Verify Intercompany Transaction Pairing Status
- Go back to the Vendor Bill created in Step 2.
- Locate the Paired Intercompany Transaction field and verify that the Invoice created in Step 3 appears.
- If the invoice does not appear, click Edit on the bill and manually select the invoice in the Paired Intercompany Transaction field.
- Verify the intercompany pairing status. If NetSuite identifies a match, the Intercompany Status field will display ‘Paired’.

Note:
- NetSuite displays only those transactions that match the correct combination of subsidiary, entity, currency, and document status. If the list appears empty, it could be because one of these criteria has not been set or is unavailable NetSuite filters relevant transactions based on these selections in the specified order. If you select these criteria out of order, NetSuite may display transactions that do not match the intended combination. To ensure accurate results, follow this order when making your selections:
- Subsidiary
- Entity
- Currency
- Paired transactions cannot be deleted directly. To delete a paired transaction, first clear the Paired Intercompany Transaction field and save the record. Then, in edit mode, go to Actions > Delete to remove the transaction.
Kayleen Huang
Oracle Netsuite Consultant