
 RSMUS.com
Managing expense reports manually can slow close timelines, increase data entry errors, and limit visibility across departments. Importing expense reports directly into NetSuite streamlines the process, improves accuracy, and centralizes employee expense data in a single, auditable system.
For organizations processing high volumes of expenses or supporting multiple entities, currencies, or approval of workflows, NetSuite’s CSV import functionality offers a scalable, efficient solution. This blog walks through how to enable expense reports in NetSuite, import single and multiple expense lines, manage multi-currency expense reports, and approve submitted expenses with confidence.
Enabling Expense Reports in NetSuite
To enable expense reports:
Navigate to Setup → Company → Enable Features
Under the Employee subtab, select the Expense Reports checkbox
Once enabled, NetSuite allows employees and administrators to create, import, and approve expense reports within a centralized framework.
Importing Expense Reports Using CSV
NetSuite supports importing expense reports through the CSV Import Assistant, allowing organizations to upload expense data in bulk rather than entering it manually.
To begin the import process:
Navigate to Setup → Import/Export → Import CSV Records

Importing a Single Expense Line
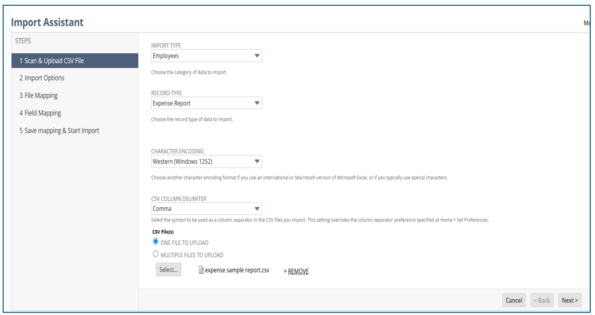
Step 1: Upload the CSV File
Import Type: Employees
Record Type: Expense Report
Select the CSV file to upload.
Click Next.
Step 2: Prepare the Expense File
Example file for uploading a single expense line per report:

Step 3: Configure Import Options
On the Import Options page:
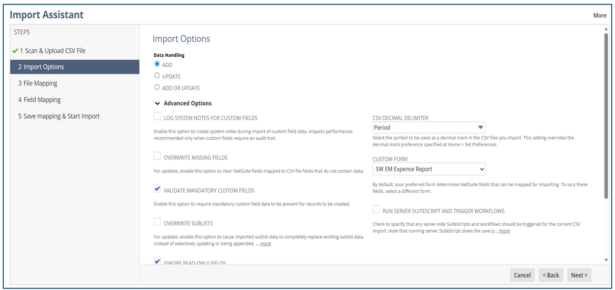
Select the appropriate fields under the Advanced Option:
- Add: creates a new record if it doesn’t already exist.
- Update: an existing record if it matches based on a unique identifier (like internal ID, external ID, or name).
- Add or Update performs both actions as needed.
Confirm the correct custom form. By default, your preferred form determines NetSuite fields that can be mapped for importing.
Run Server Suite Script and trigger Workflows. Check to specify that any server-side Suite Scripts and workflows should be triggered for the current CSV import. Note that running server Suite Script slows down the save process.
Click Next to continue.
Step 4: Map Fields
The Field Mapping page opens, where you map the expense report to upload file columns to the NetSuite fields on the right.
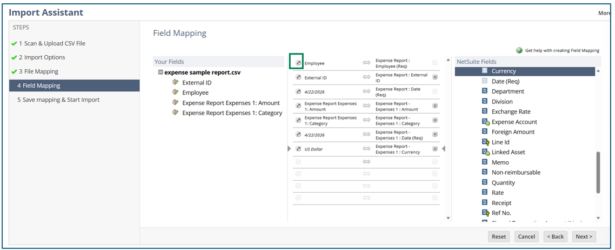
Use the pencil icon to map employees using an Internal ID when required.
Save the mapping for future imports. Save the import by entering a name for it.
Click on the Next button to proceed.
Step 5: Run the Import
Click Save and Run.

Step 6: Monitor the Import Job Status until it shows Completed
Click on the Import Job Status link and then click the Refresh button until the status shows Completed.

Step 7: Review Imported Expense Reports
Navigate to Transactions → Employees → Enter Expense Reports → List.
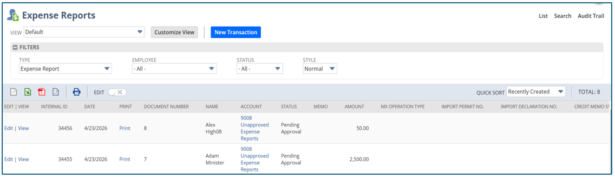
Click View to review the imported expense report.


Adding Multiple Lines in Employee Expense Reports
When expense reports include multiple line items, NetSuite requires two CSV files:
- Header file: expense report body fields.
- Line file: expense sublist details.
Multi files CSV Example
Below is the file for the header data:
Each row in the second file must include values for the Category field and, typically, for the Amount field. (If the body data for the record has Use Multiple Currencies set to No, which is the default, then Amount is required).
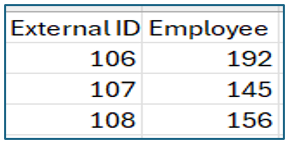
Each sublist record must also include a unique identifier that links the sublist record to an entry in the main file.
This example uses the External ID field for this purpose.

With multiple-file import, you use one file for the expense report of body fields and another file for the Expenses sublist fields.
Navigate to Setup → Import/Export → Import CSV Records.
Import Type: Select Employees.
Record Type: Select Expense Report.
Select Multiple Files to Upload in the CSV File(s).
- Primary File – Expense Report: Select the first CSV file (Expense Header).
- Linked File (Optional) – Expense Report Expenses: Select second CSV file (Expenses Line).
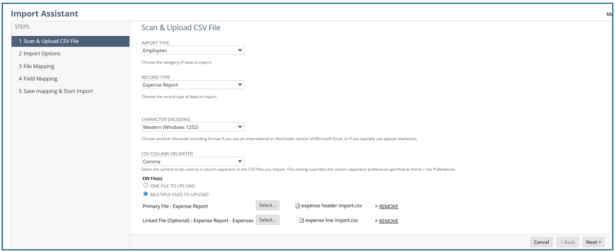
Click Next → Data Handling: Select Add → Click Next.
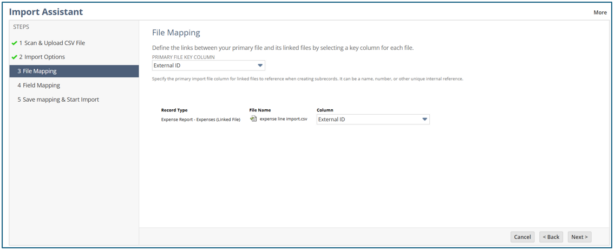
Next, on the File Mapping page:
Select External ID in the Primary File Key Column.
Map all the fields.
- Map the External ID (Expenses Line) to the Line ID field.

Click Next, then save the import by providing a name.
Click Save and Run.
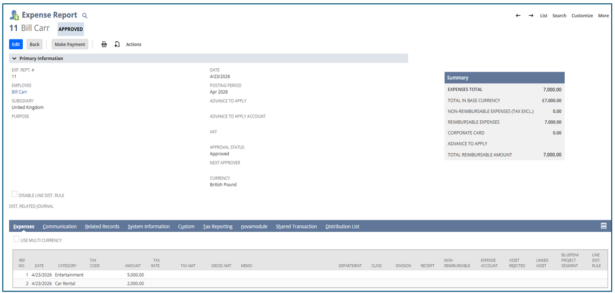
Users can check the uploaded expense report with multiple lines by going to Transactions → Employees → Enter Expense Reports → List.
Click on the View link to open the expense report.

Importing Multi-Currency Expense Reports
For organizations operating in multiple currencies, NetSuite supports importing expense reports with currency-specific line items.
- The header file must indicate that multi-currency is enabled.
- The linked expense file must include a Currency column for each line.
Example file for the header:

Example of the linked file for the Expenses sublist:

Example of expense lines with multiple currencies:

Approving Expense Reports in NetSuite
NetSuite provides built-in approval visibility through the Reminders portlet.
Add Expense Reports to Approve to your reminders by clicking on the setup.


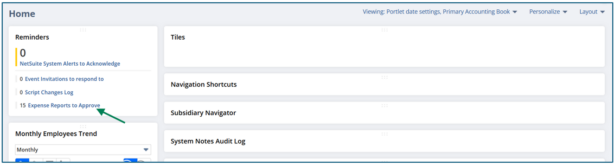
Click on the Expense Reports to Approve. It will redirect to the Approve Expense Reports.
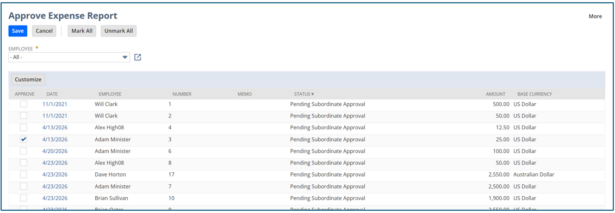
Click Save. The expense report has been approved.
Common Errors Messages
- Please enter value(s) for: Amount: This error can indicate that failure to provide a value for one of the following sublist fields: Amount
- You must enter at least one line item for this transaction: This error indicates that failure to include sublist data for every expense report record. Each expense report must have at least one sublist record.
- Invalid posting period reference key for subsidiary 1: This error indicates a problem with the Posting Period value. Double-check that the name of an existing posting period has been entered.
Importing expense reports in NetSuite reduces manual effort, improves accuracy, and supports faster month-end close processes, especially for organizations managing high transaction volumes or complex expense structures. When configured correctly, CSV imports allow finance teams to maintain control while scaling operations efficiently.
RSM helps organizations design, automate, and optimize NetSuite expenses and financial workflows to improve visibility, strengthen controls, and reduce operational risk. If your team is looking to streamline expense reporting or enhance NetSuite functionality, connect with RSM to explore a tailored solution.
Subhashini Gatla
Subhashini Gatla works as an associate consultant in RSM USI Integrated Services Pvt Ltd. She supports implementation projects by assisting with system configuration, testing, and process improvement initiatives.