Do you run into errors when attempting to import location specific sales data through a CSV file?
Follow these steps to ensure that your records are imported successfully every time.
Step 1:
Within NetSuite, ensure all the following have been created:
· customer records
· items
· locations
Step 2:
Ensure your CSV file includes all appropriate fields of data. For an example of an appropriate file, reference the image below:

Things to keep in mind for the content of your CSV file:
· The order in which your fields are laid out do not matter
· If you wish, you may include other fields such as discount item, rate, sales rep, and memo
· Ensure the name of your customers include the ID number of the customer record in NetSuite + the name of the customer (ex. 87 Classic Keys instead of Classic Keys)
· Ensure the names of your items, and locations in your CSV file match the names of you items, and locations in NetSuite
· Ensure currencies for your records match currencies that are present in the NetSuite environment already
· Ensure the status of your records is marked as one of the following:
- Pending Approval
- Pending Fulfillment
· Ensure each external ID is unique
Step 3:
It’s time to upload your records into NetSuite!
Within NetSuite, navigate to Setup > Import/Export > Import CSV Records
Step 4:
Make the following changes on the Scan & Upload CSV File page:
· Import type: Transactions
· Record type: Sales Order
· On the bottom left of the page, click select and pick the CSV file you want to upload from the saved files on your computer
· Click next
Step 5:
On the Import Options page, ensure the Data Handling option is set to ADD and click next
Step 6:
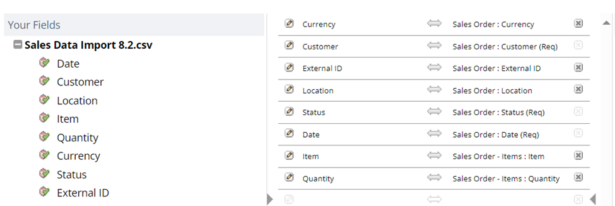
On the Field Mapping page, you should see the headings of your data match with fields that are populated within NetSuite:

If you followed steps 1-5 correctly, your field mapping page should look like this. If not, go back and ensure you completed each previous step correctly or your file will not upload successfully. If all your CSV fields are matched to a NetSuite field like the image above, click next.
Step 7:
· On the Save Mapping & Start Import page, enter an IMPORT MAP NAME (required), and a DESCRIPTION and ID if you would like
· Click save and run
Step 8:
· On the Confirmation page, click the Import Job Status link
· Refresh Job Status page until the status of your import is complete, this should take a few minutes
· If you followed all steps correctly, all your records will import successfully, and you will see this screen:

Congratulations! You have imported your location specific sales data successfully using NetSuite’s CSV import feature.
If there are errors in your file, you may see 0 records import successfully. Click the CSV response link on the right side of the screen for an explanation of the error.

 RSMUS.com