
 RSMUS.com
Copy to Account is an administrator tool designed to transfer custom objects between your accounts. Copy to Account allows you to pick the target account, select its dependencies, choose which record instances to include, and deploy your custom record. This tool can copy one custom object with its dependencies and instances at a time. Copy to Account is available from production, development, and sandbox accounts in which you have administrator access. With Copy to Account, you can migrate a variety of elements, including:
- Custom Transaction forms
- Custom Fields
- Workflows
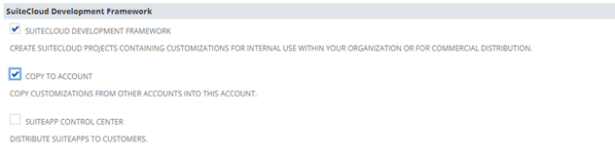
Required features to be enabled:
Navigate to setup > Company > Enable features > Suitecloud and enable:
– SuiteCloud Development Framework: Check this box to enable the SuiteCloud Development Framework (SDF). You can use the SDF to deploy projects from your development environment to this account.
– Copy to Account: Check this box to copy customizations from other accounts into your account.
How to ‘Copy to Account’ (Custom Record Type)
Step 1: Finding the ‘Copy to Account’ Tool
Navigate to Customization > Lists, Records, & Fields
- Select a Custom Record: Locate and select the custom record to be duplicated.
- Click ‘Copy to Account’: Once chosen, click Copy to Account in the upper right corner of the screen.

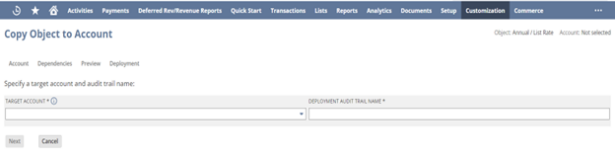
Step 2: Selecting the Target Account
- Select Target Account and Give Audit Trail Name: Select the target account you want to be migrated too. For tracking purposes, provide an audit trail name.
- Administrator Access: Make sure you have administrator access in the target account, and same features enabled, before selecting a target account. Click Next.
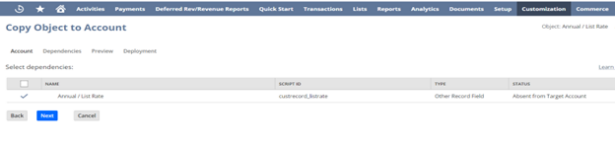
Step 3: Dependencies
- Review Dependencies: Any dependencies associated with the record will appear on a list in hierarchical level.
- Select Dependency Records: Choose which records you would like to include in the duplication process. Up to 1,000 instances can be chosen to replicate. Click Next.
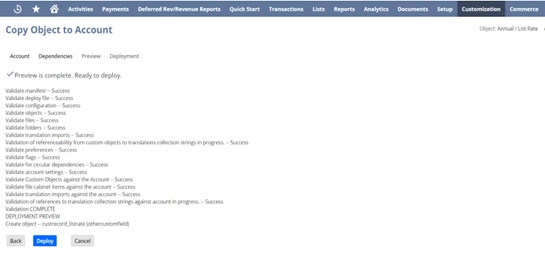
Step 4: Preview and Deployment
- Review Preview: NetSuite will generate a preview during the validation and development phase to verify status of the deployment.
- Deploy the Copy: Once the preview is verified, click Deploy.
- Deployment Status: An active status log will appear on your screen after deployment.
The NetSuite feature, ‘Copy to Account’ allows the user to migrate custom objects from different NetSuite environments. This feature provides an excellent opportunity to save time migrating records between accounts. For further details on the benefits of this feature, feel free to contact our team.