
 RSMUS.com
In NetSuite, custom fields based on saved search values are often “unstored,” meaning their values update dynamically. While this is useful for real-time visibility, unstored fields can’t be used in reports, saved searches, or external integrations because their data isn’t saved. To overcome this, you can create a stored field, commonly referred to as a stamp field, to capture and hold the value of an unstored field at a specific moment.
This guide walks you through how to capture unstored field values and store them using workflows, enabling consistent visibility in reports and third-party systems.
Step 1: Create a Saved Search for the Unstored Field
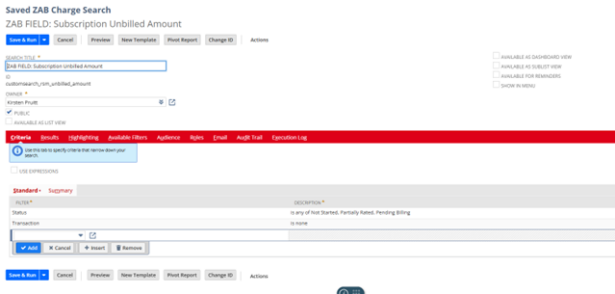
The first step is to create a saved search that identifies the data you want to display in your custom field. In this example, let’s assume we want to track all Subscription Charges that have not been billed yet.
-
Go to Lists > Searches > Saved Searches > New.
-
Select the relevant search type (e.g., ZAB Charge Search for Zone Subscription Charges).
-
On the Criteria tab, filter for transactions that are not billed and where no transaction has been created.
-
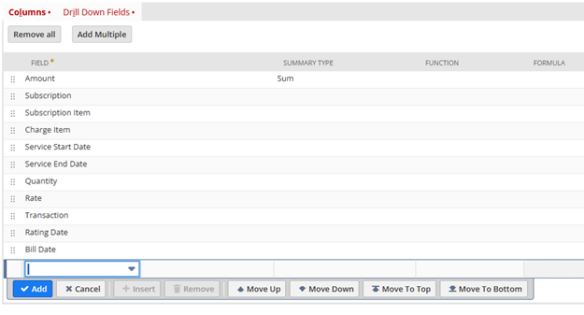
On the Results tab, select the fields you want to reference in your custom field.
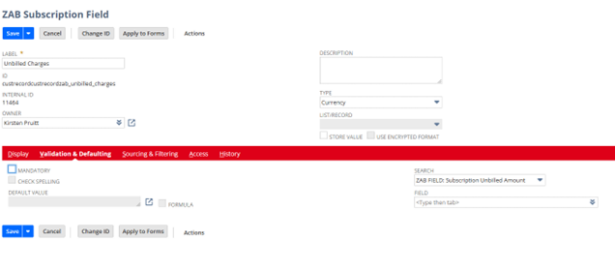
Step 2: Create the Unstored Custom Field
Now, create a custom field that dynamically pulls values from the saved search.
-
Navigate to Customization > Lists, Records, & Fields > Transaction Body Fields (or Record Types for custom records).
-
Click to create a New Field.
-
Fill in the field details (name, ID, description, and type). For example: Service Billed Through.
-
Ensure that the “Store Value” checkbox remains unchecked to keep the field unstored.
-
Under the Validation & Defaulting subtab, select the saved search created in Step 1.
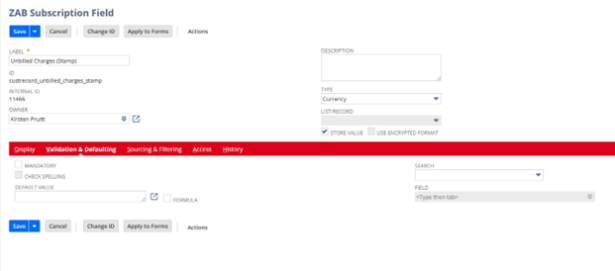
Step 3: Create the Stored (Stamp) Field
This field will hold the value of the unstored field at a specific point in time.
-
Follow the same steps as above to create a new custom field.
-
Give it a unique name (e.g., Service Billed Through (Stamp)).
-
Check the “Store Value” checkbox to ensure the value is saved and not dynamically updated.
-
No other configuration is required on the other subtabs.
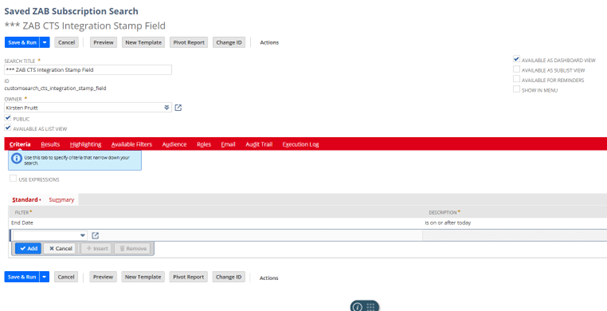
Step 4: Build a Saved Search for the Stamp Field
This saved search will pull the data for your stamp field and match it to your unstored field.
-
Go to Lists > Searches > Saved Searches > New.
-
Select the Type of Search (e.g., ZAB Subscription Search) to pull all records that contain the stamp field.
-
In the Criteria tab, filter the records according to the parameters you need for the report.
-
Under Results, select the fields you need to view, including both the non-stored and stored fields.
-
This search will serve as the foundation for the workflow you’ll create in the next step.

Step 5: Create the Workflow
This workflow will automate the process of updating the stamp field with the value of the unstored field.
-
Go to Customization > Workflow > Workflows > New.
-
Populate the Name of the workflow (e.g., Set Stamp Field Value).
-
Select the Record Type where the fields are located (e.g., Subscription or Transaction).
-
Set Release Status to Testing initially or Released when you’re ready for it to go live.
-
Set Keep Instance and History to Always.
-
Set Initiation to Scheduled.
-
Choose the saved search created in Step 4 as the source.
-
Enable Repeat and choose a frequency if you want the workflow to run periodically (e.g., every 30 minutes or daily).
-
Save the workflow.

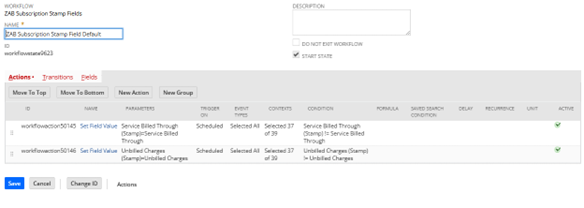
Step 6: Configure States and Actions
Now create a state and action within the workflow to update the stamp field based on the non-stored field:
-
Create a new State (e.g., Stamp Fields).
-
Click New Action and select Set Field Value as the action.
-
Set Trigger On to Scheduled.
-
For Field, choose your stamp field (e.g., Service Billed Through (Stamp)).
-
For Value From Field, select Record: Current Record, and Field to the non-stored field (e.g., “Service Billed Through“).
-
Under Conditions, set:
-
Field: the stamp field (e.g., “Service Billed Through (Stamp)“).
-
Compare Type: Not Equal
-
Value Field: the non-stored field (e.g., “Service Billed Through“).
-
This condition ensures the stamp field updates only when its value of the two fields is not equal.
Step 7: Release the Workflow
Once everything is set up:
-
Test the workflow using the Execute Now button.
-
Confirm the stamp field updates accurately.
-
Change the Release Status to Released when ready to activate the workflow.
By following these steps, you can ensure that your unstored fields are properly updated and stored for reporting, saved searches, and integration purposes in NetSuite. This method allows you to capture dynamic values in real-time while ensuring that the values are properly stored in a field that can be used consistently in reports and third-party integrations.