
 RSMUS.com
After reading this article, you will have a better understanding in terms of what SuiteTax can do and how to configure SuiteTax in your NetSuite environment. NetSuite SuiteTax is a robust indirect tax management solution designed to simplify and optimize global tax compliance. Key features of SuiteTax include:
- A fully configurable tax engine that streamlines the complexities of tax management across multiple regions.
- Accurate and efficient tax calculations, significantly reducing the risk of errors in global tax compliance.
- The ability for businesses to save time, cut operational costs, and eliminate manual calculations.
- A comprehensive tool that ensures global tax compliance, making it an essential part of the tax management process.
To Implement SuiteTax, you need to follow the steps below:
- Complete the questionnaire and submit a support case with answers to the following questions (SuiteTax features have already been installed) to have SuiteTax provisioned in your account:
-
- General account information
- Countries where the customer requires SuiteTax support
- Third-party solutions (such as Avalara, Vertex, etc.) to be integrated with SuiteTax
- Features and bundles in use that may be incompatible with SuiteTax
Note: This process will take NetSuite up to a week or more to process.
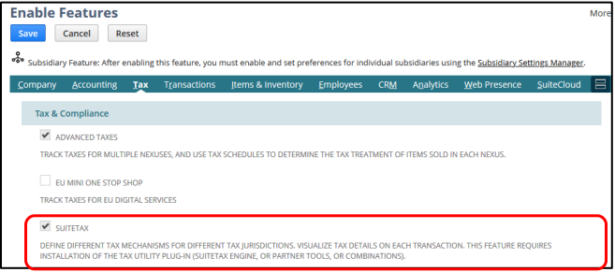
- Activate the SuiteTax Feature in the Enable Features Tab in NetSuite
Go to Setup > Company > Enable Features. On the Tax subtab, check the SuiteTax box, then click Save.
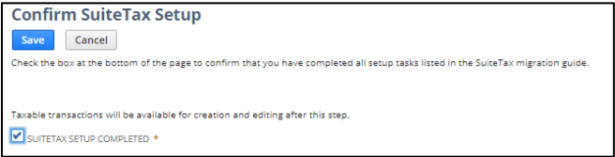
- Confirm SuiteTax Setup
After completing the tax configuration, go to Setup > Tax > SuiteTax Migration, and click the Confirm SuiteTax Setup button. On the Confirm SuiteTax Setup page, any warnings will be displayed if the system detects discrepancies in the setup. Once the warnings have been addressed, check the SuiteTax Setup Completed box at the bottom of the page to confirm the setup, then click Save.
- Install SuiteTax Bundles
Note: This section and the following steps apply only if you are implementing SuiteTax using the NetSuite SuiteTax Engine.
-
- Refer to the latest version of the bundle for installation.
- For reference, the example below outlines the recommended installation order for SuiteTax with India Localization:
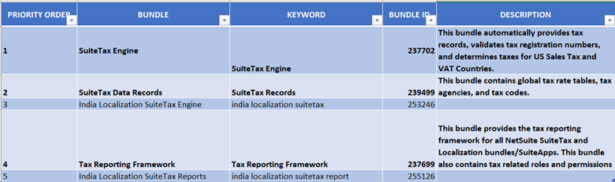
Note: Rows highlighted in bold are mandatory bundle to installed regardless of what localization you installed. While the India Localization bundle is optional and should only be installed if needed.
Additional bundle to download to use India localization is shown below:
![]()
- Plug-In Implementation
-
- Go to Customization > Plug-Ins > Manage Plug-Ins.
- On the Manage Plug-In Implementations page, select the SuiteTax Engine.
- Click Save to complete the implementation.
- SuiteTax Engine Setup
To assign subsidiary tax registration, follow these steps:
-
- Go to Setup > Company > Subsidiaries.
- Click the Edit link next to the subsidiary you wish to update.
- On the subsidiary record, navigate to the Tax Registrations
- Select the Tax Registration line you want to update.
- Enter or update the Tax Reg. Number.
- In the Tax Engine dropdown, choose the appropriate tax engine for the nexus. The dropdown will display the tax engine implementations that have been added and activated in your account.
Note: If taxes are not required for a specific nexus, you can leave the tax engine unselected and mark it as Tax-Exempt. - Click OK.
- Repeat steps 4 through 7 for each nexus.
- Click Save to complete the process.
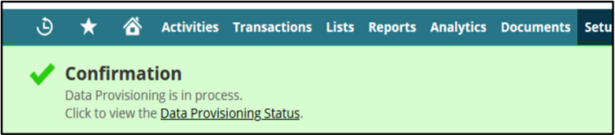
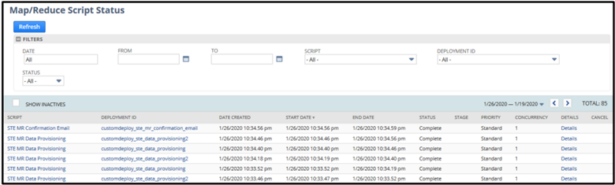
Once all migrated subsidiary records have been saved, a green banner will appear at the top, indicating that the Data Provisioning process is underway. You can click the link to track the status of the process. Additionally, you will receive an email notification once the process is complete.
Data Provisioning is the process by which the SuiteTax Engine creates essential tax-related records, including Tax Types, Tax Codes, Tax Accounts, and Tax Agencies.
Note: The options available under the Tax Engine column depend on the tax engines installed in your NetSuite account. If both NetSuite and partner tax engines are in use, they will be listed in the dropdown. It is crucial to select the correct tax engine for each nexus. If the Tax Engine column is left empty, tax record provisioning, tax determination, and tax calculation will not be possible.
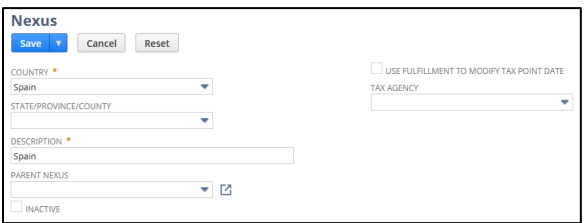
- Set Up Nexus: A nexus refers to a tax jurisdiction or geographic area where a business operates, and each has its own tax regulations.
To create a Nexus record:
-
- Navigate to Setup > Tax > Nexuses > New.
- In the Country field, select the country where this nexus is located.
- In the State/Province/County field (if applicable), choose the specific state, province, or county for the nexus.
- If the state/province/county record does not exist, create a new record by going to Setup > Company > Setup Tasks > States/Provinces/Counties > New.
- In the Description field, provide a description for this nexus.
- If this is a subnexus, select the parent nexus. If it is not a subnexus, leave the Parent Nexus field blank. Only nexuses within the selected country will appear in the list for the Parent Nexus
- If you no longer report taxes in this nexus or if it was set up by mistake, check the Inactive
- In the Tax Agency field, select the name of the tax vendor to whom you submit tax reports and remit payments.
- You can set up a vendor as a tax agency in two ways:
By selecting Tax Agency in the Category field on the vendor record.
b. By clicking the plus icon (New) next to the Tax Agency field on the nexus record. - Click Save to complete the process.
- Set Up Tax Types: Tax Types link tax codes to nexuses, associate them with the appropriate general ledger accounts, and group tax amounts on the transaction summary.
To create a new Tax Type:
-
- Navigate to Setup > Tax > Tax Types > New.
- Select the country for which you are creating the tax type. Only countries where a nexus has been set up will be available in the list.
- Enter a name for the tax type.
- Provide a description for this tax type.
- If applicable, set a special property for the tax type (e.g., for withholding taxes, check the box Does Not Add to Transaction Total).
- Check the Inactive box if you do not want this tax type to be available in lists and transactions.
- Add nexuses and assign tax accounts for each nexus by performing the following steps:
- In the Nexus column, select the appropriate nexus.
- In the Payables Account column, choose the account to which taxes on sales transactions for the nexus should be posted.
- In the Receivables Account column, select the account to which taxes on purchase transactions for the nexus should be posted.
- Click Add.
- Repeat step 7 for each nexus you wish to associate with this tax type.
- Click Save to complete the setup.

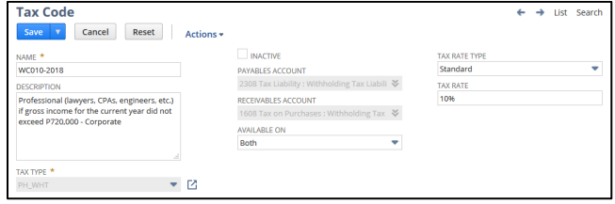
- Set Up Tax Code
A Tax Code determines the appropriate tax rate applied to transactions, typically based on the information provided by the tax agency in the country or nexus where you conduct business.
To create a new Tax Code:
-
- Navigate to Setup > Tax > Tax Codes > New.
- Enter a name for the tax code.
- Provide a description for this tax code.
- Select the tax type for this tax code. If needed, you can create a new tax type by going to Setup > Accounting > Taxes > Tax Types > New.
- Check the Inactive box if you do not want this tax code to be available for use in lists and transactions.
- In the Available On field, select the type of transaction this tax code applies to.
- In the Tax Rate Type field, choose the appropriate tax rate type:
- Standard – for typical purchase or sales transactions.
- Reduced (including special and super-reduced rates) – for transactions with special conditions.
- Zero – for transactions with a tax rate of zero.
- Exempt – for transactions that are not liable to tax.
- Click Save to complete the process.
Note: Once the tax code is saved, the tax type value cannot be changed.
- Set Up Tax Groups
A Tax Group is a combination of multiple tax codes that can be applied to a single transaction even if the taxes are paid to different jurisdictions. The tax group rate is the sum of these individual tax codes. - To set up Tax Groups:
-
- Go to Setup > SuiteTax Engine > Tax Groups.
- Click New Tax Group.
- In the Name field, enter a name for the tax group.
- From the Nexus list, select the nexus to which this tax group will apply. Only active nexuses assigned to the account will appear in the list.
- (Optional) In the Description field, provide a brief description of the tax group.
- Choose at least one tax code from the Tax Codes
- Click Save to complete the setup.
-
Note: The SuiteTax Engine automatically provisions Tax Groups for US and Canada nexuses only.
- Entity Tax Registration Setup
SuiteTax allows you to apply multiple tax registrations for a single entity across different states and countries.
To set up entity tax registrations:
- Navigate to Lists > Relationships > Customers (or Leads, Prospects, Vendors, Partners, Other Names).
- Click the Edit link next to the entity you wish to update.
- Go to the Financial
- Click on the Tax Registrations
- To add a tax registration:
- Select a Country.
- Choose a Nexus. Only nexuses for the selected country will appear in the list.
- Select the Address for this nexus. Only address labels will be shown, which can be set on the Address subtab of the entity record.
- If adding a new address, ensure you save the record first before assigning it to the nexus.
- Enter the tax registration number for the nexus (the Legacy Tax Reg. Number will be migrated as the initial Tax Reg. Number).
- Click Add.
- Repeat these steps for each tax registration you need to apply for the entity.
- Click Save to complete the process
13. Tax Agency (If there are any vendors that will use new nexus)
Users would need to activate vendors and assign them to the nexus:
-
- Reactivate the relevant vendors from the vendor list and assign them to the corresponding nexus.
14. Tax Item Setup
Tax Items are required for tax calculation and VAT reporting. By default, the SuiteTax Engine provides two tax item types:
-
- Services – Used to classify and report transactions under Services.
- Goods – Used to classify and report transactions under Goods.
You can set up additional tax item types if needed. - For new items created after SuiteTax Engine installation, the appropriate tax item type will be automatically applied. For existing items, the tax item type must be manually set.
- To set the Tax Item Type:
- Go to Lists > Accounting > Items.
- Click Edit next to the item you wish to update.
- Click the Tax
- In the Tax Item Type field, select the appropriate tax item type from the list.
- Click Save to finalize the changes.
Once all 14 steps above have been completed, SuiteTax is fully configured and ready to be used in your environment.
Henry Luo
Henry is a part of the firm’s NetSuite and Zuora practice and specializes in the Order to Cash process, with a focus on Billing and Advanced Revenue Management. He is experienced in supporting clients across complex multi-subsidiary environments, helps businesses implement and optimize SuiteTax and Multi-Book accounting. He also plays a key role in configuring the full revenue lifecycle for companies from start to finish while ensuring seamless integration with Salesforce, serving as both a technical and functional consultant throughout the process.