As globally-connected companies move toward NetSuite, the need to display information in multiple languages is increasing in importance. NetSuite natively supports different languages through a change in personal preferences, but this does not affect the data in each of your fields. This means, for your employees to effectively work within your ERP system, you need data stored in multiple languages. Not to mention, customers will appreciate seeing their name in their native language – not an English translation!
Follow these steps to import data in native Japanese characters, without allowing Excel to damage the integrity of the information.
- Open the .xls or .xlsx file containing the Japanese characters.
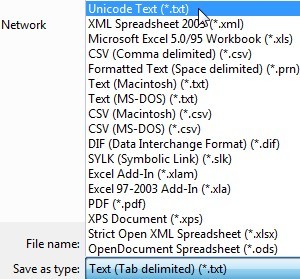
- Save the file in Unicode Text .txt format.

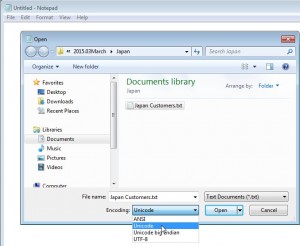
- Open the Notepad application and select the .txt file save above. Before opening, ensure the coding selection is Unicode.

- The next step is to replace the spaces (tabs) between columns with commas, so we can transition the file from a tab-delimited file into a comma-delimited file. This is necessary because NetSuite will recognize the comma-delimited CSV format without breaking up values in one column.
- To do so, highlight the space between two column labels and copy that value to your clipboard.
![]()
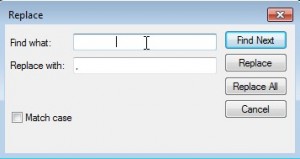
- Then, do a search and replace using Ctrl + H. Paste the space value in the ‘Find What’ section and enter a comma in the ‘Replace With’ section. Click Replace All and each tab will be replaced with a comma.

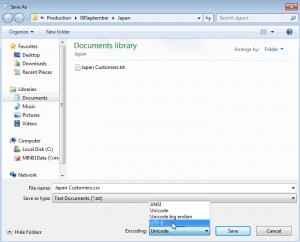
- Now it’s time to save the text file as a CSV file. Navigate to ‘Save As’ and make the following two corrections before clicking Save: (1) change the file name to .csv and (2) change the encoding to UTF-8.

At this point, you will be able to open your CSV file and see the format. The key here is that any changes needing to be made have to be made in the original excel file – and then all of the steps need to be repeated. This can be a tedious process, but your team in Japan will appreciate being able to read company names in their native language!
Finally, when attempting to import to NetSuite, be sure to select a Character Encoding of Unicode (UTF-8). Happy importing!
If you have any questions about how to import CSV files with NetSuite, the NetSuite Professionals at RSM can answer any of your questions!
For more information on this topic or others related to NetSuite, reach out to our national NetSuite practice at erp@rsmus.com or by phone at 855.437.7202.
By: Tyler Cronk – Minnesota NetSuite Solution Provider

 RSMUS.com