
 RSMUS.com
The BI Team at RSM had a need for an automated process to export Microsoft Dynamics 365 – PSA data to Azure SQL Database for dashboard and report development. The file will be dropped out to our team SharePoint environment for document storage. The following steps convert the XLSX documents to CSV, transform the values, and copy them to Azure SQL DB using a daily Azure Data Factory V2 trigger. The PSA and Azure SQL DB instances were already created (including tables for the data in the database).
Azure Logic App
- Create a new Azure Logic App.

- After it’s done deploying, click the Logic app designer from the toolbar on the left to enter the designer environment.
- Click the + New step button
- Select the When an HTTP request is received The URL will automatically be generated once you add the activity.

- Click the + New step button again.
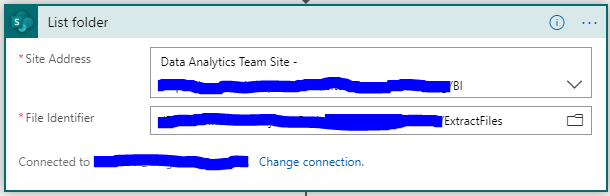
- Since we have to handle the connection and credentials to SharePoint, we need to start with a SharePoint activity called List folder. This activity will return a listing of all items in the specified folder.
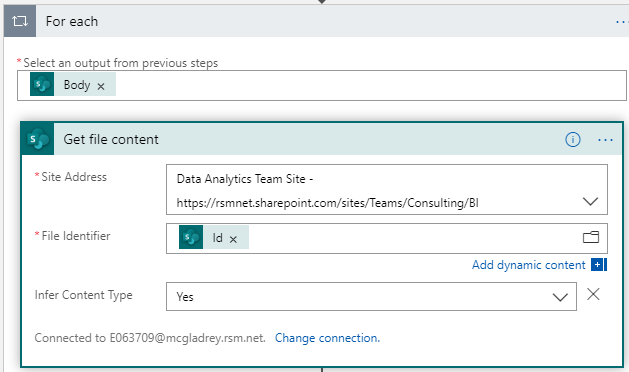
- We will need a For each activity to handle each file listed in the previous step. The easiest way to do this is to add a new SharePoint step called Get file content. Provide the site address and use the SharePoint based dynamic item Id for the File Identifier. Once you click out of the File Identifier box, it automatically converts to a For each activity with a Get file content activity inside of it. Verify that the SharePoint Body is the selected output from the previous steps.
- If a storage account has not been created yet, do this now. I would additionally recommend creating a new container for your files to be stored. In this case, it was called “active”.
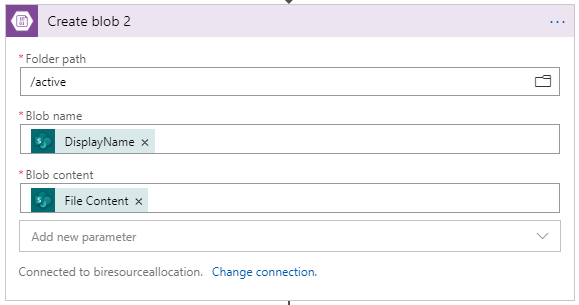
- A blob will be created for each of the files identified in the previous Get file content step 7 using the Create blob [Note: although this is an unnecessary step at this time, it allows a safety net should the event occur where the process fails.] Provide the Folder path, which in this case is “/active”. Additionally, the Blob name should be the DisplayName from the List folder activity and the Blob content should be the File Content from the Get file content step.
If you save and run the Logic App at this point, the file should be visible in the storage container.
![]()
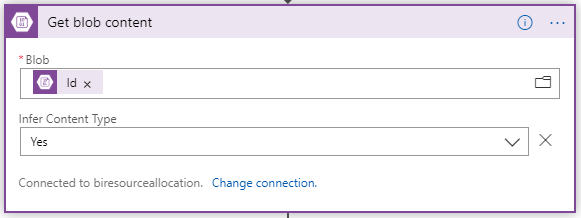
- Grab the content of each blob that was created in the previous step using the Get blob content Use the Id for the required Blob input from the previous Create blob step.
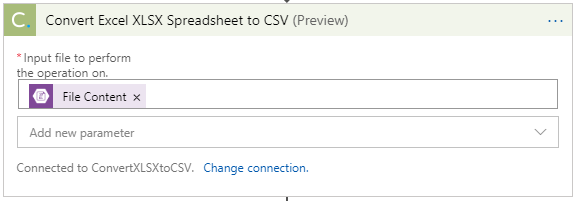
- Cloudmersive makes a fantastic, simple activity for converting an XLSX Spreadsheet to CSV, called Convert Excel XLSX Spreadsheet to CSV (Still in Preview). Navigate to their site, sign up, and provide an access key that can be entered into their activity during configuration. You can do numerous iterations up to a certain file size using this tool (See their site for further details). Provide the File Content from the previous Get blob content step as the input for this activity.
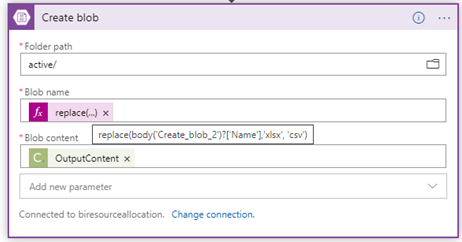
- Use the Create blob activity to create a new blob after the file has been converted. In this case, the same Folder path was specified as in the Create blob activity in step 9. Additionally, use a replace function for the Blob name that replaces the xlsx extension with csv in the file Name from the Create blob activity in step 9 and provide the OutputContent output from the previous step for the Blob content.
If you save and run the Logic App at this point, you should see the corresponding csv version of the original xlsx file in blob storage.
![]()
Azure Data Factory
- Create a new Azure Data Factory Instance

- Click on Author and Monitor to access the Data Factory development environment.
- Create a new pipeline and give it a name.

From the General activity folder, drag and drop the Web activity onto the canvas. (The purpose of the Web activity is to kick off our Azure Logic App, which will follow)
- Give it a name and move on to the Settings
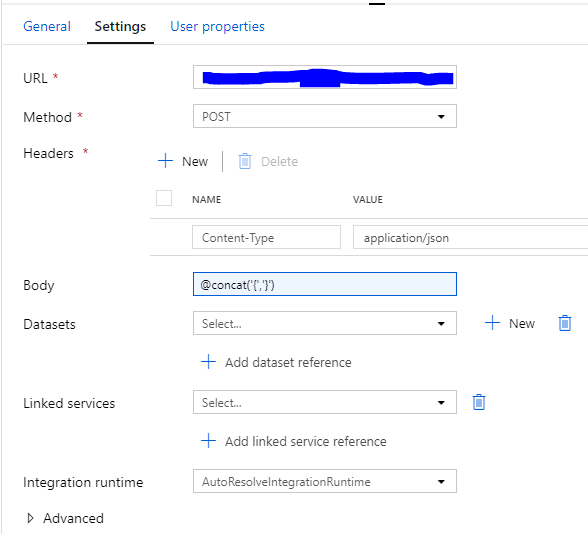
- From the Azure Logic App that we created above, expand the When a HTTP request is received activity and copy the HTTP POST URL. Paste the URL into the URL textbox in the Settings tab within the Data Factory Web Activity.
- Enter POST for the method
- In the Headers section, @concat(‘{‘,’}’).
Drag a Mapping Data Flow activity from the Move & Transform tab within the Activity Pane.
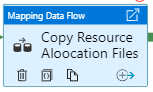
- Give it a name and select the Settings
- Click the + New button to create a new Data flow.
- Give it a name and click the Add Source button located on the designer pane
- Give it a name and click the + New button to create a new source dataset
- Give it a name and click the Connection tab to continue.
- Select the Storage Account from the Linked service dropdown that we created in step 8 above.
- Provide a File path to the designated source file.
- Check the First row as header
- From the Schema tab, click the Import schema button to pull in all of the headers from the Excel file.
- Verify your Source dataset is selected and click Test connection for good measure.
![]()
- Click back over to the Data flow tab which we started on above.
- In our case, there is a generic header in the first 8 rows of our excel file. So 8 is entered for the Skip line count.
- While testing, make sure the Sampling is set to Enable so you don’t get charged for repeatedly loading a large dataset. When you’re ready to switch to a full load, select Disable.
- Click the Import schema button from the Projection tab. Leave all column Types as a string.
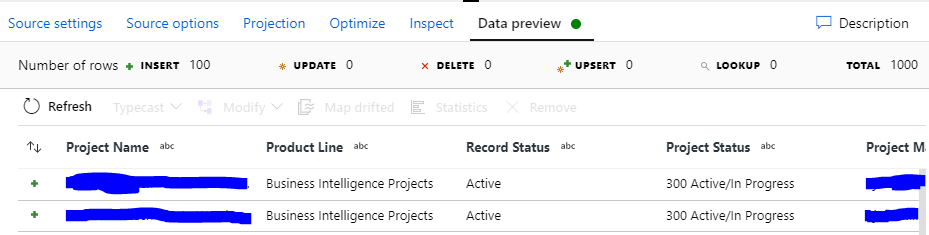
- Click over to the Data preview tab to review the data.
NOTE: the Data flow debug switch will need to be set to the On position for data to be shown
- Click the + and select Sink under Destination.
- Give it a name.
- Click the + New button next to Sink dataset. Repeat steps for ii above to create a corresponding Azure SQL Database dataset
- Under the Settings tab, check the Allow insert checkbox for the Update Method.
- The table will be cleared out and refreshed for every load, so select the Truncate table option for the Table action.
- In the Mapping tab, make sure all of the Input columns are matched up with the Output columns. [NOTE: If the names are exactly the same, they should automatically match. If not, they’ll have to be matched manually]
- In the Data flow designer window, click the little plus symbol between the source and destination flows, and select Derived Column under Schema modifier. This is where we’ll be doing our transformations.

- Give it a name.
- Click back over to the source data flow and preview the data. There will likely be several columns which need a transformation to get them in the correct format to convert them from Excel (XLSX) to SQL Server data types. Comparing the original XLSX spreadsheet to the preview, there are fields that have unexpected null cells. This is caused by the discrepancy in data types and formatting. The following transformations will resolve that problem.
-
- The column PIA Hour Type contains an asterisk (*) before the actual hour type. So select PIA Hour Type for the column and type the following for the transformation:
regexReplace({PIA Hour Type}, '[*]', '')
-
- The Default Hour Type column has the same problem. So select Default Hour Type for the column and type the following for the transformation:
regexReplace({Default Hour Type}, '[*]', '')
-
- The CRM Teams contains a trailing comma (,) which should be removed. Select CRM Teams for the column and type the following for the transformation:
regexReplace({CRM Teams}, ',$', '')
-
- The Project Start Date is not in the correct format. We need to take the current format (eg. 8/19/2019) and convert it to ‘YYYY-MM-DD’. Select Project Start Date for the column and type the following for the transformation:
split(split(toString({Project Start Date}), ' ')[1],'/')[3] + '-' + lpad(split(split(toString({Project Start Date}), ' ')[1],'/')[1], 2, '0') + '-' + lpad(split(split(toString({Project Start Date}), ' ')[1],'/')[2], 2, '0')
-
- The Project End Date is in the same format as the Project Start Date. It needs to be converted. Select Project End Date for the column and type the following for the transformation:
split(split(toString({Project End Date}), ' ')[1],'/')[3] + '-' + lpad(split(split(toString({Project End Date}), ' ')[1],'/')[1], 2, '0') + '-' + lpad(split(split(toString({Project End Date}), ' ')[1],'/')[2], 2, '0')
-
- The PIA Day column is in the same format as Project Start Date and Project End Date. It needs to be converted. Select PIA Day for the column and type the following for the transformation:
split(split(toString({PIA Day}), ' ')[1],'/')[3] + '-' + lpad(split(split(toString({PIA Day}), ' ')[1],'/')[1], 2, '0') + '-' + lpad(split(split(toString({PIA Day}), ' ')[1],'/')[2], 2, '0')
- Clicking on the Inspect tab will give insight into which columns will be triggered for an update based on the transformation configuration. In this case, PIA Hour Type, Default Hour Type, CRM Teams, Project Start Date, Project End Date, and PIA Day are flagged for update.
- Click the Data preview tab and refresh the dataset to make sure the previously null cells are filled in.
- Return to the Mapping Data Flow activity in the pipeline development window and verify your newly created Data flow is selected within the Data flow dropdown of the Settings
At this point, we are ready to run the full pipeline. Click on the Debug button to run and monitor the pipeline.
- To set up a trigger, click on the Add trigger button > New/edit > + New .
- Give it a name in the New trigger
- It’s going to run every day at 5 AM EST, so verify that Schedule is selected for the Type, enter 9 AM for the Start Date (UTC), and Recurrence is Every 1 Day(s).
- Verify that No End is selected for End and Yes is selected for Activated.
- Click the monitor icon when the process is running or after it has run to see if it completed successfully.
Though this process could have been completed in many different ways using the Azure framework, this seemed to be the most straight forward route to getting the data moved from source to destination. To recap, in this process we: Picked up the XLSX file from SharePoint, converted it to CSV, saved the file to Blob storage, extracted the data, transformed the data, and loaded the data into SQL Server tables.
Ryan Brossart
As a director in RSM US LLP’s technology consulting practice, Ryan Brossart leads the data and digital services managed services team, providing comprehensive ongoing support to organizations of all sizes. His team leverages vendor partnerships and certifications across various technology stacks to deliver seamless service. Based in the Cincinnati, Ohio office, Ryan oversees a national team of RSM professionals in the United States, Canada, El Salvador and India.