
 RSMUS.com
In the past, Tableau Desktop limited users to establish a data model utilizing only a physical layer where unions and joins were defined. This often resulted in cumbersome processes that required a lot of data processing and resulted in long query times.
Everything changed with version 2020.2. With this update, Tableau introduced a logical layer to the data model. This logical layer sits above the physical layer and allows relationships to be defined between tables. This relationship does not specify a join type, instead, the join type is determined at the time of analysis based on the context of the visualization. Each table in the data source remains normalized and in its native level of detail. This enables a single data source to support different join types depending on the analysis being performed. An added benefit of using relationships is that they do not require LOD calculations when performing analysis at different levels of detail.
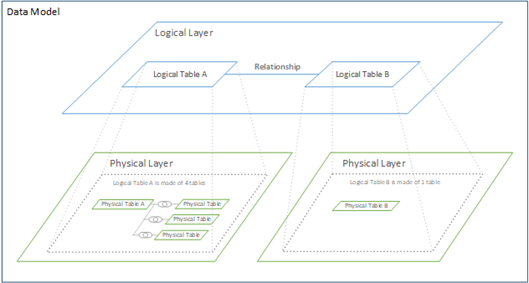
It’s easy to gloss over those last three sentences, but for anyone who has tried to work with large, disparate datasets (or even better, large, disparate databases!), this new functionality is HUGE! As anyone with LOD join experience knows, these calculations of the past were tough to manage and keep organized when developing a new data model. A visual representation of the new data model looks like the following:
New and Improved Tableau Data Model

Image Credit: https://help.tableau.com/current/pro/desktop/en-us/datasource_datamodel.htm
In order to illustrate the new data model capabilities, we’ll walk through an example of this at work!
Implementation Overview
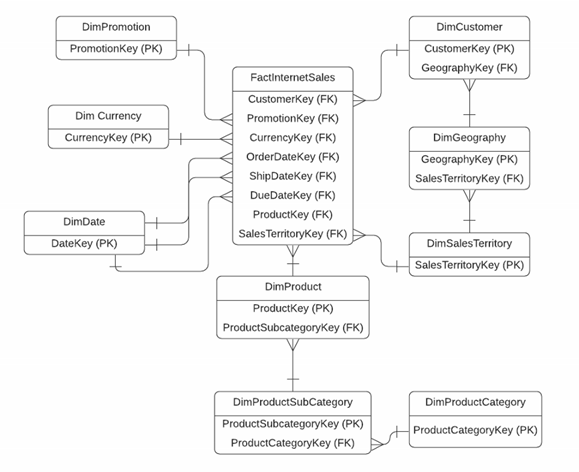
The diagram below shows the example data model that we will be implementing during this exercise. Some modifications to the model will be necessary for implementation inside of Tableau Desktop. During this implementation we will be adhering to data modeling best practices, however, some deviation will be required due to limitations with Tableau. These situations will be discussed in detail during the implementation.
Setting up SQL Server
Important Note for Mac users: SQL Server Management Studio (SSMS) is only available on Windows. Mac users will need to set up a SQL server environment using an alternative program. For this exercise, we will be utilizing a SQL server with a copy of the AdventureWorks2019DW.
Instructions on how to restore the database using SQL Server Management Studio can be found here. Be sure to download the Data Warehouse version and not the OLTP version of the database. Once this process is complete, you should see the AdventureWorks data warehouse in the SQL Server Management Studio Object Explorer as shown below.

Connecting Tableau Desktop to SQL Server
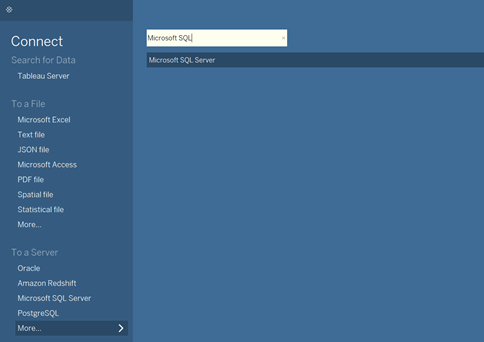
- Open up a new Tableau Workbook and perform the following:
- Under To a Server, click More…
- Search for ‘Microsoft SQL’
- Click on Microsoft SQL Server
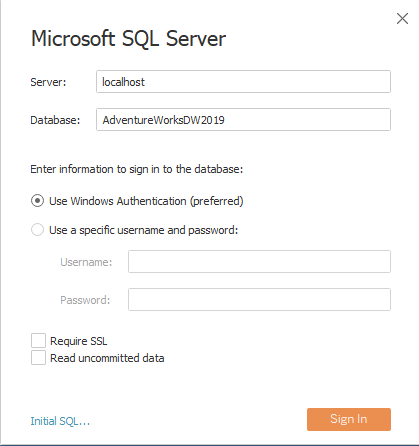
- Enter the following information to connect to the SQL server:
- Server: localhost
- Database: AdventureWorksDW2019
- Click Sign In
Implementing the Data Model
- Click and drag the FactInternetSales table onto the canvas. It is best practice to bring the fact table onto the canvas first.

- Create two relationships. One relationship between the fact table and DimPromotion and another between the fact table and DimCurrency.
- When a table is added to the canvas, an orange line will appear between the two tables indicating a relationship is being created. If you do not see the orange line, drag the dimension table closer to the fact table until it appears
- Ensure that Tableau recognized the correct Keys in the Edit Relationship window
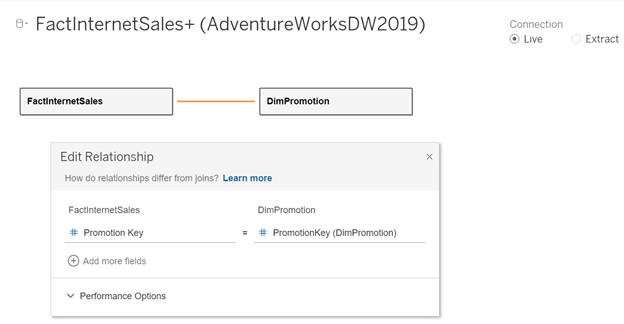
-
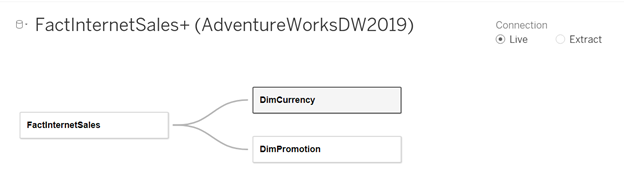
- Repeat this process for the DimCurrency table. Once completed, your canvas should look like the one shown below.
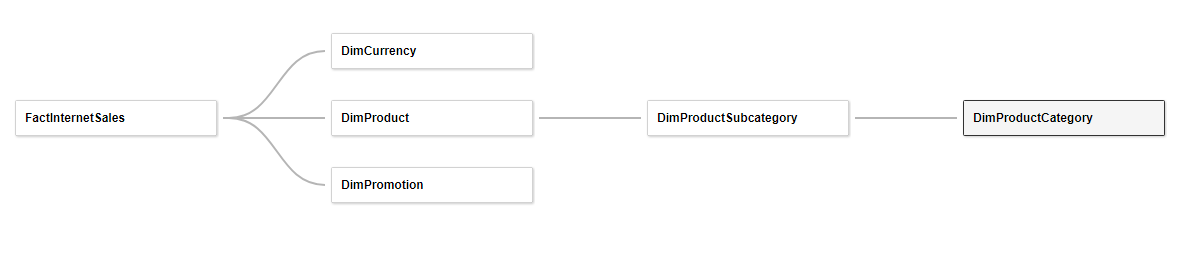
- Create relationships between the tables that make up the product hierarchy (DimProduct, DimProductSubCategory, and DimProductCategory). Tableau recommends using relationships by default and only utilizing joins when it is absolutely necessary.
- Create a relationship between DimProduct and the fact table
- Create a relationship between the DimProductSubCategory and DimProduct
- Create a relationship between DimProductCategory and DimProductSubCategory
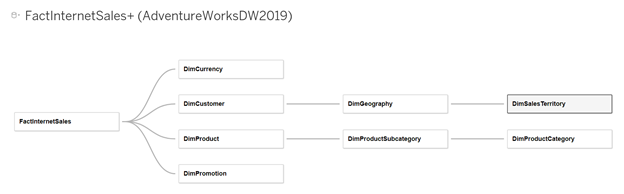
- Create relationships between the tables that make up the customer hierarchy.
-
- Create a relationship between the DimCustomer and the fact table
- Create a relationship between the DimGeography and the DimCustomer table
- Create a relationship between the DimGeography and DimSalesTerritory table

Recall from the data model that the DimSalesTerritory table connects to both the fact table and the Dim Geography table. The additional relationship between the fact table and the DimSalesTerritory table allows for analysis involving sales territories to bypass the other two dimension tables, therefore improving query performance by reducing the number of joins required. In order to replicate this model in Tableau, we would have to add the DimSalesTerritory table to the canvas twice. While doing so may improve query performance, it will create confusion during analysis by having two Sales Territory tables. Therefore, we are not implementing the direct relationship between the fact table and the DimSalesTerritory table.
- Create relationships between the date table and the fact table.
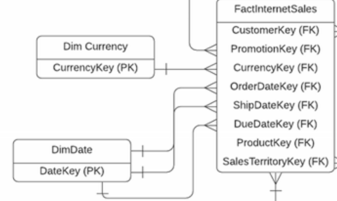
Recall that the DimDate and fact table has three relationships using the following keys.
| DimDate Key | FactInternetSales Key |
| DateKey | OrderDateKey |
| DateKey | ShipDateKey |
| DateKey | DueDateKey |
Tableau does not support multiple distinct relationships between tables. Therefore, implementing this relationship will require adding the DimDate table three separate times. In order to reduce confusion during analysis, we will name each table to correspond with the key being used from the fact table as shown below.
| Table Name | Associated Key |
| DimOrderDate | OrderDateKey |
| DimShipDate | ShipDateKey |
| DimDueDate | DueDateKey |
-
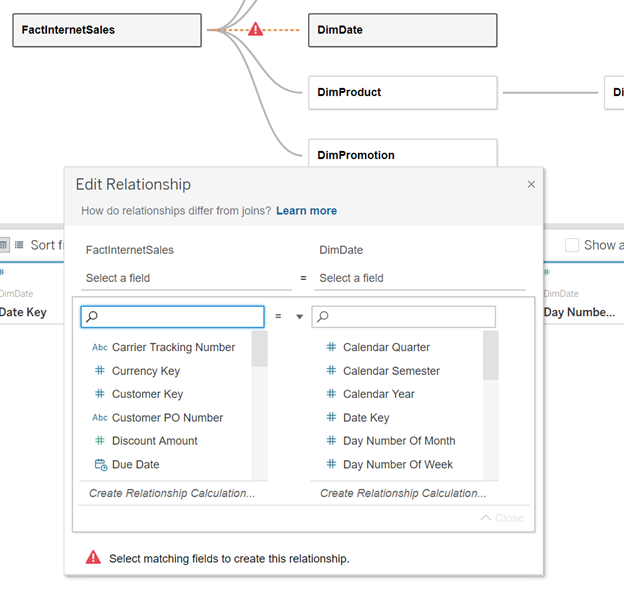
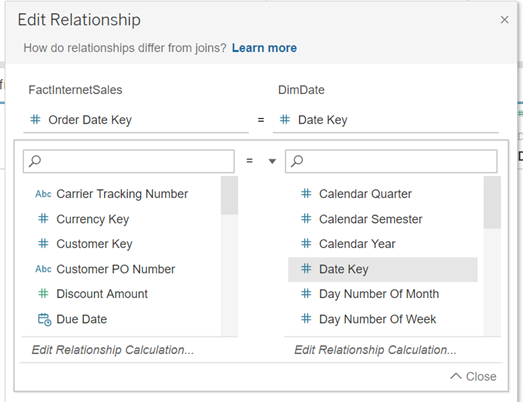
- Create a relationship between DimDate and the fact table.
-
- Select the Order Date Key from the fact table and the Date Key from the date dimension.
- Close the Edit Relationship window.
-
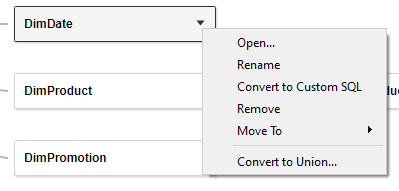
- Click on the drop-down arrow next to DimDate on the canvas. Click rename.
- Change the table name to DimOrderDate.
-
- Repeat this process to create DimShipDate and DimDueDate dimensions. Once complete, your model should look like the one shown below.

And there you have it, a full new data model in Tableau Desktop is now complete. This single data source provides the user an easy to understand model and a great deal of flexibility in terms of analysis. The addition of relationships to the Tableau data model saves development time by eliminating the need for many LOD calculations. It also allows for one data source to be used for many different types of analysis thanks to relationships deferring the join type until analysis. Ultimately, these updates provide the user with a better understanding of how their data is structured and makes creating visualizations more efficient. Happy analyzing!
To learn more about how RSM can support your advanced analytics and reporting needs, please visit our website, call 800-274-3978, or email us.