
 RSMUS.com
You are sitting at your desk, making sure products are in stock and your website is prepared for increased volume as the majority of your business has switched from your retail locations to online and your boss rushes over to you: “We need to offer chat for customer service on the website immediately!”
Or maybe you’ve just completed your Fast Track implementation and need to quickly extend your site.
If that sounds familiar, and you are looking to provide a quick, potentially code-free update to your SuiteCommerce site, you can use Google’s free Google Tag Manager tool to extend the functionality of your site via added features such as Live Chat, integrated advanced analytics via Google Analytics, or even third-party tools like Facebook’s pixel. For NetSuite’s SuiteCommerce and SuiteCommerce Advanced customers, installing all of these tools can be accomplished through a few clicks from within NetSuite.
What is Google Tag Manager?
According to Google, Google Tag Manager allows you to “Manage all your website tags without editing code. Google Tag Manager delivers simple, reliable, easily integrated tag management solutions.” But what does that mean?
In practical terms, Google Tag Manager is a container into which you can insert integrations for your website and trigger when you want those integrations to run.
Back to that Facebook pixel mentioned above, it means you can install the pixel across all pages of your site to track visitors and additionally set the Order Confirmation page to tell Facebook that the customer has completed a purchase, all without writing any code.
Install Google Tag Manager On SuiteCommerce Advanced
With NetSuite’s built-in integration for SuiteCommerce and SuiteCommerce Advanced sites, you can instantly install Google Tag Manager via the NetSuite UI with no coding needed.
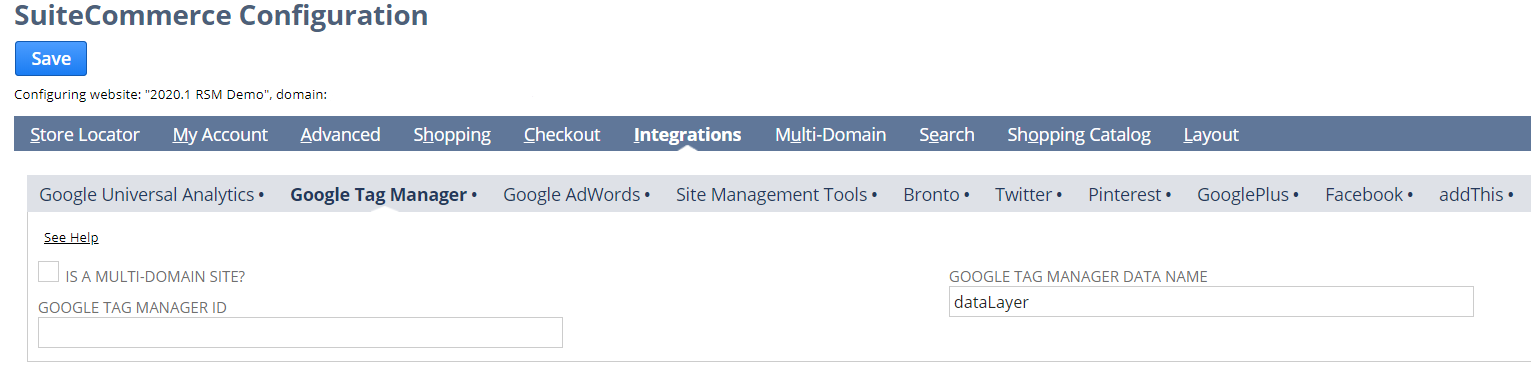
- In NetSuite, go to Setup -> SuiteCommerce Advanced -> Configuration -> [Pick your Domain/Site] -> Integrations -> Google Tag Manager
- Enter in your Google Tag Manager ID (which starts with “GTM-“) and click save.
- Google Tag Manager is now installed on your site! Let’s extend the site functionality.
Prepare to Extend Your Site by Installing the Google Tag Manager Editor extension
Once you have installed Google Tag Manager, you’re almost ready to extend your site. Within NetSuite, for SCA versions since 2018.2 and for SuiteCommerce, if you install the Google Tag Manager Editor extension, you can continue to install integrations from within the NetSuite user interface without any code!
NetSuite provides out-of-the-box integrations for a large number of popular products including Google Analytics, Google and Bing Ads, Facebook, Hot Jar, and Live Chat. While you can install all of these integrations directly in Google Tag Manager, you will need to know some coding and will need to understand how to use Google Tag Manager with SuiteCommerce to make sure everything works correctly and triggers at the appropriate time.
To stay code-free, go with the extension. The initial setup of the Google Tag Manager Editor extension in NetSuite can be tricky and following NetSuite’s installation instructions can leave you confused because they are missing an important step.
Without rehashing the entire process found in NetSuite’s instructions, before step 3, you must enable the Google Tag Manager API within Google’s API Console.
You can do this relatively easily by following the link to the Google Console from within NetSuite:

Once in the API console, before setting up the OAuth client ID, you must click APIs and Services.
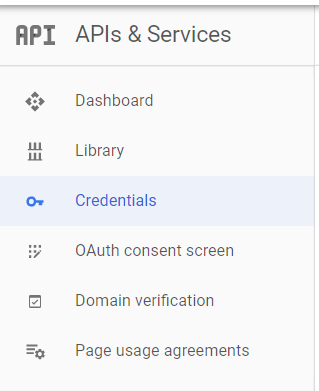
To be able to enable the Google Tag Manager API, click +Enable APIS and Services.![]()
Then enter “Google Tag Manager” into the search box. That will get you a link to this page, which is where you can actually enable the API and continue with OAuth setup.
Extend Your Site with Google Tag Manager
With the setup now complete, let’s extend your site!
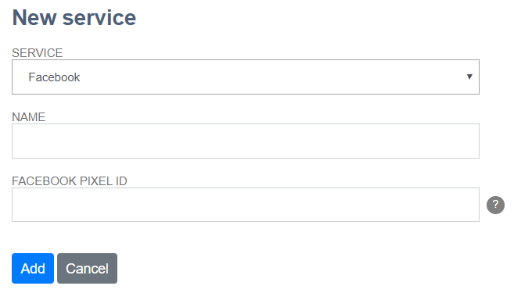
From within NetSuite, you can access the Google Tag Manager Editor by going to Setup -> SuiteCommerce Advanced -> Google Tag Manager Editor. Select your GTM Account, and you’ll see the container services page. Clicking Add a Service will let you select from any of NetSuite’s pre-built integrations!
To install the Facebook Pixel, for example, you’ll simply need to enter a name and enter your Facebook Pixel ID.
Once you’ve added all of the additional services, you click Review and Publish Changes and NetSuite will access your Google Tag Manager account and add in all of the Variables, Triggers, and Tags. Do not navigate away from the page until NetSuite confirms they were successfully created. Then go to Google Tag Manager and Publish the container. Once published, the new functionality will instantly start loading on your website!
If you need to manually install additional pixels or tags, ask the vendor’s support team if they offer Google Tag Manager setup instructions which are frequently available and easy-to-follow.
Need Help?
If you’re struggling to get started or need additional help, reach out to RSM’s Digital Marketing team and we can assist with setting up, monitoring, extending, and optimizing your website and Google Tag Manager installation.
For more information on eCommerce integrations, contact RSM at ecommerce@rsmus.com or by phone at 800.274.3978.
Andrew Perlgut
Andrew has been working in Technology and Technology Consulting since 2012 with a focus in NetSuite and NetSuite eCommerce since 2015. Andrew has a BA from Wesleyan University where he especially enjoyed courses focused on logic and ethics and applies those skills in his current work with RSM. Having implemented NetSuite both as a client and for RSM as a consultant, Andrew knows the ins and outs of the process, the difficult decisions, and the key areas to focus to have a successful implementation. At RSM, Andrew's role on the eCommerce team is to provide NetSuite back-end expertise and NetSuite eCommerce experience as an administrator and user.