
 RSMUS.com
There may be scenarios when you want certain users or groups of users to access specific data in a given table. For example, you may want a user only to be allowed to post to certain G/L accounts, customers, vendors, items, or some other master record type of data. This is typically called implementing some ‘record-level security.’
For record-level security in Business Central, you can use security filters to limit a user’s access to data in a table. A security filter describes a set of records in a table that a user has permission to access. You can specify, for example, that a user can only read the records that contain information about a particular G/L account. This means the user cannot access the records containing information about other G/L accounts.
Below is one way to use security filters to implement record-level security.
The scenario: limit which G/L accounts a user can view and post to.
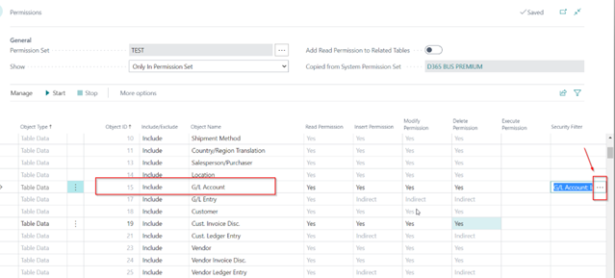
First, copy an existing permission set already assigned to a user. In this case, we copied the D365 BUS PREMIUM permission set and named it TEST. Then go to the G/L Account line (Object ID 15) and click on the ellipses under Security Filters.
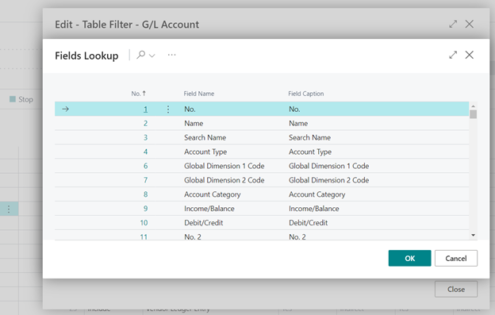
Then you can add a filter based on the various fields available on the G/L account table. You can filter it in numerous ways, so think through how you want it to be designed.
Here are two examples of ways to filter (there are many ways):
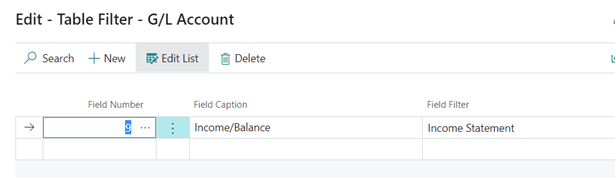
- By Income/Balance – in this case, I filtered it so that this permission set can only see Income Statement accounts
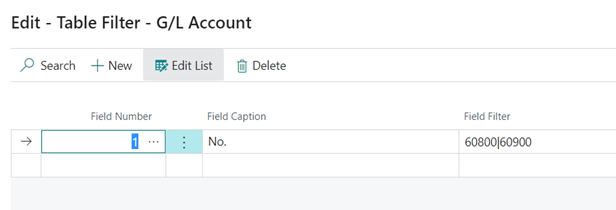
- Or, filter by just listing out the GL accounts you want the permission set to be able to view/post to. To list their account, you need to have the | symbol in between them like below (on most keyboards, this is above the ‘Enter’ key). This example means the user would only be able to view/post to GL 60800 or 60900
In this scenario, we implemented the first example above of limiting the access to Income Statement accounts only.
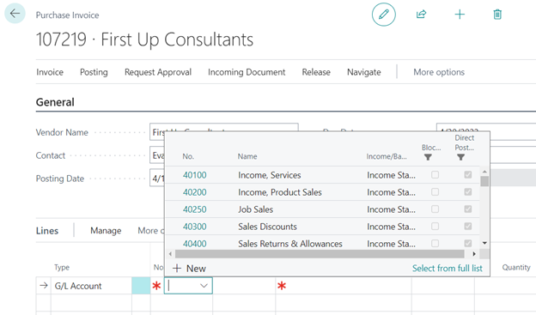
Once the filters are entered, the next step is to assign that new permission set to the user(s) and ensure the old one is removed. Now when that user enters a transaction, in this example, a Purchase Invoice, they will only be able to see Income Statement accounts in the drop-down menu.
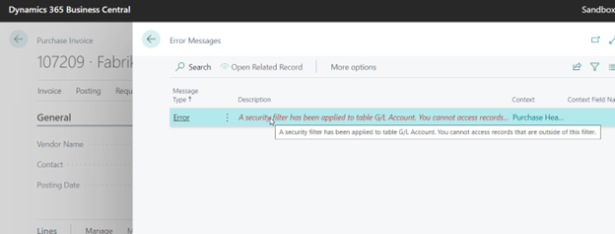
And when doing this, you need to ensure you think of all possible accounts the user will be posting to, even the sub-ledger type accounts—for example, entering a purchase invoice automatically always posts to an Accounts Payable (balance sheet) account. So, if this user only has access to Income Statement accounts, they will get the error below when trying to post.
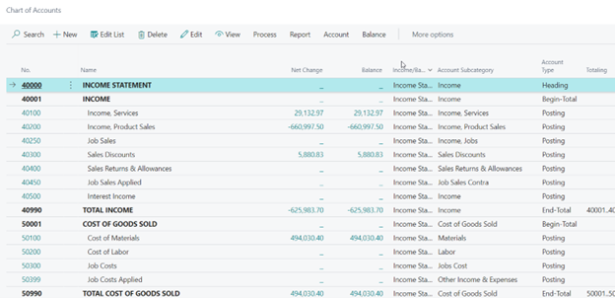
Also, if you go to the Chart of Accounts, you can see that the user can only see Income Statement accounts. Balance Sheet accounts are hidden from the user. So take this into account – users will not be able to VIEW accounts they do not have access to.
This is just one example of how security filters can be used. There are numerous creative ways to implement record-level security. If you have any further questions, feel free to contact our team, and we would be more than happy to provide additional demonstration and training sessions.
Please contact spencer.coulter@rsmus.com with any questions.
Rudy Balasabas
Rudy works on our Managed Application Services (MAS) team, focusing on providing support to our Dynamics 365 Business Central clients from initial setup to ongoing support after go live. He brings more than a decade of experience in all aspects of financial processes in an organization, along with years of end user experience in Microsoft Dynamics and other ERP systems. He has a deep understanding of financial and organizational operations, as well as how to simplify complex processes. He has a passion for process improvement and has experience implementing major efficiency changes to organizations.