
 RSMUS.com
Enabling users to find the information they need has been streamed with Dynamics 365 Relevance Search. While leveraging Azure to provide search indexing for improved performance, search results are returned to users in a sorted order. What is unique is that Relevance Search is not just limited to the fields that are recorded on a Dynamics record, but the user is also returned results from the Notes, email attachments, and appointment attachments. Please keep mind that only text fields are available for Relevance Search.
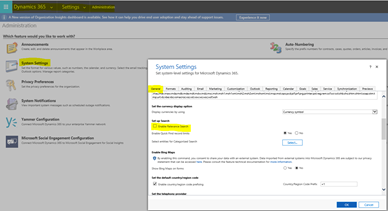
To begin, Relevance Search must be turned on for the organization which is located under the “General” tab of “System Settings”. Scrolling partially down on the tab, you will want to select the checkbox “Enable Relevance Search”.
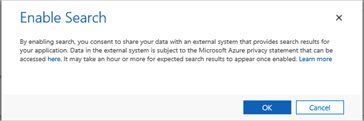
Once the option is selected, a prompt will appear to inform that the information is being stored and indexed by Azure. In order to enable the Relevance Search, the prompt must be agreed to. However, keep in mind that the information is encrypted and the only information that is stored is the fields that are configured for the Relevance Search.
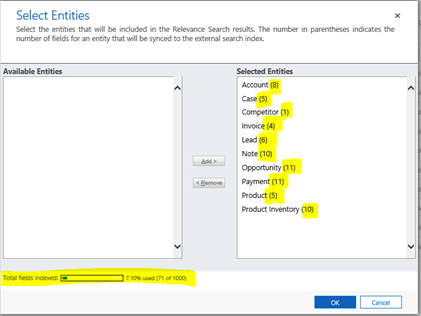
Now that Relevance Search has been enabled, the Entities and Fields that Relevance Search is applied requires configuration as well. The configuration of Relevance Search can be implemented in two ways:
- Within the CRM Default solution

- Within a new solution


When the entities are selected, the default attributes aligned with the Quick Find view have aggregated towards the total count of fields that Relevance Search is able to index. There is no limitation on individual entities, but collectively there are only 1,000 fields that can be indexed by the organization. Note that in a custom solution when an existing entity is added to the solution, it will be added to the “Selected Entities” (which can be removed).
However, to change which fields should be indexed requires the Quick Find view for each entity be adjusted by adding and removing attributes in the “Add Find Columns” and then the “Add View Columns”. The changes to both must match which ensures that the data you are bringing back from the search can be reviewed and validated. Note you could have more columns selected and shown with the “Add View Columns”.
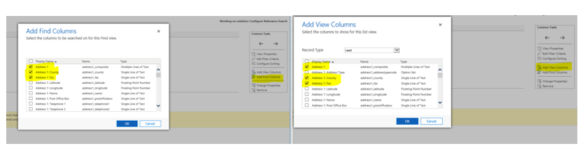
Please note (and save time troubleshooting), only fields that are single or multiple lines of text are searchable. This eliminates option sets, lookups, etc; however, they can still be added through the “Add Find Columns” and the “Add View Columns”, but Relevance Search ignores them.
Moreover, once the entities and attributes have been configured, the Personal Options must be configured to use the Relevance Search. The Personal Options section is found in the top right of the browser.
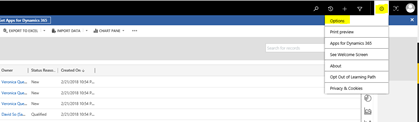
Once selected, under the General tab there is a section for choosing the “Select Default Search Experience” which is only available when once Relevance Search has been enabled.
Once all have been configured, the search experience will be smoother for the individual, but could create some obstacles if not configured correctly based on typical user behavior. For example, if the Name attribute on Leads was not configured as searchable, then the user would not find a lead by name.

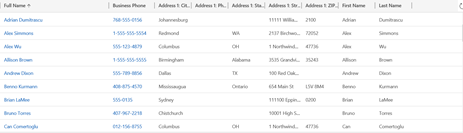
The user must start their search with exact first word values, e.g. 645 Main St requires the search to begin with the 645. Otherwise, it is possible that the search will not return a result:

When in fact it should return a result:

At the current time Relevance Search does not support any of the following operators: Like, Not Like, Begins With, Does Not Begin With, End With, Does Not End With, Child Of, Mask, Not Mask, Mask Select, Equal User Language, Under, Not Under, Under Or Equal, Above, or Above Or Equal.
The fundamental key to Relevance Search being a great tool for improving search speed and usability by the end users is ensuring that user’s habits are accounted for. For example, if Relevance Search is to be used on Contacts, then it is assumed that the key attributes users normally look for a contact should include:
- First Name
- Last Name
- Address 1
- Address City
- Address State
- Address Zip
- Phone Number
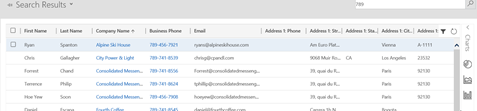
When configured, a search for a contact named Alex would result in:

A search for a phone number that starts with 789 would result in:
With the planned and strategize attributes included in the Relevance Search configuration, the functionality does improve search speed and usability. It also removes the unnecessary noise of configuring fields that users necessarily don’t use to search records for, but are important to the record.
With Dynamics 365 Relevance Search, RSM US LLP has the expertise to work with your organization to configure a system that is robust and adaptable to your user’s search habits to improve their user acceptance and productivity.
To learn more about how you can take advantage of this and other Dynamics 365 features, visit RSM’s Microsoft Dynamics 365 resource. To make sure you stay up to date with the Microsoft Dynamics Community, subscribe to our Microsoft Dynamics Community Newsletter.
For more information on Microsoft Dynamics 365, contact RSM’s Dynamics Professionals.
By: Brian Connelly
RSM Staff
RSM empowers middle market companies worldwide to take charge of change. Our unique middle market perspective makes RSM the natural choice for growth-oriented, internationally active organizations seeking relevant insights and tailored, innovative solutions for a complex and changing world. With a global reach spanning more than 120 countries, we instill confidence in a world of change by bringing the full power of RSM to make a lasting impact on our clients, colleagues and communities.