
 RSMUS.com
Have you ever needed to import thousands of records that can’t be done using Integration Manager? And have you thought to yourself “how am I ever going to get all of this data into the system without manual entry or a SQL expert?” Well there is another option – a mail merge macro! A mail merge macro is nothing more than a script that mimics the manual entry of data repetitively until all records have been entered and saved. A macro can import hundreds of records in minutes and thousands of records in less than an hour. You will need three things to successfully import records using a mail merge macro:
- the import file (generally in Excel)
- the macro (or script) that illustrates the entering and saving of one record in code format
- the ability to create a mail merge document in Word
Below are the detailed steps on how to create a macro, create the mail merge document and run the macro. This illustration applies specifically to Price Sheet Details but can be applied to nearly any window and set of data in Dynamics GP.
Prepare the Excel (merge) file
Prior to creating the macro prepare an excel file with a list of the Item Numbers, Unit of Measures and the Net Prices you want to import into the price sheet. Unless you’ve downloaded this list directly from Dynamics GP validate that every item number in the list exists in Dynamics Dynamics GP (the macro will stop when it encounters an item that does not exist).
- The price should be formatted to show dollars and cents WITHOUT the decimal.
- The item numbers must match exactly to those in Dynamics GP
- Sort the items by item number
- Delete any unused rows at the end of the document
Create the mail merge macro
Open the window where you would manually input the data (in this case Inventory > Cards > Extended Pricing > Price Sheets > Price Sheet Detail Maintenance. When you are ready to start the macro go to Tools > Macro > Record > name the macro and save it to a folder where you can retrieve it. Manually enter one record into the window and Save. When you are have completed entering and saving one record go to Tools > Macro > Stop. This records the steps of processing one record and will be the foundation for the mail merge macro.
NOTE: you can try running this macro to ensure it works properly before creating the mail merge document.
Create the Word document for the mail merge
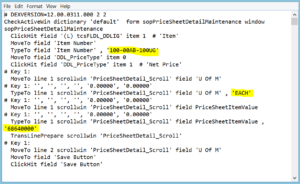
Locate the macro you just created and either open it using Word or paste it into Word from the notepad file. For a Price Sheet Detail Maintenance mail merge the file should look like this:
# DEXVERSION=12.00.0311.000 2 2
CheckActiveWin dictionary ‘default’ form sopPriceSheetDetailMaintenance window sopPriceSheetDetailMaintenance
ClickHit field ‘(L) tcsFLDL_DDLIG’ item 1 # ‘Item’
MoveTo field ‘Item Number’
TypeTo field ‘Item Number’ , ‘100-00AB-100UG’
MoveTo field ‘DDL_PriceType’ item 0
ClickHit field ‘DDL_PriceType’ item 1 # ‘Net Price’
# Key 1:
MoveTo line 1 scrollwin ‘PriceSheetDetail_Scroll’ field ‘U Of M’
# Key 1: ”, ”, ”, ”, ‘0.00000’, ‘0.00000’
TypeTo line 1 scrollwin ‘PriceSheetDetail_Scroll’ field ‘U Of M’ , ‘EACH’
# Key 1: ”, ”, ”, ”, ‘0.00000’, ‘0.00000’
MoveTo line 1 scrollwin ‘PriceSheetDetail_Scroll’ field PriceSheetItemValue
# Key 1: ”, ”, ”, ”, ‘0.00000’, ‘0.00000’
TypeTo line 1 scrollwin ‘PriceSheetDetail_Scroll’ field PriceSheetItemValue , ‘68640000’
TransLinePrepare scrollwin ‘PriceSheetDetail_Scroll’
# Key 1:
MoveTo line 2 scrollwin ‘PriceSheetDetail_Scroll’ field ‘U Of M’
MoveTo field ‘Save Button’
ClickHit field ‘Save Button’
Remove and save to a notepad file the first two lines of the macro – header (these will be used later). For the Price Sheet Maintenance macro the lines are as follows:
# DEXVERSION=12.00.0311.000 2 2
CheckActiveWin dictionary ‘default’ form sopPriceSheetDetailMaintenance window sopPriceSheetDetailMaintenance
Open a blank Word document to begin the mail merge document
Click on the Mailings tab and Start Mail Merge by selecting the Step by Step Mail Merge Wizard.
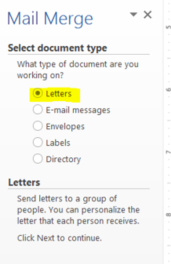
Select the document type as Letters.
On the Mail Merge Toolbar click on Next: Starting Document
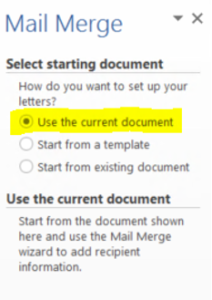
Select Use the current document.
On the Mail Merge Toolbar click on Next: Select Recipients
Select Use an existing list.
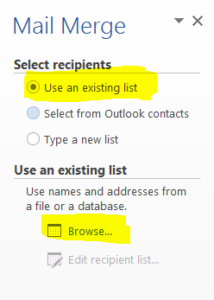
Browse and find the excel sheet with your pricing
When you Browse to select a Data Source, change the file type to Excel Files
Select the sheet that has the data you want to import.
A window will appear with all of the items. By default all of the items will be checked. If there is a record you do not want to import you would uncheck the box next to the item. Scroll to the end of the list to see if there are any blank rows that have been checked and uncheck them.
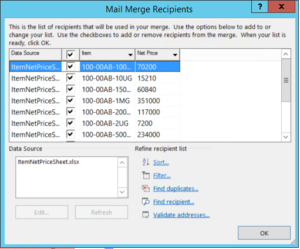
Click OK and it will bring you back to the Mail Merge Wizard
On the Mail Merge Toolbar click on Next: Write your letter
You are now on Step 4 of 6 (Writing your letter):
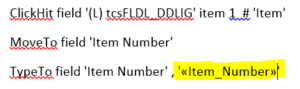
Look for the TypeTo Macro commands and replace the text between the single quotes with merge fields.
On the Mailings tab use the Insert Merge Field button
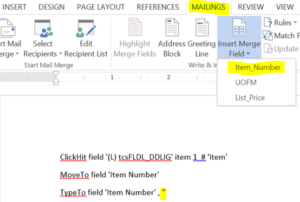
After you insert your merge field it should now look like this:
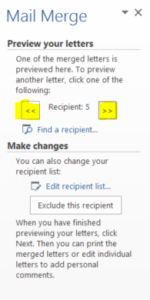
On the Mail Merge Toolbar click on Next: Preview your letters
You should now be on Step 5 of 6
You can toggle with the arrows to each of the records.
On the Mail Merge Toolbar click on Next: Complete the merge
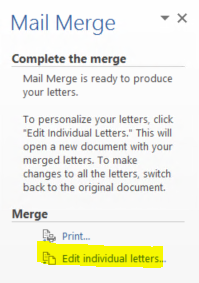
You should now be on Step 6 of 6
Click on Edit individual letters.
Merge ALL to include all records.
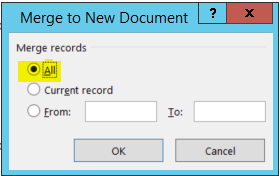
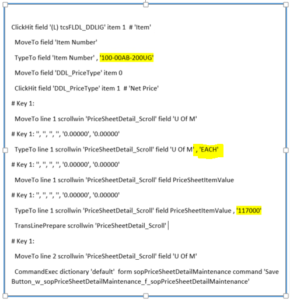
If you scroll down the document you should see a separate record for each item on your excel sheet.
On the first line of the merge document, add back in the first 2 lines of the macro which we took out at the beginning of this exercise.
Saving the document:
- Select Save As
- Select the Save as Type as Plain Text (*txt).
- Enter in the output file name and click save.
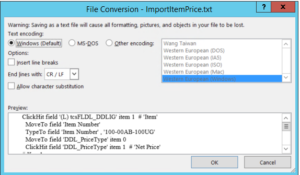
- On the File Conversion Window, click OK to accept the default settings.
Note: The file name and location can be anything – just remember it because you will need to access it to rename and run the macro.
Close Word.
Running the macro
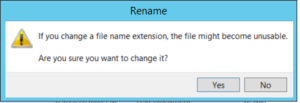
Locate the file and rename the extension from *.txt to *mac.
Note: You might need to uncheck the “Hide extensions for known file types” folder option to be able to rename the extension.
When you rename you will get a warning message – Click YES.
Return to Dynamics GP.
Open up the Extended Pricing Price Sheet (Inventory > Cards > Extended Pricing > Price Sheets).
IF THIS IS NOT A NEW PRICE SHEET:
- Use the lookup to find the Price Sheet.
- Click on the arrow next to the Item Number/Price Group ID
IF THIS IS A NEW PRICE SHEET:
- Enter the Price Sheet ID
- Description
- Currency
- Date Range
- Click on the arrow next to the Item Number/Price Group ID
On the ribbon go to Tools > Macro > Play
Find the macro and Click on it to open.
It will start importing all records.
Once completed, close the window to return to the main window.
You will see all your items/prices.
NOTE: You cannot use Dynamics GP while the macro is running.
If you have any questions regarding this process, feel free to email me at tracyjo.dance@rsmus.com, or contact any of our dynamics pros experts. 855-437-7201
by http://dynamicserppros.com/author/tjdance/Tracy Jo Dance for RSM
RSM Staff
RSM empowers middle market companies worldwide to take charge of change. Our unique middle market perspective makes RSM the natural choice for growth-oriented, internationally active organizations seeking relevant insights and tailored, innovative solutions for a complex and changing world. With a global reach spanning more than 120 countries, we instill confidence in a world of change by bringing the full power of RSM to make a lasting impact on our clients, colleagues and communities.