Use Case: A user needs to submit a document on the portal by attaching a file to a CRM record. This creates a note attachment in CRM on the timeline of that record. There is a subgrid of these records on a parent record, so to access the file you would have to click on each one. What if there was a way to easily access all the attached files in one convenient location? This is possible with the use of Power Automate and adding a sub-grid of Documents on the parent record.
Another use case would be if you wanted to store the attached files in SharePoint so everyone who has access to the site can easily access the file, instead of going into the parent record in CRM.
How to manage your documents
These instructions are under the assumption that you already have your SharePoint site set up. To set that up, you would go to Advanced Settings > Document Management > SharePoint Sites.
It is also under the assumption that the relationship between SharePoint Documents and the parent entity has already been defined. To do this, you would go to Advanced Settings > Document Management > Document Management Settings.
To upload a file in CRM, that will get dropped in SharePoint, you have to create a document location in CRM for the related entity, which also creates the folder in SharePoint. When you manually upload a file, the out-of-the-box behavior creates both for you. Unfortunately, that is not true when trying to automate the process of uploading a file, instead, the SharePoint folder/document location needs to exist prior to file upload. The good news is that you can use Power Automate to create that SharePoint folder/document location!
For automatically uploading a file to work, you must create a SharePoint folder that has the same name as it would if it were to be created using the previously mentioned out-of-the-box functionality. You also have to create a Document Location for that SharePoint folder, both of which must have the same name.
Before getting started, you should test manually uploading a file and then look at the folder it creates in SharePoint to see the out-of-the-box naming schema
Create Document Location Folder Using Power Automate
In the following example, I will be creating a document location. In this case, we are creating a document location for the project entity.
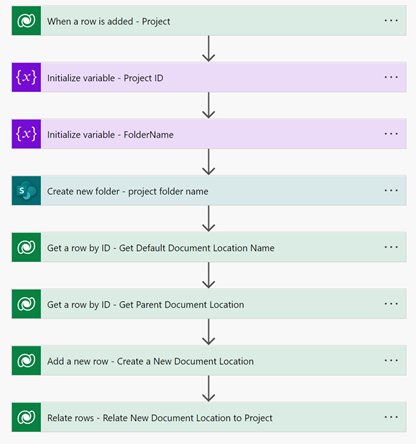
Let’s take a closer look at each of the steps:
- Use the ‘Initialize variable’ action to create a variable to store the record’s GUID.
- To match exactly the out-of-the-box SharePoint folder name – you will have to make the GUID all upper case and remove the special characters (-)
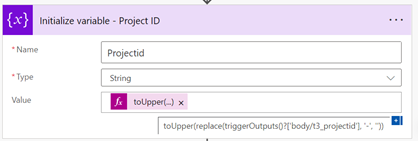
A closer look at that expression:
toUpper(replace(triggerOutputs()?[‘body/t3_projectid’], ‘-‘, ”))
- Use the ‘Initialize variable’ action to create a variable to store the name of the SharePoint folder
- In this case, it is an attribute of the record_variable from step 1

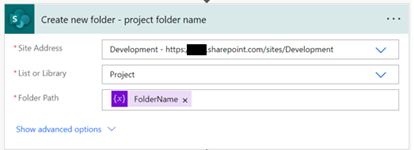
- Use the ‘Create new folder’ (Sharepoint) action to create a folder directly into your SharePoint site.
- Select the site and library (should be the name of the parent entity) you would like to create the folder in
- Folder path = the variable from step 2.

- Use the ‘Get a row by ID’ action to get the default Document Location.

-
- This should be the Document Location with an Absolute URL that matches the Site Address that you selected in the previous step, which you can find by doing an advanced find
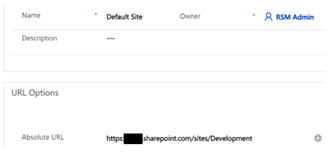
- Use the ‘Get a row by ID’ action to get the parent Document Location (for the document library).

-
- This should have a relative URL that matches the schema name of the entity
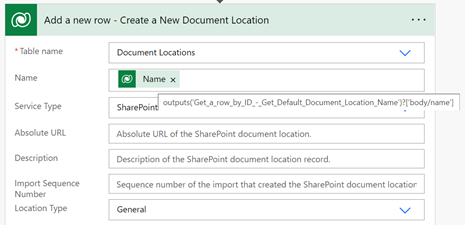
- Use the ‘Add a new row’ action to create a new document location
- You will need to fill in the following fields: Name, Service Type, Location Type, Parent Site or Location (Document Locations), Relative URL
- The name should be from step 4. – Default Document Location

- OData Id should be from step 5. – Parent Document Location

- The name should be from step 4. – Default Document Location
- You will need to fill in the following fields: Name, Service Type, Location Type, Parent Site or Location (Document Locations), Relative URL
-
-
- The relative URL should be the FolderName variable from step 2.

- The relative URL should be the FolderName variable from step 2.
-
- Use the ‘Relate rows’ action to relate the new document location (created in step 6.) to the record in the trigger step (this stamps the project value as the regarding object on the document location)
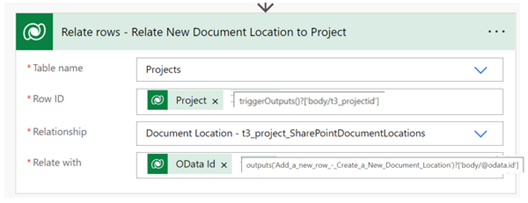
Move a Note Attachment to SharePoint Using Power Automate
Now that you have created the document location in CRM and a folder in SharePoint, you are ready to move a note attachment to SharePoint. Please note, if you have not created the Create Document Location flow yet, then this next process will not work.
In the following example, I will be moving a note attachment to SharePoint. In this case, a project record can have many requirement records, and on the requirement record, the user must attach a file (creating a note attachment on the requirement’s timeline in CRM). The steps below will show you how to directly move this attachment into SharePoint and show up on your documents sub-grid.
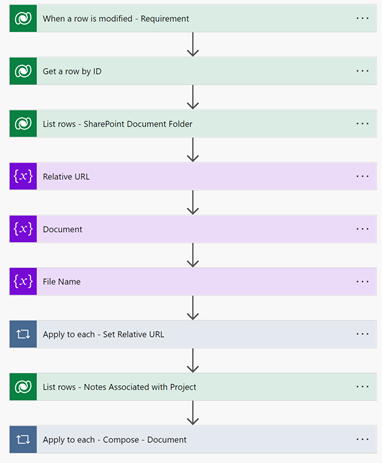
Let’s take a closer look at these steps:
- Trigger on the table that the file gets attached to, in this example, it is the Requirement record.
- Use the ‘Get a row by ID’ action to get the record (parent entity) – this should be the record that has the document location related to it

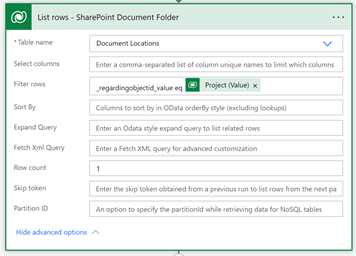
- Use the ‘List rows’ action to list and grab the document location that you previously created in the flow outlined above (make sure the row count is set to 1).

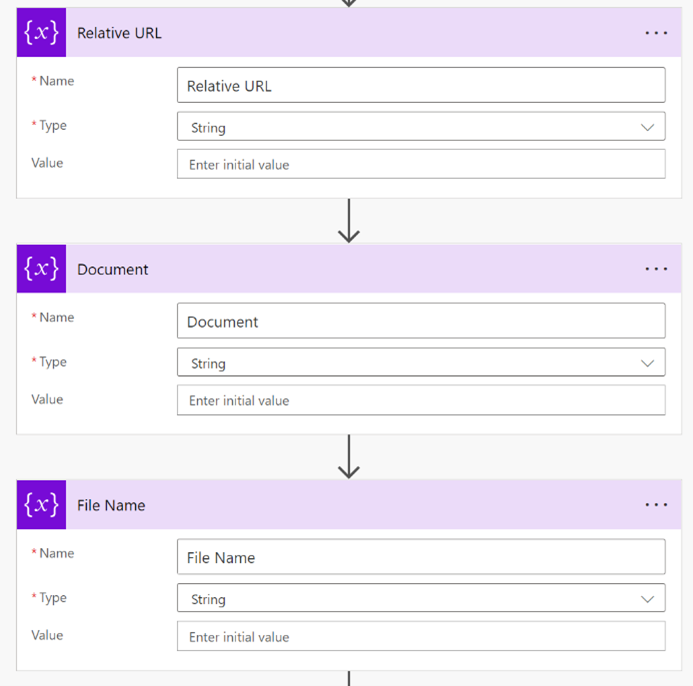
- Use three separate ‘Initialize variable’ actions that will be used later to set the values and apply them to each step.

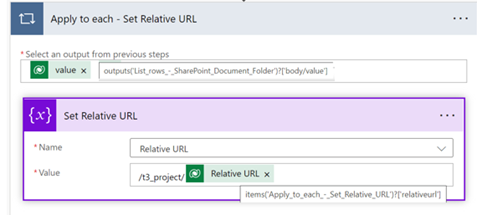
- Use the ‘Set variable’ action to set the Relative URL variable you initialized in step 4.
- The schema should be /SharePoint Library/Relative URL (from step 3.)

- The schema should be /SharePoint Library/Relative URL (from step 3.)
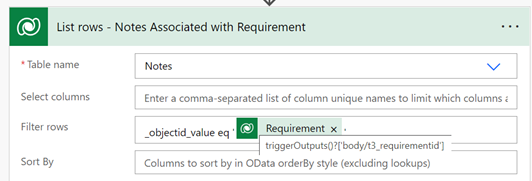
- Use the ‘List Rows’ action to list the notes associated with the trigger step record by filtering the note’s object id value equal to the trigger step record.

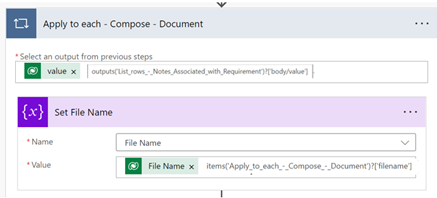
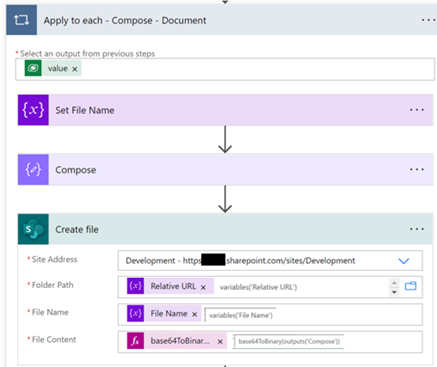
- Use the ‘Set variable’ action to set the File Name variable you initialized in step 4 from the List Rows in step 6.

- Use the ‘Compose’ action to dynamically get the document body from the List Rows in step 6.
Let’s take a closer look at the inputs:
Items(‘Apply_to_each_-_Compose_-_Docuemnt’)?[‘documentbody’]
- Use the ‘Create file’ (SharePoint) action to create the note attachment file in SharePoint.
Let’s take a closer look at the expression in the File Content field:
base64ToBinary(outputs(‘Compose’))
Contact us to learn more about Power Automate and see what it can do for you.
Learn more about the Power Platform.

 RSMUS.com