RSMUS.com
There are several reasons why an organization would want their NetSuite users to be protected through SAML SSO, or Security Assertion Markup Language Single Sign On. Not only does it allow for a more efficient user experience, as users only need to provide log-in information one time when logging into multiple systems, but this feature also prioritizes security. This authentication process involves three different parties:
- Principal/Subject: Typically the user attempting to access the application, which is NetSuite in this case.
- Identity Provider (IdP): A service that verifies who a user is, working in synchrony with the SSO. Some examples of this include Microsoft Azure AD, OneLogin, and Okta.
- Service Provider: The cloud app or service the user wants to access: NetSuite in this case. The user logs into the SSO, instead of logging into NetSuite directly, and SAML is used to grant access.
Now, how does this process get set up on the NetSuite end? The actual configuration of this for a NetSuite user is fairly straightforward. For the sake of this example, we will be going through steps as if Okta is the IdP we will use.
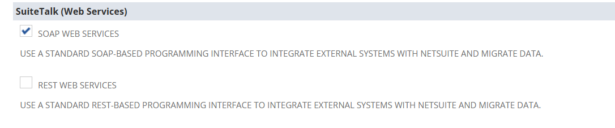
- Enable Necessary Features
- Using your Administrator role, log in to NetSuite.
- Navigate to Setup > Company > Enable Features.
- Select the SuiteCloud subtab.
- Scroll to the SuiteTalk (Web Services) Section and check “Check SOAP WEB SERVICES”.
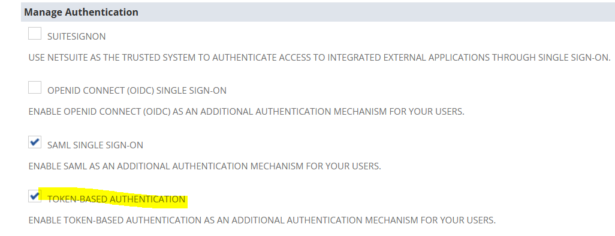
- Scroll to the Manage Authentication Section and check “TOKEN-BASED AUTHENTICATION”.
- You may be prompted to read the SuiteCloud Terms of Service page; if so, choose “I Agree” to proceed.

- You may be prompted to read the SuiteCloud Terms of Service page; if so, choose “I Agree” to proceed.
- Assign Permissions
- Navigate to Setup > Users/Roles, then click Manage Roles.
- Choose the role that you want to be protected through SAML Single Sign On.
- Click “Edit” on the role.
- Navigate to the “Setup” subtab under Permissions.
- Add the permission “SAML Single-Sign On” and make the level “Full”.
- If you want to configure the role for someone who should have the ability to manage the SAML SSO connection (typically an administrator or manager role):
- Add the permission “Set Up SAML Single Sign On” and make the level “Full”.
- Click Save, and repeat for each role for which you want SAML SSO enabled.
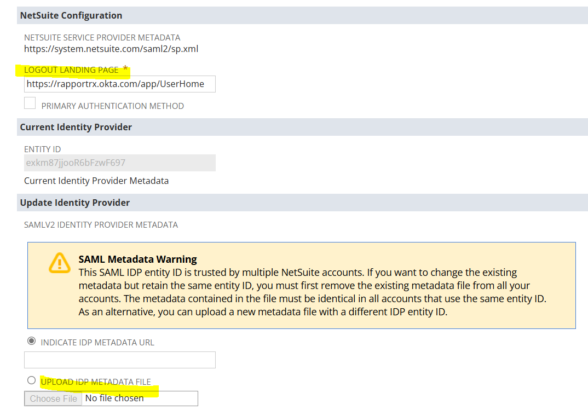
- Gather Relevant NetSuite SP Metadata
- Navigate to Setup > Integration > SAML Single Sign-On.
- Navigate to the “Logout Landing Page” and enter the following: “Sign into the Okta Admin dashboard to generate this value.”
- Save the following text in a file named “metadata.xml”: “Sign into the Okta Admin dashboard to generate this value.”
- Navigate to the “Upload IDP Metadata File”, and upload the file you just created.
- Click.
- Submit.
- Navigate to Setup > Integration > SAML Single Sign-On.
- Account ID
- Navigate to Setup > Company > Company Information.
- Copy the value for “Account ID”.
- Okta Interface
- Navigate to your Okta portal.
- Select the “Sign On” tab for the NetSuite SAML App and click “Edit”.
- Under Advanced Sign-On Settings, make the following changes:
- For “Email SAML attribute”: Select the option to be used as email SAML attribute (either Email or Username).
- In this case, an attribute is the piece of information about a user that is processed during authentication, so choose if the user is going to be identified by their email or username.
- For “NetSuite Account ID”: Enter the NetSuite Account ID you made a copy of.
- For “Email SAML attribute”: Select the option to be used as email SAML attribute (either Email or Username).
After these steps are completed, it’s worth mentioning some additional implementation notes that will help users become more knowledgeable about SAML SSO and NetSuite.
- Administrator Role:
- When a user logs into NetSuite through SAML SSO, the Administrator role is not available for them to switch into. A user can only access the Administrator role through the NetSuite log-in screen.
- Testing Permissions:
- Often during UAT, NetSuite consultants will duplicate roles and use these roles for testing to allow themselves to experiment with permissions without ramifications.
- However, it’s worth noting that if this SAML Single Sign-On permission is not removed, this role will not be accessible via the NetSuite log-in screen.
- Therefore, for a consultant to use a role for testing, this permission must be removed.
In summary, SAML SSO can be a useful and advantageous tool when it comes to protecting the security of your NetSuite environment, and it can also make sign-in more streamlined and efficient for the users themselves. Furthermore, it offers an intuitive and concise setup process, ensuring that it can be implemented with minimal hassle.