All too often, Microsoft Dynamics SL clients run out of user fields when looking to maintain additional information. This shortage of user fields is typically the result of one of two possible scenarios:
1) The user needs more of a specific data type than what the standard Dynamics SL table provides (i.e. the table has 2 date fields and the user needs a third).
2) The user needs to store a string with a length greater than what is available in the standard Dynamics SL table.
Looking at the Vendor record as an example, there are only 8 user fields available to the end user that are guaranteed not to be used by Dynamics SL.
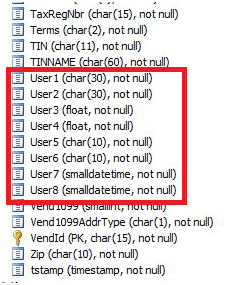
The first inclination for developers, who don’t understand how Dynamics SL works from a programming standpoint, is to either add a new field to a core Dynamics SL table, or alter an existing field. The problem with doing this is that Dynamics SL works with records based on offsets with buffers in memory. This is one reason why Dynamics does not allow null values and does not allow varchar or nvarchar data types (the “char” datatype has a fixed width regardless of how much non-whitespace is stored in the field whereas the “varchar” and “nvarchar” have variable lengths depending on how much data is stored in the field). These core tables have predefined structures that Dynamics SL is expecting to see. As soon as the table is modified, Dynamics SL catches this and will fail to load the screen.
As an example, a new field, User9, has been added to the Vendor table:
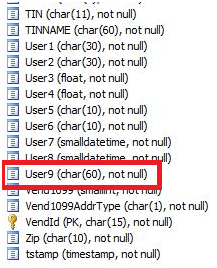
Now, when attempting to open the Vendor Maintenance screen, there is a system message that appears:
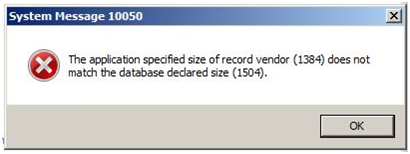
So how can that additional information be stored and maintained? The answer is, create a new table and now the developer is responsible for keeping that new table synchronized with the record being worked on in Dynamics SL.
Assume that the following SQL Script is used to create a new table which extends the vendor table:
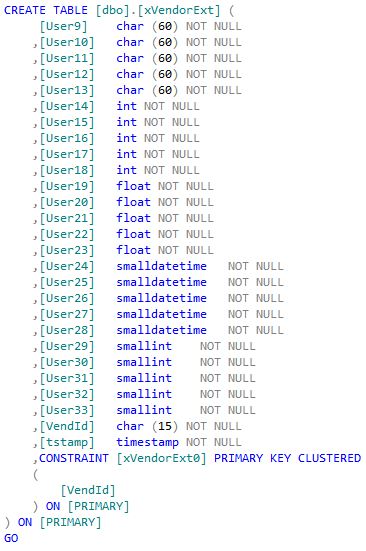
Note the following rules that must be followed when creating a new table to be used in Dynamics SL:
- No field can allow NULL values
- The last field in the table is named “tstamp” and has a timestamp data type.
- The name for the primary key is the table name with the number “0” at the end
- The only valid SQL data types are:
- Smallint
- Int
- Float
- Char
- Smalldatetime
- Timestamp (but ONLY for the tstamp field).
Note the following rules that SHOULD be followed (but are not required) when creating a new table:
- The name of the table should start with the letter “x”.
- Dynamics SL will never put out a release where there is a standard table starting with an “x”.
- It makes custom tables easier to find in SQL Server Management Studio.
- Fields should be in alphabetical order
- It makes fields easier to find.
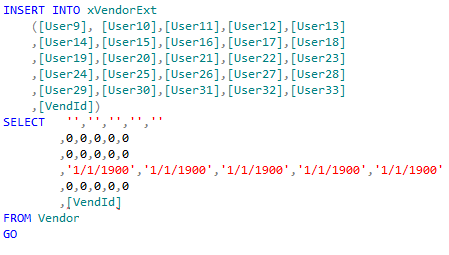
With the new table in place, it is a good idea to seed the table. In this case, all the values will either be a blank string, zero, or 1/1/1900 depending on the field type. This will help when working with existing vendors in Dynamics SL. The script to do this is as simple as:
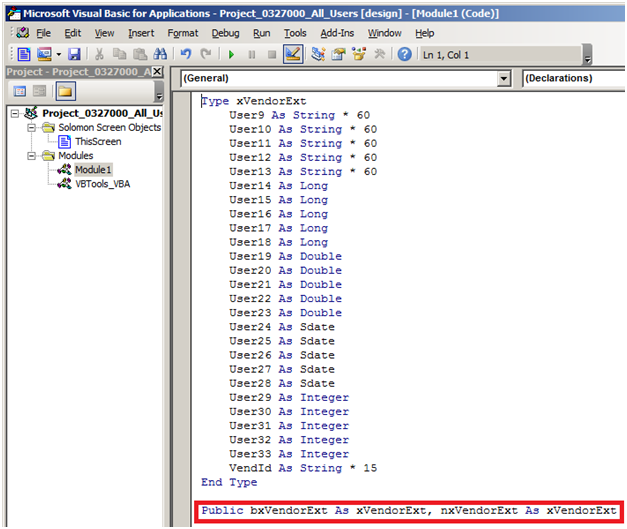
Now it’s time to start adding in the code to enter and maintain the data in the extended table from within Dynamics SL. Be sure to select the appropriate customization level before launching the screen. When in customize mode, add a new module. This is where a new type is declared to define what an extended vendor looks like in VBA. See the code below to see what the table looks like in VBA. Note that two public variables have been defined in this module
- bxVendorExt
- This is the buffer that will be used to store any record fetched from SQL.
- nxVendorExt
- This is a null buffer
With the type and variables declared, there is one more variable to declare – a link to a cursor that is used to search for, and iterate over records fetched from SQL.

It is time to set an address in memory for the buffer variable, and declare a cursor to fetch records from SQL. This needs to be done within the Form_Load event.

At this point, if the Vendor Maintenance screen is closed and reloaded, it will appear as though the fields of the xVendorExt table are fully functional. However, there is still nothing to tie the vendor record with the xVendorExt record. This requires additional VBA code.
To start, code needs to be added to fetch the extended vendor record when the user selects a new vendor. This needs to go into the “Chk” event for the VendId control.
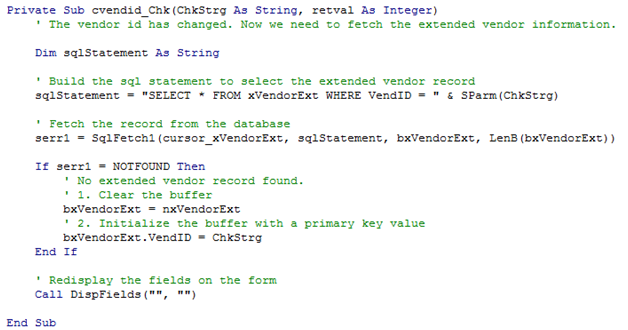
At this point, the extended record will display (if controls have been added to the window that are bound to the xVendorExt table). However, if the user inserts a new record or makes changes to an existing record, these will not be captured. In order to commit these changes to the database, code needs to be added in the Update1_Update event.
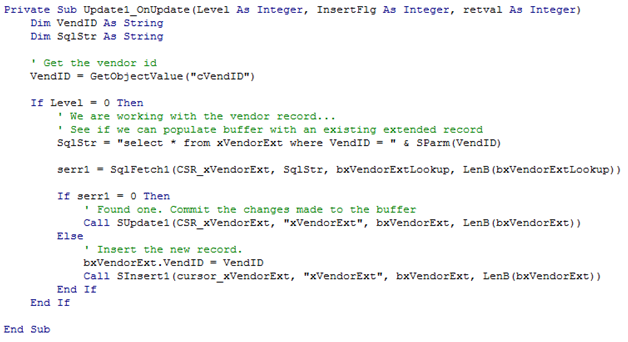
Now, as the user selects a vendor, the extended information is displayed and maintained just as if it was part of the standard Dynamics SL core product.
If you are looking to add fields to the Dynamics SL screens and don’t feel comfortable making these changes yourself, RSM offers services that extends your Dynamics SL solution. Contact our professionals at erp@rsmus.com or leave me a comment below for more information.
By: Dan Hufford – Massachusetts Microsoft Dynamics partner

 RSMUS.com