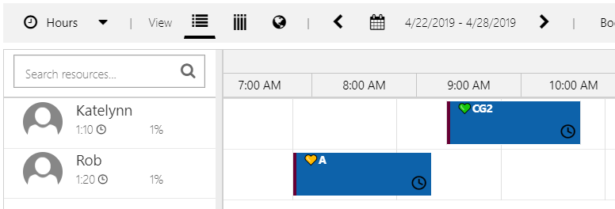
Have you ever needed additional color-coding functionality in Dynamics 365 for Field Service other than system status and priority color-coding? We recently helped a client that had a need for additional at a glance identification on the Dynamics 365 Field Service Schedule Board. The client needed the ability to quickly see their Security Level code and color on the Schedule Board for the Work Order that had been scheduled. Our solution? Emoji’s. That’s right, you can use Emoji’s in Dynamics 365 for Customer Engagement (D365 CE). This blog will show you how to add emoji’s to D365 CE and display them on the Schedule Board in Field Service, allowing for at a glance identification.
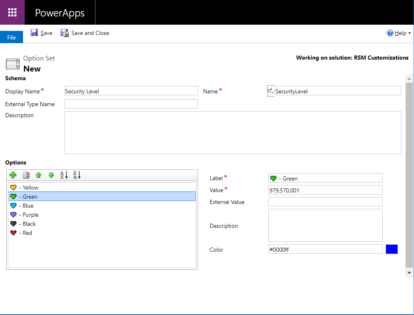
Create an Option Set.
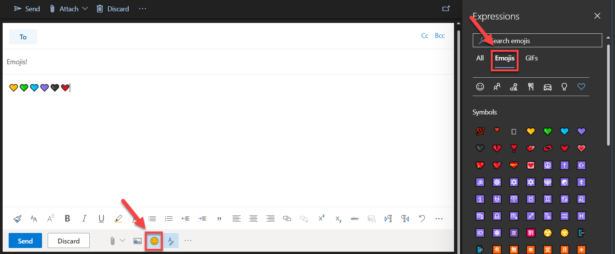
To start with, create an option set. Copy and paste Emoji’s into the label field of the option set. In order to copy and paste the Emojis, I used emoji’s from Outlook to help with compatibility. Once logged in to the Outlook web app, I selected the smiley face icon at the bottom of the screen to display the Expressions pane, then selected the Emoji’s tab to display the Emoji options. Selecting the Emoji icon places the Emoji in the body of the email. To use the Emoji in the option set, highlight the Emoji then copy it (Ctrl + C), then paste (Ctrl + V) it in the Label field of the option set.
Using Outlook for Emoji’s
Option Set
As shown in the image below you can use accompanying text with the Emoji.
Place the Option Set field on the form.

For this example, the field is located on the Account entity form.
Customize Resource Booking Display
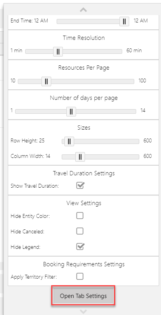
On the Schedule Board, select the schedule tab that you want the change to take effect on. After that select the Scheduler Settings gear.

Select Open Tab Settings on the settings pane.
Open the Schedule Types tab and select Work Order.
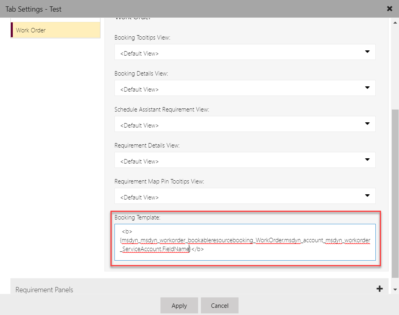
In the Booking Template section, enter the following text. Replace Field Name with the field name in your system that is using the Emoji option set.
<b>{msdyn_msdyn_workorder_bookableresourcebooking_WorkOrder.msdyn_account_msdyn_workorder_ServiceAccount.FieldName}</b>
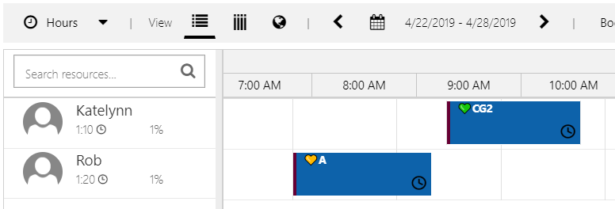
Select Apply and you will see the Emoji’s displayed on the Schedule Board.
I hope that this article will help you provide additional functionality to your Dynamics 365 Field Service Schedule board.
If you have any questions, feel free to drop a comment below.
To learn more about how you can take advantage of the Field Service Mobile app and other Dynamics 365 features, visit Microsoft Dynamics 365. For more information, contact us.
By: Katelynn Arnold | Microsoft Dynamics 365 for Customer Engagement | Microsoft Dynamics 365 for Field Service

 RSMUS.com