In my last blog, The Microsoft Dynamics CRM email router made simple, I talked about the basic concept of the Microsoft Dynamics CRM email router, what it does, and how it compares to using the Dynamics CRM Outlook Client for email synchronization. Below are the steps and the information you need to know in order to configure the Email Router for use with Microsoft Dynamics CRM.
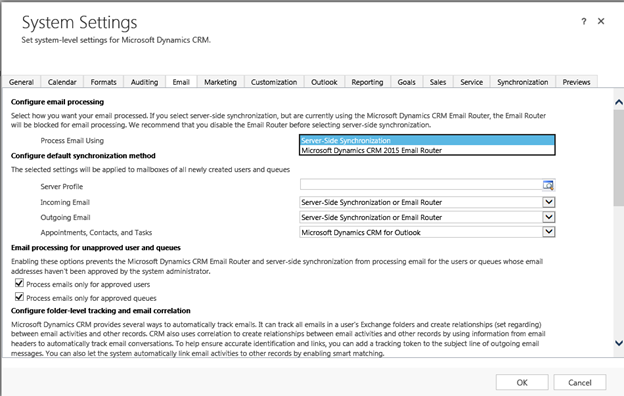
- The Server must be set to use the Email Router (vs. Server Side Sync). This is sort of an on/off switch. Either the email router is on, and server side Sync is off, or Server side Sync is on and the email router is off.
- This setting is under Administration > Settings > System Settings, on the email Tab. The drop down for Process Email Using needs to be set to the email router.
- Server Profile, is only used for Server side Sync. This can be left blank for the email router.

- Other settings to Note:
- Process emails only for approved users
- Requires that you approve each user for which the email router will be processing mail. There is an approve button on the mailbox you will need to click. Same for Queues. Uncheck this checkbox to skip this step.
- Additional settings can be found here that control how and which emails Dynamics CRM tracks.
- Process emails only for approved users
- You must have at least 1 user account, set to use the email router as it’s incoming or outgoing synchronization method, (or both).
- The settings on the user accounts are 1 of 2 settings. They are either set to use Outlook, or Email Router or Server side Sync. Which is it? It is whatever option is set in the System Settings, (number one) above.
Email Router Configuration Requirements
- In order to configure the email router, you will need the following information:
- The Information to connect to a user mailbox.
- Server name/URL FQDN for Exchange Web Services & Version (2007/2010/2013), or a Pop3 Server address
- An Exchange address will be in the following format. http(s)://Server.domain.com/EWS/Exchange.asmx
- For Exchange, you can often just append the /EWS/Exchange.asmx to the address they use for Outlook Web Access.
- For Example: if you access OWA via a URL such as Https://Mail.MyCompanyDomain.com/OWA then adding /EWS/Exchange.asmx instead of /OWA is typically the Exchange Web Services URL.
- A Pop3 server would have just a server.domain.com format.
- For Exchange, you can often just append the /EWS/Exchange.asmx to the address they use for Outlook Web Access.
- An Exchange address will be in the following format. http(s)://Server.domain.com/EWS/Exchange.asmx
- You will also need the username and password for the mailbox (usually same as windows credentials).
- This could be in the format of an email address, or in the format of domainUser for the username.
- Next, you need the information you would use to connect or log in to an instance of Dynamics CRM including:
- The Dynamics CRM URL. Usually something like Https://CRMCompany.CompanyDomain.COM:444
- The Org Name for Dynamics CRM.
- This is not necessarily the Org name as it appears in deployment manager.
- You can get the org name from Dynamics CRM by going to Settings > Systems Settings > Developer Tools.
- A username and password with a license to access to Dynamics CRM. (Administrative License will not work.)
Setting up the email router for the first time
- The Email Router must first be installed. If you can click next, you can install this in less than 10 minutes. Please be sure to install the same update roll-up that the Dynamics CRM server is on.
- Launch the email router Configuration manager
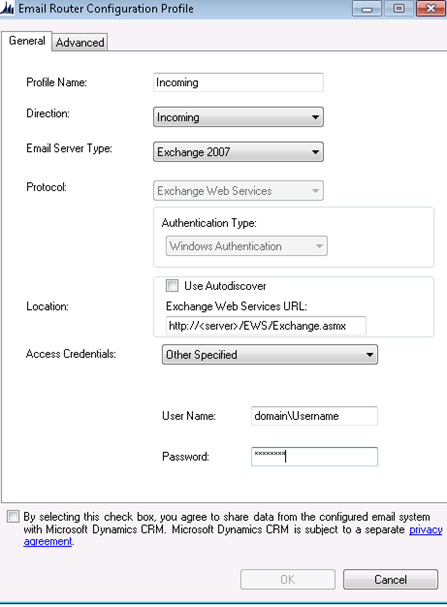
- On the Configuration Profiles Tab, click New. You will have to create a profile for both directions (incoming and outgoing).
- Use the information from the requirements above.
- Give the Profile a name.
- Alternatively, for Outgoing, you can use SMTP.
- For SMTP, you just need the FQDN of the server. E.g. MyMailserver.mydomain.com
- You may specify credentials, or you may ask your mail administrator to allow anonymous access to the IP address of your email router server.
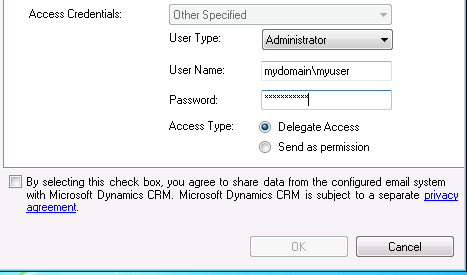
- If you elect to user Exchange for the Outgoing type, you must specify what type of access credentials you are using. Select Administrator if you have an admin account that has permission to all users’ mailboxes, or if you just want to specify the credentials for one user. This can be any user, it does not have to be a Dynamics CRM admin, a windows admin, or anything like that.

- On the Deployments Tab, you can connect to one or more deployments of Dynamics CRM, (perhaps you have a production and a test deployment, here you can create a connection to both of them).
- Choose what deployment type you have.
- Dynamics CRM Online if you are using Office 365, my company would be on premise, or online service provider for a 3rd party hosted installation of Dynamics CRM.
- Enter the URL to your Dynamics CRM Organization.
- For Dynamics CRM online, this will be
https://disco.crm.dynamics.com/ORGNAME- See section 2.C above for instructions on finding your Org name under developer resources.
- Enter in the credentials for a user that has access to login to Dynamics CRM. This is simply to read settings from Dynamics CRM, and write them back to the system. Usually a system admin, with a full Dynamics CRM license (not just administrative license).
- Optionally, select a default Profile for the deployment. This will set all users to use this profile in that deployment. The Profile you select, will be the mailbox/server that the user(s) will send and receive from.
- For Dynamics CRM online, this will be
- Choose what deployment type you have.
- Next move on to the Users, Queues and Forward Mailboxes Tab.
- Select your deployment and click Load Data.
- (Troubleshooting tip) If you get an error at this point, it is a problem with the settings on the deployments tab. Go back, and verify the URL by pasting it into a web browser, and verify the username and password by logging into Dynamics CRM with it.
- Once the data loads, you will see all of your users that are set (on the Dynamics CRM user account inside of Dynamics CRM), to use the Email Router as either their incoming or outgoing email method.
- Select a user, and click test Access. (If no profile is assigned because you left that blank on the deployments tab, double click the user first and assign a profile).
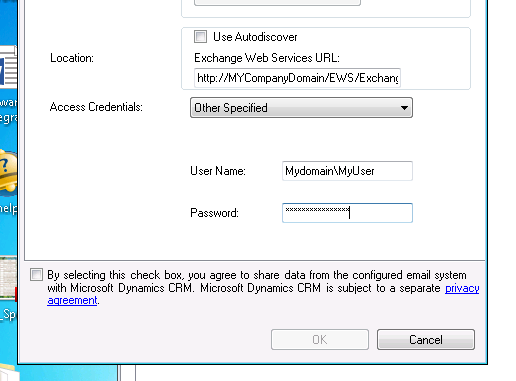
- Access Denied? Ok, here’s the catch. The user account you setup on the Configuration Profile, that’s whose mailbox you are connecting to. If the user you are testing access for, doesn’t have access to the user’s mailbox that you used (access credential), on the configuration profile, you will get an access denied, (or unable to relay) message. The email address on the user you are assigning to the profile, must match the email address of the mailbox. Take the following Example: On the profile, you have the following credentials.

- You are logging into the mailbox for MYUser, on MyDomain. If on the Configuration Profile, you have that same user’s email address, then this should work without any special Exchange or mailbox permissions. The primary email address for the user in the figure above, would match the primary email address for the user that you are configuring to use the email router for.

- If you would like multiple users to use the same mailbox for incoming or outgoing purposes, you have two options. You can ask the mail administrator to give them Delegate permission. Or Send As permission. The difference between these two options, is how the From Address will appear to the recipient. For a delegate it will say From UserA on Behalf of UserB. With Send As permissions, you will not know the email was sent as a different user at all. This is controlled with the Access type setting, back on the configuration Profile by choosing Delegate Access, or Send as Permission.

- Access Denied? Ok, here’s the catch. The user account you setup on the Configuration Profile, that’s whose mailbox you are connecting to. If the user you are testing access for, doesn’t have access to the user’s mailbox that you used (access credential), on the configuration profile, you will get an access denied, (or unable to relay) message. The email address on the user you are assigning to the profile, must match the email address of the mailbox. Take the following Example: On the profile, you have the following credentials.
- Select your deployment and click Load Data.
Once you have your users assigned to the profile, and the test succeeds, emails should get to (and/or from), Dynamics CRM without the user needing to be in Outlook. The most common scenario I see this used for, is when a workflow is kicking off an email, maybe a notification, or upon some other event happening and the client is wanting an automated email to be sent for each of those activities.
To keep things simple in the scenario above, just use the credentials of the user that is sending the notifications when you configure the incoming and outgoing mail profile, set that user to use the email router for outgoing mail, make sure his/her email address in Dynamics CRM matches the primary email address on the active directory account, and assign that user to the incoming/outgoing profile created. Then there will be no special permissions needed on the mailbox.
If you are looking for Microsoft Dynamics Support Specialist, RSM can help. Our professionals are certified for Microsoft Dynamics CRM with an average of fifteen years of CRM experience. Contact our professionals at crm@rsmus.com for more information.
By: LaTonia Watne – Minnesota Microsoft Dynamics CRM partner

 RSMUS.com


