Field Service is a great tool for companies that send out remote workers, but what happens if that remote worker isn’t able to perform the work? It might be that they got sick or maybe they are having problems with their vehicle in which case they need an easy way to let the dispatcher know. Yes they can call the dispatcher to let them know, but what if there was an easier way to accomplish this quickly? In this blog post I’m going to show how you can configure the application to address scenarios like this.
Solution
We are going to add a two option field called ‘Accept WO’ with the values ‘yes/no’. By default, this field will be set to ‘yes’. When the remote worker needs to reject the booking in the Field Service mobile app , they can set this field to ‘no’. Once this happens we want the booking status to change to ‘reschedule’ and show in a different color on the schedule board so that the dispatcher sees the remote worker can’t perform the work and the booking needs to be rescheduled. We also don’t want the remote worker to change the status as this point, so we’ll lock the booking status field once the booking has been rejected.
Configuration
The first thing we’re going to do is add a new booking status. Open the Field Service app and go to the Resources area. Click on ‘Booking Statuses’ under Booking settings. Click the ‘+New’ button on the command bar. Set ‘Reschedule’ as the name of the booking status, and set the status to ‘Committed’. Click on the common tab to set the color for the status. (You can find color codes here: https://html-color-codes.info) I’m going to use yellow for this: E7FF0A. Click on the field service tab and select ‘Scheduled’ as the Field Service Status, then click save and close. That was easy enough!
Now let’s add the ‘Accept WO’ field to the bookable resource booking entity. Open the default solution or create a new solution and add your changes there (highly recommended). If you’re going to use a new solution, click on the gear icon on the top right and click ‘Advanced Settings’, then navigate to settings > solutions and click ‘New’ on the command bar. Name your solution, then click ‘Add Existing’ and select ‘entity’. Check the box next to the bookable resource booking entity, and click add. We’re not going to add any existing components, so just click finish. When the ‘missing components’ box pops up, select ‘No , do not include required components’ and click ‘ok’. Expand the entities on the left side by clicking the arrow, then expand the bookable resource bookings entity and click on ‘fields’. Click the ‘New’ button to create the field using the metadata below:
– Name: Accept WO
– Field Requirement: Optional
– Data Type: Two Options (Yes/No)
– Field Type: Simple
-Default Value: Yes
Click ‘save and close’ to create the field, then publish your changes.
Mobile Configuration
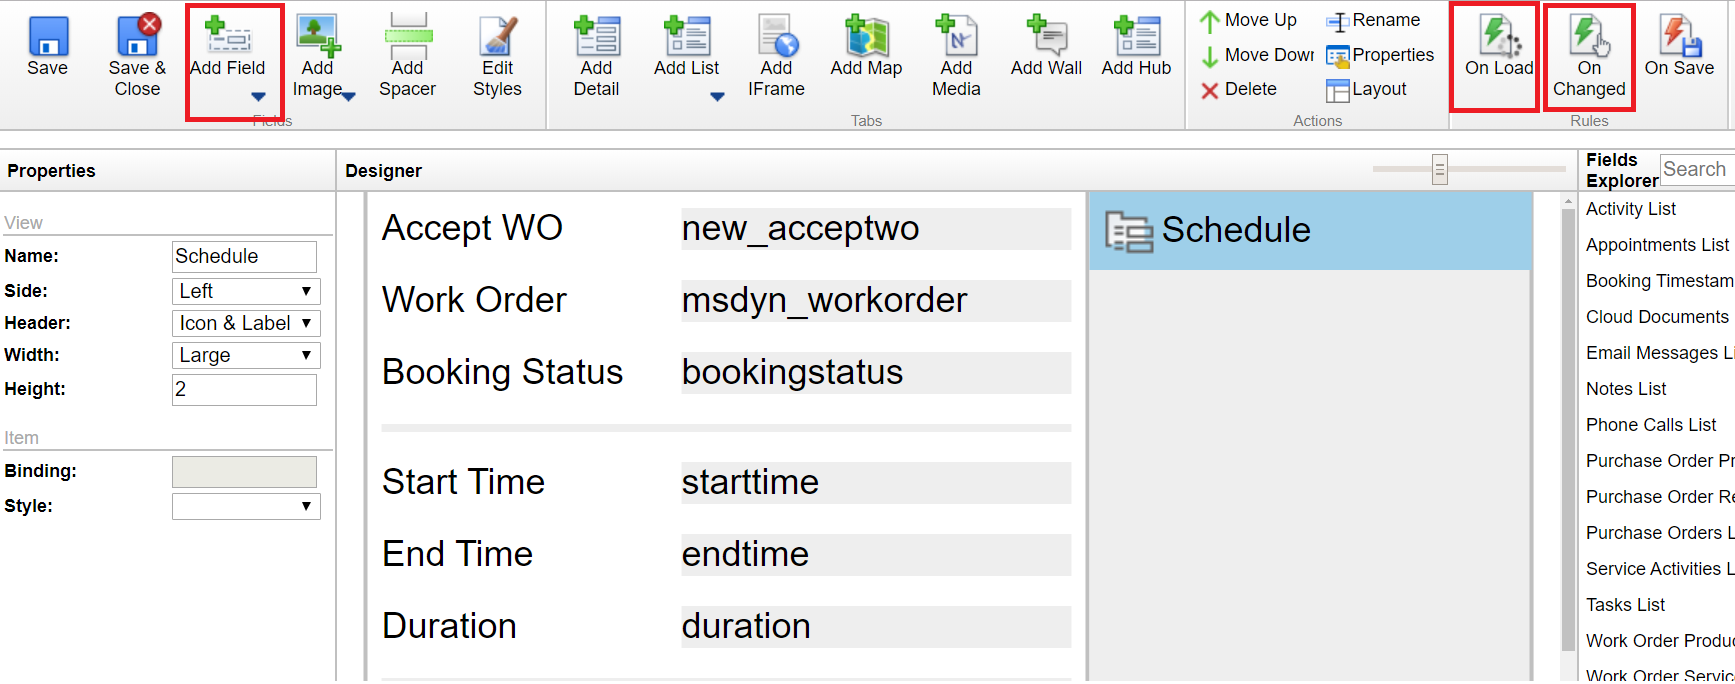
The next step is to add the field to the Field Service Mobile app. Navigate to Settings > Woodford > MobileCRM Woodford HTML5. Double click on the project to open it. In the search box on the left side, type ‘bookable resource booking’ and click on the entity name. Scroll down until you find the field that was just created, or use the search box on the top right side to find it. Check the box next to the field to enable it, then click ‘Save’ on the top. On the left side of the screen, click on the icon on the left side of the entity name to open the editor. Open the default form by double clicking it. Click ‘Add Field’ on the ribbon and drag it to the top of the form, then click ‘Save’ on the ribbon.

Now let’s add some logic to the form: When the field tech set the ‘Accept WO’ field to ‘No’ we want the booking status to automatically change to ‘Reschedule’ and we don’t want the tech to be able change the booking status field. This is very much like configuring a business rule in Dynamics 365 CE.
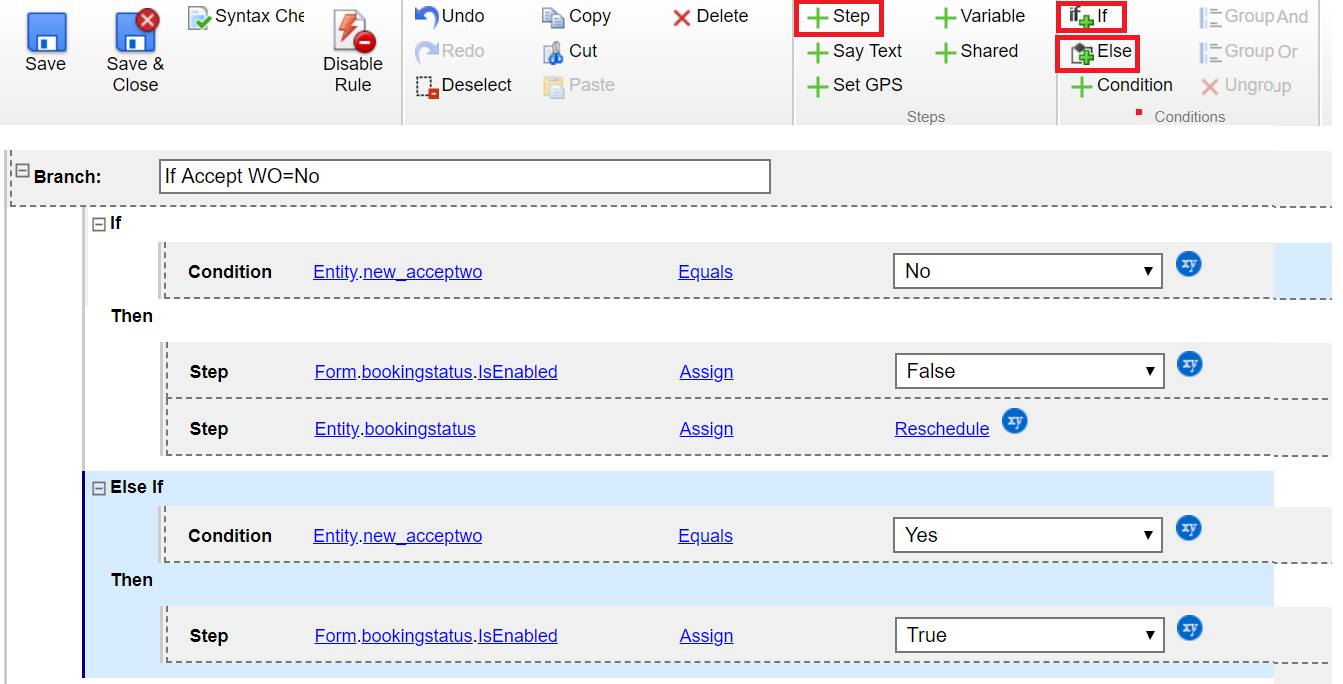
While still on the form, click the ‘On-Changed’ button on the ribbon. Click the ‘if’ button on the ribbon, next to condition, select ‘entity’, then select the newly created field: new_acceptwo, click on ‘contains data’ to change it to ‘equals’, then select ‘No’. Now click on ‘+Step’ on the ribbon. Click on ‘Pick Value’ and select form, click ‘Pick Value’ again and select ‘booking status, click ‘Pick Value’ again and select ‘IsEnabled’, leave ‘Assign’ and select the dropdown to ‘False’.
This logic ensures that when the field is set to no, the technician will not be able to change the value in the booking status field. Now let’s add the logic where the booking status is changed to ‘Reschedule’.
Click ‘+Step’ again and select: Entity – Booking Status – Assign – Reschedule. We also need to enter the logic if the Accept WO field is set to ‘yes’: Click the +Else button, for the condition select Entity – new_acceptwo – Equals – Yes. The step is: form – bookingstatus – IsEnabled – Assign – True. Click save and close. Back on the form click ‘On Load’ and add the same logic here. Don’t forget to publish your changes in Woodford!

Workflow Configuration
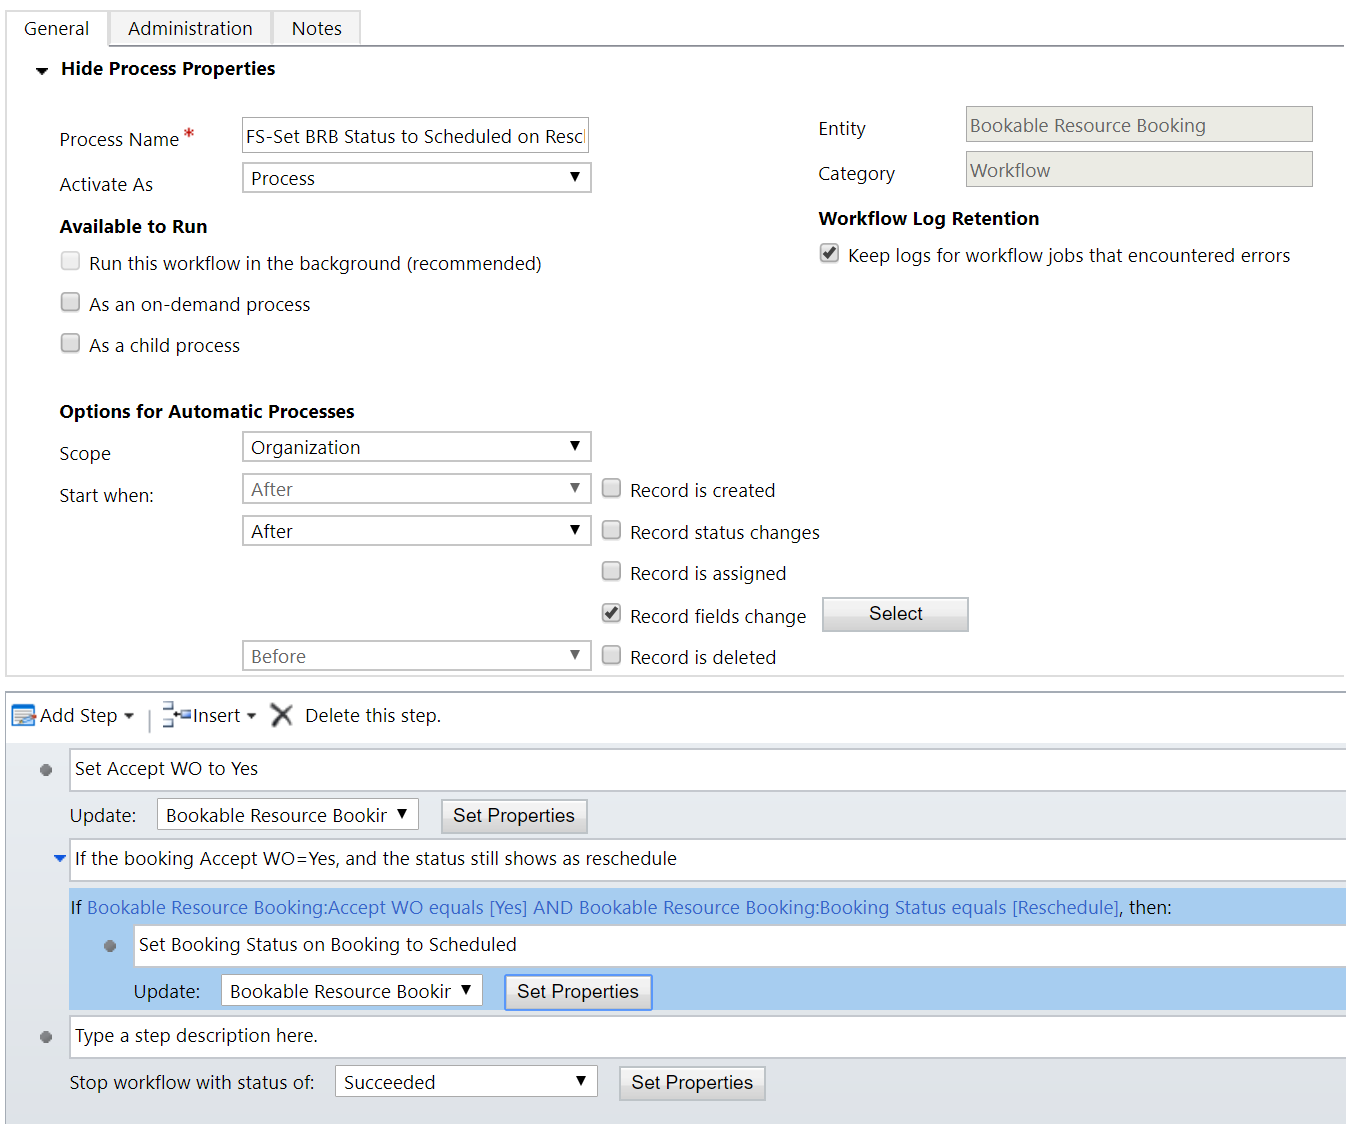
Create a new real time workflow that runs on the bookable resource booking entity and starts after a record field change: the name of the field is resource. (when the work order gets assigned to a different resource).
The first step is to set the ‘Accept WO’ field back to ‘yes’, then we want to check if we need to reset the booking status field:
– Click ‘Add Step’, select ‘Update Record’
– Click ‘Set Properties’ – Bookable Resource Booking – Set the ‘Accept WO’ field to ‘Yes’
– Click ‘Add Step’ select ‘Check Condition’, click ‘Set Properties’.
– Select ‘Bookable Resource Booking’ – Accept WO – Equals – Yes on the next row, select Bookable Resource Booking – Booking Status – Equals – Reschedule
– Select the line below and click ‘Add Step’ – ‘Update Record’, select Bookable Resource Booking’ as the record to update, then click ‘Set Properties’. Set the Booking Status field to ‘Scheduled’.
– Activate the work flow. Below is a screenshot of what the workflow should look like.

Now you’re ready to test your configurations! Assign a work order to yourself on the schedule board, open the booking on the Field Service mobile device and set the ‘Accept WO’ field to ‘No’. Synch back your changes, at which point you should see the status of the booking change to ‘Reschedule’ in the color you selected. Drag the booking to another resource, you should see that the color of the booking changes back to blue (status – scheduled).
I hope you enjoyed this post! Be sure to check in again next week for another article!
This article was originally published on https://d365goddess.com/dynamics-365-field-service-rejecting-a-booking/

 RSMUS.com