The mail merge feature in Microsoft Dynamics CRM 2013 allows users to automatically add the names, addresses, and other information from records stored in Dynamics CRM directly into letter or envelope templates for mass mailings. A common issue with Mail Merges executed from Dynamics CRM 2013, however, pertains to date fields. Any date field included in the merge will automatically export in the “MM/DD/YYYY HH:MM AM/PM” format, despite the field being configured to display “Date Only” in Dynamics CRM.
While technically accurate, this default format is not typically the desired outcome for the letter.

Within Dynamics CRM there are merge codes that can be used to format the exported data while executing a mail merge. Changes to the merge codes must be made in the mail merge template, then re-loaded into CRM.
- In Dynamics CRM 2013, navigate to the mail merge templates by clicking the Templates tile under the Settings Nav Bar.

- Select the Mail Merge Templates option.
- Select the template to edit from the list by double clicking on the row.
- Select Edit Template in Word from the ribbon.
- Select Open from the security pop-up box.
- The template will open in Microsoft Word in Protected View. Click the Enable Editing button in the yellow ribbon at the top of the document.
- Open the Add-Ins tab in the ribbon, and click the CRM button.

- The Mail Merge Recipients window will open. Click OK.
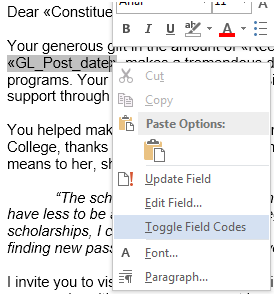
- You may now begin editing the document. Right-click on the date field that needs to be formatted, and select Toggle Field Codes from the drop-down list.

- The field will change from looking like «GL_Post_date» to {MERGEFIELD GL_Post_date}
- Edit the field so it looks like this: {MERGEFIELD GL_Post_date @ “MMMM D, YYYY”}
- Repeat Steps 9-11 as necessary to other date fields in the merge.
- Once all date fields have been modified, save the template. If a copy of the template already exists on your computer, consider naming the new copy the same name as the previous copy. The new copy will overwrite the existing copy, and eliminate any chances of redundancy or accidentally uploading the old copy.
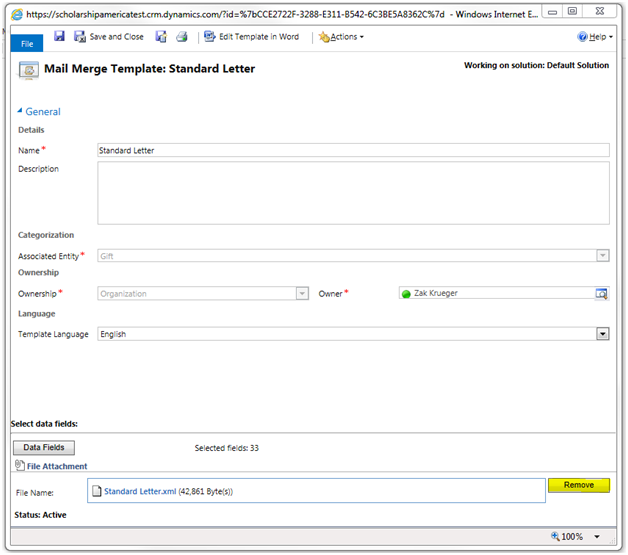
- In Dynamics CRM, the template window should still be open. Click the Remove button at the bottom of the window to remove the current file.

- Click the Browse button next to the now empty File Name field, then select the updated template file from your computer.
- Once the file has been selected, click Attach.
- Click Save and Close in the ribbon.
The date fields have now been configured to display date only in the merges.

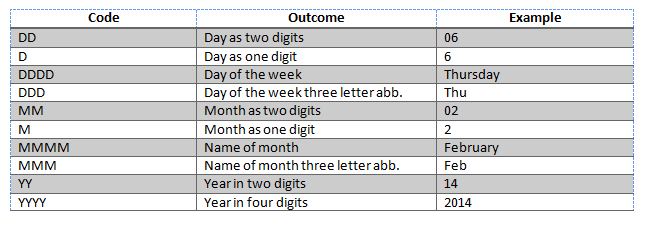
Other formatting options for the date, such as “MM/DD/YYYY” are also available:

The formatting codes may be inserted in the merge fields in almost any combination, but must be proceeded by “@” to be effective.
If you are looking for support for Microsoft Dynamics CRM, our professionals can help. We offer services from basic out of the box to complex architecture. Contact our professionals at crm@mcgladrey.com to learn more.
Read more articles on the new release of Microsoft Dynamics CRM 2013.
By: Lindsay Kurt – Minnesota Microsoft Dynamics CRM partner

 RSMUS.com


