There’s no need to struggle with processing customer refunds anymore. Microsoft Dynamics GP includes a module called Refunds that is part of the Receivables Management module. Processing customer refunds in Dynamics GP can be relatively simple if everything is set up properly and you follow the correct procedures. Below are some reminders and things to consider when setting up and using the Refunds module.
- Make sure you have activated the Refunds module in the Registration window, otherwise you will not see the Refund related menu options in Sales. (Tools > Setup > System > Registration)
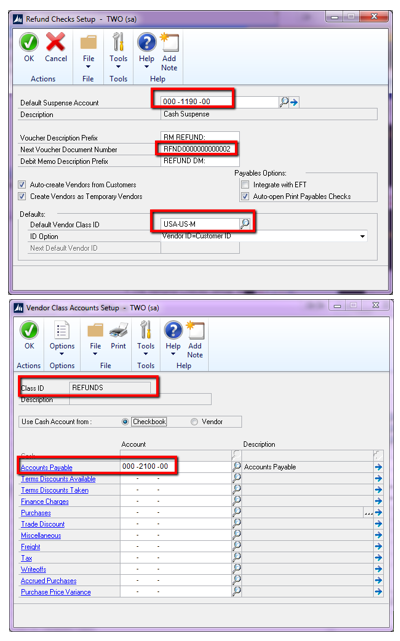
- Make sure you have completed ALL of the setup options in the Refund Setup window. (Tools > Setup > Sales > Refund). The Default Suspense Account, Next Voucher Document Number, and Default Vendor Class ID are actually required fields, and it will not allow you to save the window until these fields have been populated. Also, since the Default Vendor Class ID is a required field in this window, I recommend you set up a class just for REFUNDS and make sure the Class ID has the default Payables account assigned in the Vendor Class Accounts window.

- In the Refund Setup window, there is a Payables option to Integrate with EFT. Please note that if this option is marked and you attempt to process a refund check but the Customer/Vendor is NOT set up for EFT, the refund process will not complete and you will receive a message that there are no checks to print. So if you want to process a batch of refund checks, and the Customer/Vendor is not set up for EFT, then you will need to un-mark this setting. If the Customer/Vendor is set up for EFT, this same box will appear in the Create Refunds window and you can select it during the refund creation process.
- Make sure you have selected a default debit memo account in your posting setups so the system will populate the account for you when you attempt to process the refund. (Tools > Setup > Posting > Posting Accounts)
- Make sure the user processing refunds has the appropriate security permissions that include a minimum of the following:
- Refund Checks window
- Entering, posting, and applying receivables transactions.
- Creating Vendors
- Entering and posting payables transactions, Select Checks, Print Checks, and Post Checks.
- To avoid posting interruptions during the refund process, please consider the following:
- Make sure you have designated an Accounts Payable default account either in the Vendor Account Maintenance window for the Vendor OR in the Posting Accounts Setup window for the Purchasing Series.
- If your company uses Account Level Security, make sure the user is set up in the Organizational Structures window to allow access to the payables account.
- Make sure the fiscal period in which you’re posting the transactions to the Sales and Purchasing modules is open.
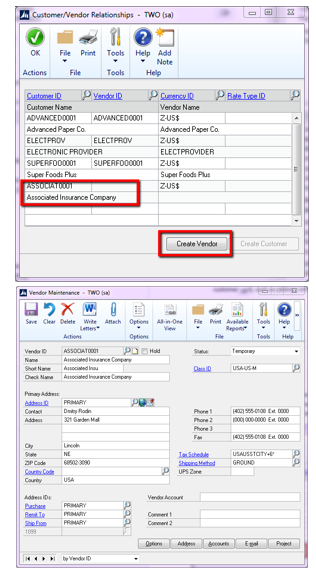
- There must be a Vendor record created for the Customer and a relationship between the two must be established. The simplest way to do this is to mark the option in the Refund Setup window to Auto-create Vendors from Customers. If you mark this option, information from the customer card, such as address information, will be entered automatically on the vendor card when you create it. You can create the Vendor by going to Cards > Sales > Customer/Vendor to open the Customer/Vendor Relationships window. Call up the Customer and click Create Vendor. It will open the Vendor Card and automatically populate all the fields for you.

- The Print Payables Checks window will open, where you can print checks for each vendor if the Auto-open Print Payables Checks option is marked in the Refund Checks Setup window.
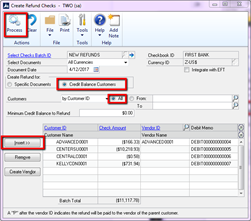
- In the Create Refunds Checks window, you can select to create a refund for specific documents for a specific customer, or you can select to review ALL Credit Balance Customers and the system will pull in any customers that currently have a credit balance. You may want to enter a Minimum Credit Balance to Refund so that you’re not creating refund checks for immaterial amounts. Leave the amount a zero to pull in ALL customers with credit balances regardless of the amount. Remember to click the INSERT button to pull the customers into the scrolling window. If you click the PROCESS button without inserting any records, the system will prompt you to transfer the balances and print posting journals, but then when it appears to have completed the process, the Print Checks window will open with an error stating there are No Checks to Print. This can be avoided by clicking the Insert button, which will bring up a list of customers that you can choose to modify the amounts or remove them from the list.

- Finally, it is important to understand the flow of the transactions and the posting accounts used in the process. Once you have selected the transactions you wish to refund and click the Process button in the Create Refund Checks window, a receivables debit memo document will be generated in Receivables Management for each customer you selected, and a payables miscellaneous charge document will be generated in Payables Management for each vendor. The posting flow includes a debit to the AR account and a credit to the Suspense account you designated in the Refunds Setup window. In payables, the Misc. Charge transaction that is created will debit the Suspense account and credit the AP account. Then the check that is processed will debit the AP account and credit Cash.
RSM offers access to Certified Microsoft Professionals, help desk and phone support, knowledge and experience with third-party products and dedicated account management. To learn more about who we are, go to http://rsmus.com/who-we-are.html or contact our professionals at erp@rsmus.com or by phone at 855.437.7202.
by Nancy Hogan for RSM

 RSMUS.com

