Workspaces are areas within Power BI where you can collaborate with colleagues and clients to create a collection of dashboards, reports, datasets, and paginated reports. There are two different types of workspaces within Power BI:
- New workspaces, and
- Classic workspaces
New, upgraded workspaces can coexist side by side with existing classic workspaces – however the new workspace will be the default workspace type. Users will still be allowed to use classic workspace if they need to.
In the following article we will discuss how Microsoft has redesigned some of the features in the new workspaces to better fit our needs, and how we can upgrade classic workspaces to new workspaces in Power BI.
To start off we first need to understand some of the differences between the new and classic workspaces:
- Creating a new workspace will not create Microsoft 365 groups like classic workspaces do. All the new workspace administration is in Power BI, and not in Office 365.
- For more flexible permissions management in new workspaces use more granular workspace roles. In the classic workspace you add only individuals to the members and admin lists.
- In the new workspace you can assign user groups to workspace roles. You can add multiple Active Directory security groups, distribution lists, or Microsoft 365 groups to these roles, for easier user management.
- Contact list: In new workspaces, users can specify who receives notifications about workspace activity.
- Only in new workspaces is it that users can create template apps – these are apps that you can distribute to customers outside your organization. These customers can then connect their own data with the template app provided to them.
- Share datasets: To share datasets outside a specific workspace – the user needs to save the report that contains the data set to one of the new workspaces, you can’t share datasets from classic workspaces.
- Apps and templates apps replace organizational content packs in new workspaces. Organizational content packs are being deprecated. Now is a good time to upgrade your content packs to apps, if you haven’t started yet.
As we discuss the differences between the two types of workspaces it is also important to consider how there are some features in the new workspace that work differently – and according to Microsoft these differences are intentional based on the feedback they have received from customers.
- Licensing enforcement: when users publish reports in new workspaces, they experience existing licensing rules. Users collaborating in new workspaces or sharing content to others in the Power BI service need a Power BI Pro or Premium Per User (PPU) license. Users without a Pro or PPU license see the error “Only users with Power BI Pro licenses can publish to this workspace.”
- ‘Members can reshare’ setting: The Contributor role in the new workspace replaces the ‘Members can reshare’ setting in the classic workspace.
- Read-only workspaces: The Viewer role in new workspaces replaces granting users read-only access to classic workspaces. The Viewer role allows similar read-only access to the content in the new workspaces.
- Users without a Pro or Premium Per User (PPU) licensecan access a new workspace if the workspace is in a Power BI Premium capacity, but only if they have the Viewer role.
- Allow users to export data: Even users with the Viewer role in the new workspaces can export data if they have ‘build’ permissions on the datasets in that workspace.
- There is no Leave workspace button in the new workspace.
Upgrade classic workspaces to the new workspace in Power BI
With all the differences in features mentioned above it only makes sense for users to upgrade their classic workspaces to the new workspaces in Power BI. If you are a workspace admin or a Power BI admin, you can upgrade any classic workspace. As mentioned above the new workspaces have more granular workspace roles so it allows users to better manage access to content. It will also allow you to have more flexibility in managing upgraded workspaces because they are more loosely connected to their original Microsoft 365 group.
There are certain things you need to plan for – for example:
- Review the access list and understand the permissions after upgrade.
- Review the contact list and make sure it’s set as you desire.
- If you’ve not already, learn about the new workspace experience.
The next step is to upgrade your classic workspace to a new workspace. Like we mentioned that any workspace admin can upgrade the workspace – to be a workspace owner, you much be an Owner of the underlying Microsoft 365 group. Here are the steps you can take as a workspace admin to upgrade a workspace.
- In the workspace content list, select Upgrade now in the banner. If you don’t see the banner, select More options (…) > Edit this workspace.

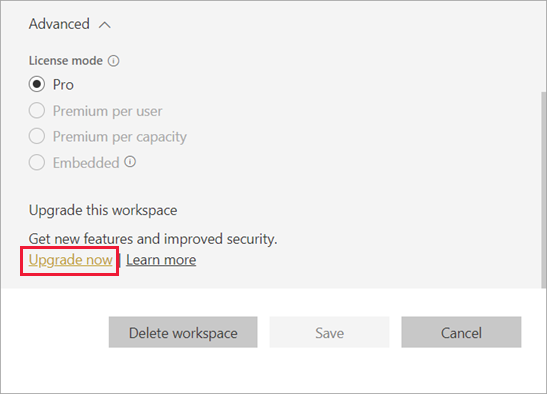
- Expand Advanced and select Upgrade now.

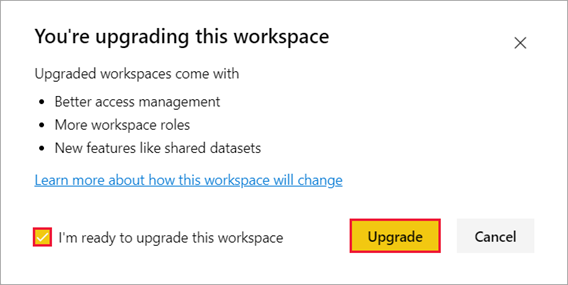
- Review the dialog box information. You see warnings if you’ve published or installed content packs in the workspace. When you’re ready, check I’m ready to upgrade this workspace, then select Upgrade.

- During upgrade, you see the Upgrading It usually takes less than a minute to upgrade your workspace.
After upgrade finishes, you see the Success dialog box. You see your new workspace experience, with the same name and contents. We recommend reading about the new workspaces in Power BI so you’re familiar with how new workspaces differ from classic workspaces
Conclusion:
In conclusion the new workspaces have more granular workspace roles so that users can better manager access to content. Users also have more flexibility in managing upgraded workspaces because they are more loosely connected to their original Microsoft 365 group.

 RSMUS.com
