Introduction to User Interface Design
Programming the user interface is a requirement of new development within Microsoft Dynamics 365 for Operations (MyDyn365). This article explores user interface elements that are used to view, interact, and review data. In this case, we try possibilities using a familiar tool, the Magic 8 Ball®. The Magic 8 Ball (made by Mattel) is a mysterious device that provides solutions to all of life’s questions with a simple shake of the ball. Beneath the murky blue netherworld, there are many more choices than expected. Our example builds upon previous articles were we covered database manipulation and X++ control statements. This expands upon those ideas and finishes them up with a user interface that not only operates the Magic 8 Ball; it also adds a new feature of saving the results.
Setup
For our process, we will need a table to store the results of our Magic 8 Ball iterations. This project will also have a new model dependency in order to incorporate the extension of the Fleet Management menu in the demonstration image.
Table Creation
- Open Visual Studio as an administrator and open the
- Right-click the project and select Add > New Item.
- Select Data Model > Table.
- Enter CrazyLuckyResults for the name and click Add.
- From the Application Explorer, under the Data Types node, expand Extended Data Types.
- Drag Name over to the CrazyLuckyResutls fields twice.
- Rename the first Name field Question and the second one Result.
- Save all and click Build.
- Ensure that there are no errors. If you have an error, resolve and rebuild.
Update Model Dependency
- Select the Dynamics 365
- Open Model Management > Update model parameters.
- Select CrazyLucky and click Next.
- Select FleetManagement.
- Click Next.
- Click Finish.
The Query
We will need to query the data from the results table. We can then use this query as a data source for our form.
Query Creation
- Right-click the project and select Add > New Item.
- Select Data Model > Query.
- Enter CrazyLuckyResults for the name and click Add.
- From the Solution Explorer, drag the CrazyLuckyResults table to the Data Sources area of the query.
- Select the CrazyLuckyResults data source and set the Dynamics Fields property to Yes.
- Save all and Build.
- Ensure that there are no errors. If you have an error, resolve and rebuild.
The User Interface Design
For our user interface, we will need to create a simple list page for the user interaction. In addition, it displays the results each time for review.
Create the Form and Apply a Pattern
- Right-click the project and select Add > New Item.
- Select User Interface > From.
- Enter CrazyLuckyResults for the name and click Add.
- From the Solution Explorer, drag the CrazyLuckyResults query to the Data Sources area of the form.
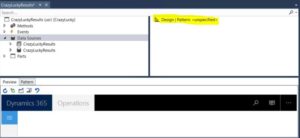
- Click Design in the right-hand frame of the Form

- Right-click and select Design > Apply pattern > Simple List. This will list the missing components needed for your form pattern below.

- Right-click and select Design > New > Action Pane.
- Right-click and select Design > New > Group.
- Right-click and select Design > New > Grid.
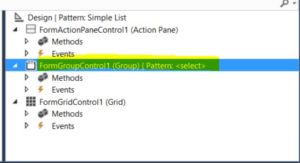
- Right-click FormGroupControl1 (Group) | Pattern <select>.

- Select Apply pattern > Custom and Quick Filters.
- Right-click FormGroupControl1 (Group) | Pattern: Custom and Quick Filters.
- Select New > QuickFilter.
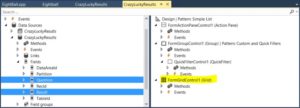
- Drag the Question and Result fields from the Crazy Lucky Results (left side) to the FormGridControl1(Grid) (right side), as shown below.

- Save all and click Build.
- Ensure that there are no errors. If you have an error, resolve and rebuild.
Create the Menu Items
- Right-click the project and select Add > New Item.
- Select User Interface > Display Menu Item.
- Enter CrazyLuckyResults for the name and click Add.
- Right-click the CrazyLuckyResults menu item and select properties.
- Select CrazyLuckyResults for Object.
- Scroll up for Label.
- Type Crazy Lucky Results Decision Maker in the Label
- Save all and click Build.
- Ensure that there are no errors. If you have an error, resolve and rebuild.
- Right click the project and select Add > New Item.
- Select User Interface > Action Menu Item.
- Enter Eightball for the name and click Add.
- Right-click the CrazyLuckyResults menu item and select properties.
- Select Class for Object Type.
- Select Eightball for Object.
- Scroll up for Label.
- Type Use the Magic 8 Ball in the Label
- Save all and click Build.
- Ensure that there are no errors. If you have an error, resolve and rebuild.
Extend the Menu
- In the Application Explorer, search for Fleet Management.
- Under Menus, right-click the Fleet Management
- Select Create Extension
Note: If this is not available, see instructions for Update Fleet Management model dependency above.
Adding the Menu Items
- Right-click Extension and click Open.
- Expand the Rentals
- Drag the CrazyLuckyResults Display menu item to the Rentals
- Right-click the CrazyLuckyResults form and click Open if it is not already open.
- Right-click FormActionPaneControl1 (ActionPane) and click New > Button Group.
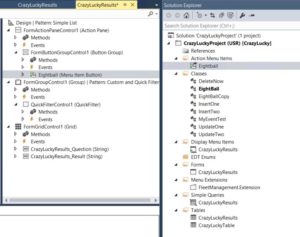
- Drag the Eightball Action menu item to the FormActionPaneControl1 (ActionPane) as shown below.

- Save all and click Build.
- Ensure that there are no errors. If you have an error, resolve and rebuild.
The Code
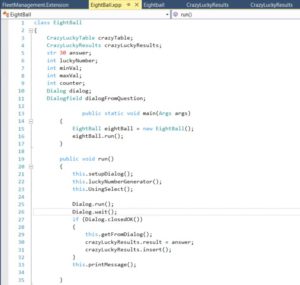
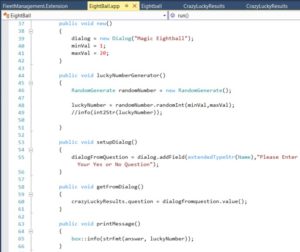
The code is the part that creates the dialog box for our use. To ensure that all of the code from previous articles is cohesive, I have included the entire class in the screen shots below.
Changing the Code
- Open the Eightball
- Ensure that it matches the following example.


- Save all and click Build.
- Ensure that there are no errors. If you have an error, resolve and rebuild.
Review the Results
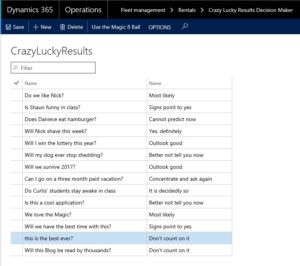
Now the fun begins. You can now interact with your Magic 8 Ball in the User Interface. If you are unfamiliar with the process, here is a quick process sheet.
Browsing the Form
- Open Dynamics 365 for Operations.
- Click Show navigation pane.
- Open the Fleet Management
- Click the Crazy Lucky Result Decision Maker menu item under Rentals.
- Click Use the Magic 8 Ball.

- Enter your question and click OK.
- Review the results.
- Refresh the form for previous results.
Conclusion
This article explored the key aspects of the user interface design MsDyn365 for the Magic 8 Ball. First, we set up the operation we created a table for our list page so that we could have the results set saved each time. Next, we created a query to retrieve the information from our table. Finally, we designed the user interface interaction so that there were forms and buttons to navigate. In addition, there was the Eightball class that we had created in earlier articles, only this time we added a dialog box for a popup experience from the Use the Magic Eightball button pointed to our class. All along this allowed us to view, interact, and review the data after a business operation was completed. Enjoy the Magic 8 Ball. Notice: This not recommended for production or for those 100+ years and older, at least according to Mattel’s packaging.
For more information I would recommend that you attend our Dynamics AX or Dynamics 365 training in person or on-demand online to learn more.
Plus keep an eye out for more articles that dive in to the technical aspects of using X++ code. Visit academy.rsmus.com for more information and training materials that will cover this and hundreds of other topics for AX2012 and MsDyn365.
by Shaun McMikle for RSM

 RSMUS.com